Help removing ST1300 throttle bodies

dduelin

Tune my heart to sing Thy grace
Site Supporter
Joined
Feb 11, 2006
Messages
9,685
Location
Jacksonville
Bike
GL1800 R1200RT NC700
2024 Miles
008131
STOC #
6651
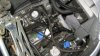
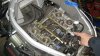
With an apparent alternator failure I am at the point of removing the throttle bodies. I haven't done this before and am following the Service Manual procedure and came to the computer after completing access to them but not removed them yet.

Are there any shortcuts here like not having to completely remove them to access the alternator? Maybe lift them free of the intake rubbers and rotate 90 degrees to vertical with either the throttle cables or fuel hoses still attached at one end or the other? I am not wanting to compromise the procedure but I know sometimes there are practical methods that work that are not in the manual. (like accessing the thermostat by removing the radiator when the Service Manual says to access the T-stat by removing the throttle bodies)

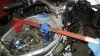
I am at an impasse trying to remove the fuel return hose from the pressure regulator at 5-66 in the manual. I can compress the clamp but can't at the same time push the hose off the coupling. Frustrating.
 

Fortunet 1

Fortunet1
Joined
May 7, 2010
Messages
801
Location
Gilroy, Ca.
Bike
06 ST 1300
I am totally intrigued by what you are doing !! Can you post some photos of where you are in this dilemma ? And some followup photos ?

Also what year of 1300 and what caused the alternator failure, symptoms and diagnosis ? Please and Thank You.
 

Igofar

Site Supporter
Joined
Jan 8, 2011
Messages
7,121
Location
Arizona
Bike
2023 Honda CT125A
You don't have to remove the TB to remove the alternator, you can go in through the front, behind the radiator. Its a little tricky but can be done. You'll have to pull the radiator, the thermostat cross brace, the thermostat housing, the left and right water hoses. You can then lift the fuel tank, air box assembly, base and snorkels, and then peel back the front of the rubber matt. This should allow you a clean shot at the EOP switch and the 3 bolts that hold the unit in place. once loosened, you can wiggle it forward and out the front. It sounds like alot of work, but it may be easier than removing the TB's and then having to deal with the proper spacing on the rubber boots and grommets.
As far as pushing the hose off. Try a couple drops of PB blaster or homemade penetrating oil (acetone/ATF) and let it sit for a couple minutes, the hose can then be gently twisted and will slip off without alot of effort.
Hope this helps.
 
OP
OP
dduelin

dduelin

Tune my heart to sing Thy grace
Site Supporter
Joined
Feb 11, 2006
Messages
9,685
Location
Jacksonville
Bike
GL1800 R1200RT NC700
2024 Miles
008131
STOC #
6651
I am totally intrigued by what you are doing !! Can you post some photos of where you are in this dilemma ? And some followup photos ?

Also what year of 1300 and what caused the alternator failure, symptoms and diagnosis ? Please and Thank You.
After typing the above I went back out in the garage with an open mind. I was able to compress the clamp and use a piece of wood split off a paint stir stick to push the hose off just like that.

Last Saturday I was out for a putt with some friends. We rode about 220 miles to lunch. Wahorn was in our lunch club. After lunch I split off and headed home alone as I did not want to ride until dark. I was cutting through the Okefenokee Swamp on GA 94 out of Fargo, GA headed to Moniac, FL. It is very desolate through there but was a good route for me to get home in a more or less a straight line. About 10 miles out of Fargo I noticed the GPS was switching on and off like a crazy monkey. Not really off/on but a black screen then a map view very quickly back and forth. I assumed the power cable had somehow worked loose in the back of the Garmin. While I was fiddling with the cable I noticed the tach was sitting on zero then the fuel gauge started blinking low fuel when it had half a tank. The engine was running smoothly but there was a ghost in the machine somewhere. I figured my electrical ground problem had reappeared with a vengence but a month earlier I had ridden about 70 miles home with no dash and no headlights so as long as the engine ran I would keep going. Middle of the swamp I had not much choice anyway. It did not run long. In a mile or so the dash went blank and the engine started to misfire. Within a mile it quit completely and I coasted to a stop. I had about 2 hours of daylight. I was able to raise 1/2 bar on my Verizon phone and called BMWMOA roadside assistance and got a incident report started and they began trying to find someone who would come 50-75 miles out to get me. I also called a friend with a trailer and he agreed to come if MOA came up a dry hole but MOA called and said someone would be onsite in 60-90 minutes. I then turned to what was wrong. It was apparent the battery was dead. I had dim lights and the fuel pump would spin up but only clicking from the solenoid when I tried to crank the engine. In two hours the bike was snugly tied down on a shiny flatbed truck and I was headed home.

At the house 72 miles later the battery had recovered enough to start the bike and it was showing only 10.5 volts at the battery when running and revving the motor to a test rpm of 5,000 showed no increase in system voltage measured at the battery. For some reason the alternator was off-line. Fuses where good and what wiring I could see was normal and not melted due to dead short. I charged the battery all night to 13.00 volts, checked headlights for one minute to load the battery then cranked it over. It started and warmed to three bars fine but the voltage was steadily dropping from 12.25 volts the whole time due to no charging system and the load of running the bike and lights. In about 10 minutes the voltage was down to 10.5 volts and the GPS started that crazy monkey thing. I shut it down and resigned myself to probably having to remove the alternator for repair or replacement. Yesterday I took the battery out and had it checked out OK. The service manual has a short charge system troubleshooting flow chart and it indicated the alternator had to be accessed to check it and the regulator/rectifier for the reason it was off-line. I started last night and this is where I am now. I am pointing to the fuel pressure regulator. The hose is disconnected from the underside of it:
 

Attachments

OP
OP
dduelin

dduelin

Tune my heart to sing Thy grace
Site Supporter
Joined
Feb 11, 2006
Messages
9,685
Location
Jacksonville
Bike
GL1800 R1200RT NC700
2024 Miles
008131
STOC #
6651
You don't have to remove the TB to remove the alternator, you can go in through the front, behind the radiator. Its a little tricky but can be done. You'll have to pull the radiator, the thermostat cross brace, the thermostat housing, the left and right water hoses. You can then lift the fuel tank, air box assembly, base and snorkels, and then peel back the front of the rubber matt. This should allow you a clean shot at the EOP switch and the 3 bolts that hold the unit in place. once loosened, you can wiggle it forward and out the front. It sounds like alot of work, but it may be easier than removing the TB's and then having to deal with the proper spacing on the rubber boots and grommets.
As far as pushing the hose off. Try a couple drops of PB blaster or homemade penetrating oil (acetone/ATF) and let it sit for a couple minutes, the hose can then be gently twisted and will slip off without alot of effort.
Hope this helps.
I removed the radiator and all that jazz first and judged there was no way the alternator would clear the intake boots plus all the small coolant hoses to the TB and the oil cooler are seeming in the way. Have you actually done this job through the front?

Since I thought I had to take the TB off I was going to take the opportunity to replace all the hoses under the TB - coolant and vacuum both due to high mileage so I will probably just do it. I have managed to get the fuel return hose and the hose that brings gas to the injectors off so the only thing left to do is lift the TB off the boots - tomorrow night.
 

Igofar

Site Supporter
Joined
Jan 8, 2011
Messages
7,121
Location
Arizona
Bike
2023 Honda CT125A
Yes, but if your going to remove and replace all the hoses, and you've gotten that far, it will be easier for you to do it your way.
While your in there, you may want to unscrew the mystery plug and place a little honda bond on it too.
One thing to watch out for when replacing the TB's is if you put anything on the boots to help them slip on easier, they will also fight you and keep popping back off.
And read the service manual as far as the DISTANCE between the flats of the clamps, they don't just get tightened down.
Looks like your doing a really good job. Hope you get the bike back up and running soon.
Igofar
 

Fortunet 1

Fortunet1
Joined
May 7, 2010
Messages
801
Location
Gilroy, Ca.
Bike
06 ST 1300
Thanks Dave for the long version of what happened and you working on the situation. I'll keep watching for your updates and photos.
 
Joined
Aug 6, 2007
Messages
4,216
Age
49
Location
Grant, MN (aka Stillwater)
Bike
ST1100 & ST1300
STOC #
6145
I shot you a PM back. There are a few things to consider and a couple other tasks that you may want to do while in there like replace the Funnel Base Screws with ones that have an allen head and extending the vac lines to the 5 way T. That last one does a couple things, replaces the lines with new ones that are free of gunk, makes them longer so TB Sync jobs are easier (that is why you want to label which cylinder they go to). Use a pipe cleaner on the 5 way T to make sure it is cleaned out. Be sure to document the connectors to the MAP sensor and Throttle Position sensor. They are the same connector but different colors. The wires are the same length so you can't use that as a guide to determine which goes where. If you are not sure which sensors I am talking about, no worries. They are the only two sensors on the TB so that makes it easy. Also if you completely remove the TB you will have to disconnect the fuel line at the banjo nut. There are crush washers that should be replaced here. Oh and a big one that I forgot about in the PM. Some people have looked at the butterflys on the TB and noticed the dark material on them. DO NOT BUST OUT THE CARB CLEANER AND REMOVE THIS MATERIAL It isn't a carbon deposit that needs to be cleaned. Rather it is a lube kind of like a wax that is there to keep the butterflys from sticking in the throttle bodies. It is a lube and needs to be there. There have been some people that have done this. I don't know that it caused an issue for sure but it likely would at some point down the road. It should be there so just leave it.

Other things... When was the last time a valve check was done. The only way to swap shims on the right side is when you can get down in the valley as the cam chain tensioner is down there from what I have read. I will find out soon as I just bought a Hot Cams shim kit the other day to do my right bank. I have a few that are in need of adjustment and I am close to you in mileage.

That is about all I can think of for tips other than what I mentioned in the PM. BKRA13 would be a good source of info as I mentioned on the Alternator part as he did one not long ago. Here are some links

Alternator died

Installation Issue

Let me know if you need anymore help and I will see what I can do to assist.
 
Joined
Aug 6, 2007
Messages
4,216
Age
49
Location
Grant, MN (aka Stillwater)
Bike
ST1100 & ST1300
STOC #
6145
I just looked at the pic you posted above. It looks like you have the fuel line off already. The Throttle Position Sensor is the blue connector on the back left part of the TB. The MAP Sensor is the Grey wire between the fuel rails. Since you already have a pic that will help with the documentation of which wire goes where. As I mentioned you can mix them up and the bike will run but you will be flashing your FI light with a fault code which will point to a faulty MAP sensor. Don't ask how I know but I might not be the only person to mess this up. That is if I ever mixed them up ;)
 
OP
OP
dduelin

dduelin

Tune my heart to sing Thy grace
Site Supporter
Joined
Feb 11, 2006
Messages
9,685
Location
Jacksonville
Bike
GL1800 R1200RT NC700
2024 Miles
008131
STOC #
6651
I shot you a PM back. There are a few things to consider and a couple other tasks that you may want to do while in there like replace the Funnel Base Screws with ones that have an allen head and extending the vac lines to the 5 way T. That last one does a couple things, replaces the lines with new ones that are free of gunk, makes them longer so TB Sync jobs are easier (that is why you want to label which cylinder they go to). Use a pipe cleaner on the 5 way T to make sure it is cleaned out. Be sure to document the connectors to the MAP sensor and Throttle Position sensor. They are the same connector but different colors. The wires are the same length so you can't use that as a guide to determine which goes where. If you are not sure which sensors I am talking about, no worries. They are the only two sensors on the TB so that makes it easy. Also if you completely remove the TB you will have to disconnect the fuel line at the banjo nut. There are crush washers that should be replaced here. Oh and a big one that I forgot about in the PM. Some people have looked at the butterflys on the TB and noticed the dark material on them. DO NOT BUST OUT THE CARB CLEANER AND REMOVE THIS MATERIAL It isn't a carbon deposit that needs to be cleaned. Rather it is a lube kind of like a wax that is there to keep the butterflys from sticking in the throttle bodies. It is a lube and needs to be there. There have been some people that have done this. I don't know that it caused an issue for sure but it likely would at some point down the road. It should be there so just leave it.

Other things... When was the last time a valve check was done. The only way to swap shims on the right side is when you can get down in the valley as the cam chain tensioner is down there from what I have read. I will find out soon as I just bought a Hot Cams shim kit the other day to do my right bank. I have a few that are in need of adjustment and I am close to you in mileage.

That is about all I can think of for tips other than what I mentioned in the PM. BKRA13 would be a good source of info as I mentioned on the Alternator part as he did one not long ago. Here are some links

Alternator died

Installation Issue

Let me know if you need anymore help and I will see what I can do to assist.
Thanks Dave. I got the PM and feel more confident about the TB and alternator removal. I did a valve adjustment at 86,000 miles with 3 of 4 cams out and the last check at 106,000 miles was all in spec. I am not worried about them although since everything is out in the open I might do another check and reset the valve check clock to the current 117,000 miles.
 
Joined
Aug 6, 2007
Messages
4,216
Age
49
Location
Grant, MN (aka Stillwater)
Bike
ST1100 & ST1300
STOC #
6145
Thanks Dave. I got the PM and feel more confident about the TB and alternator removal. I did a valve adjustment at 86,000 miles with 3 of 4 cams out and the last check at 106,000 miles was all in spec. I am not worried about them although since everything is out in the open I might do another check and reset the valve check clock to the current 117,000 miles.
Yeah, if you have any close on the right side I would consider doing them now. From what I have read that is the side that is a PITA to do changes on. Last time I checked I had a couple close. They are getting changed in a few weeks. I am also going to swap the idle adjustment cable. Mine is stuck. Another thing to consider while you are in there. Maybe see if you can shoot some lube down it? I haven't looked at it much to see how it works. The part is only $15 or so last I looked so I am just replacing mine. If you do any shim changes be sure to do the TB sync as things can be off.

I am not trying to add more work for you but as long as you are in there, might as well tick off a couple more things rather than have to go back later.
 
OP
OP
dduelin

dduelin

Tune my heart to sing Thy grace
Site Supporter
Joined
Feb 11, 2006
Messages
9,685
Location
Jacksonville
Bike
GL1800 R1200RT NC700
2024 Miles
008131
STOC #
6651
Tonight was productive - I got everything cleared down to the alternator. I used the handle from a pipe bender as a lever to pull off the throttle bodies. No kidding they resist being removed! After removing the thermostat housing and some coolant hoses I was able to check the wiring to the alternator in case the charging system failure lay in the wiring. There are only two troubleshooting checks: 1.) check the battery voltage at the B terminal and it checked OK with no voltage drop. 2.) check the voltage at the other terminal. The service manual says this should also be battery voltage with the key ON but this check revealed a .8 voltage drop from the battery.

I don't know what this means except there is some resistance in the Black/White wire. Diagram shows this wire runs through the Engine Stop switch and ignition switch. I have to consult those that know more than I if this is part of the problem that failed the alternator.
 

Attachments

Igofar

Site Supporter
Joined
Jan 8, 2011
Messages
7,121
Location
Arizona
Bike
2023 Honda CT125A
...There is no mechanical feat so difficult that it cannot be solved by brute strenght and.....oh never mind.
Can't say I've every seen anyone Pry on a fragile assembly like that before :eek:4:
Looks like your making progress.
 
OP
OP
dduelin

dduelin

Tune my heart to sing Thy grace
Site Supporter
Joined
Feb 11, 2006
Messages
9,685
Location
Jacksonville
Bike
GL1800 R1200RT NC700
2024 Miles
008131
STOC #
6651
...There is no mechanical feat so difficult that it cannot be solved by brute strenght and.....oh never mind.
Can't say I've every seen anyone Pry on a fragile assembly like that before :eek:4:
Looks like your making progress.
Use of the lever created a vertical pull on the assembly several times what I could do without mechanical advantage and it took every bit I had. (I am apparently not as big as you. All that exercise jumping to conclusions buffed you Larry!) The bike was lifting off the right foot of the centerstand and resisting so I had to place a knee against the tipover bar on that side. The lever bore against the frame padded by a piece of silicone rubber. The soft nylon loop spread the load as softly as possible. In previous threads on TB removal some one broke off a corner of the casting by prying directly against it so I lifted instead of pried.
 

BakerBoy

It's all small stuff.
Joined
Jan 31, 2008
Messages
5,446
Location
Golden, Colorado
STOC #
1408
Dave, somewhere on this forum I've seen a picture of nearly the same method you used (but with a 2x4)... as I recall it took a lot of force.
 
OP
OP
dduelin

dduelin

Tune my heart to sing Thy grace
Site Supporter
Joined
Feb 11, 2006
Messages
9,685
Location
Jacksonville
Bike
GL1800 R1200RT NC700
2024 Miles
008131
STOC #
6651
Dave, somewhere on this forum I've seen a picture of nearly the same method you used (but with a 2x4)... as I recall it took a lot of force.
Sennister told me he used a 2 x 4 and a 10" C clamp to lift the TB off. I had a 6" C clamp and the jaw would not open wide enough to gain purchase so I improvised.
 
Joined
Aug 6, 2007
Messages
4,216
Age
49
Location
Grant, MN (aka Stillwater)
Bike
ST1100 & ST1300
STOC #
6145
Sennister told me he used a 2 x 4 and a 10" C clamp to lift the TB off. I had a 6" C clamp and the jaw would not open wide enough to gain purchase so I improvised.
Yeah, that was the only way I could get it out. As mentioned you have to be careful as you can break something in the process but sometimes they are stuck on there so hard that this is going to be the only option.

I will have to look at the SM on the process of testing the alternator. I don't know off the top of my head how much resistance is a sign that it is bad. The SM may not even say. Like I mentioned, I haven't had an alternator failure in either ST (knock on wood) so I haven't had to test it.
 
Top Bottom