GoldWing Adjustable Levers...

Jefro

I ride to Sturgis
Joined
Sep 8, 2005
Messages
291
Location
Kalifornia
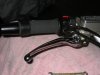
I bought the CBR1000 adjustable clutch lever, but it was 1/2 inch shorter and seemed to make the pull harder. So I went looking for an alternative.

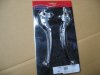
My local dealer had a set of Kuryakyn #7436 Chrome Adjustable Levers for the GL1800 Wing. I took my digital calipers to them and they looked to be a perfect match in almost every way. Plus they were 8 inches instead of the 7.5 inches of the stock levers, and they were extra wide like my Harley levers for more comfort.

I highly recommend these, but you must make a few minor mods first.

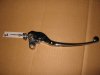
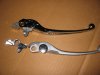
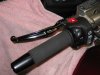
The following 7 photos show the small tab that must be hacksawed off the clutch lever. And the adjustable cup assembly from the stock brake lever must be installed on the new chrome lever.

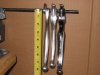
These first 4 pics show the pieces of the levers.
Jefro.
 

Attachments

OP
OP
Jefro

Jefro

I ride to Sturgis
Joined
Sep 8, 2005
Messages
291
Location
Kalifornia
The Kury set of levers cost me $36 at my local Dealer.

The CBR1000 lever is 7 inches from the center of the pivot hole to the end of the lever ball.
My stock 05 clutch lever is 7.5 inches from the center of the pivot hole to the end of the lever ball.
And the GL1800 lever is 8 inches from the center of the pivot hole to the end of the lever ball.

I find that the farther my fingers are from the pivot point, the easier it feels to pull in the clutch. It's just a bit more leverage.
But the big difference for me is the width of the Kury levers. Much more comfortable in heavy stop and go traffic.

I'll see if I can take a pic of the levers together.
Jefro.
 
OP
OP
Jefro

Jefro

I ride to Sturgis
Joined
Sep 8, 2005
Messages
291
Location
Kalifornia
Here is a pic with all three levers hanging from a steel rod thru the pivot points.

I'm betting that someone could adapt very easily the stock black Goldwing levers if he wanted the blacked-out look instead of the chrome.
 

Attachments

e4gulf

I just got the same levers and I'm wondering how you remove the adjustable cup assembly from the stock brake lever?
 

Byron

Moderator
Joined
Mar 3, 2006
Messages
2,311
Location
KY
STOC #
6091
You drive out the bushing in the center of the pivot. Easier on the parts if you have access to any sort of press. I actually used a small bench top drill press to push out the bushing. It doesn't have to be pushed all the way out, just far enough to allow the part to come free.

Do the same on the other part and swap and press the bushing back in.
 

e4gulf

Thanks. Now I just need to find some kind of press. BTW, I already did the clutch side and all I can say is it's awesome. The clutch pull is light and easy. Thanks for this post.
 
Last edited by a moderator:

wjbertrand

Ventura Highway
Joined
Feb 8, 2005
Messages
4,420
Location
Ventura, CA
There are two varieties of these levers. The ones on ebay above are non-adjustable. If you're gonna do this you might as well get the adjustable ones. From nopork.com, I think the price for the adjustables was close to what they want on ebay for the non adjustable ones.
 

smcrae

Stace McRae
Joined
Oct 8, 2007
Messages
12
Location
DFW, TX
I recently added these to my ST - very happy with them. I used a table top drill press to help change the bushing. Thanks to all for the recommendation. The wider lever makes the clutch a bit easier for me.

Stace
 

e4gulf

I just completed this installation and it went like clockwork thanks to the pics and instructions I found here and on our ST forum.

I had to buy a small hand press to get the brass ring out but, that was an added bonus. I need excuses to buy new tools. ;-)

So far, I really like the feell of them. I probably need to play around with the adjustment and go for rides till I get them dialed in. It's been snowing here so, the ride might have to wait a while. :-(

Thanks for the info,
Could you post a picture of the press and whatever else you used? I still don't have my brake side done yet due to lack of tools. Thanks!
 

wjbertrand

Ventura Highway
Joined
Feb 8, 2005
Messages
4,420
Location
Ventura, CA
I didn't have a press but it was easy enough to tap the bushing out with a properly sized socket, drill bit or other rod material. Make sure that the little cup part you need to transfer to the new lever is well protected.
 

Byron

Moderator
Joined
Mar 3, 2006
Messages
2,311
Location
KY
STOC #
6091
e4gulf,

I don't have pictures but this is the idea and should get you by.

When you go to press or tap out the bushing the lever needs to be supported yet allow for the bushing to protrude out the bottom side. You can do it over a set of padded vise jaws or simply drill a large enough hole in a scrap piece of lumber.

If you don't have a punch that is the right size go through your 1/4" sockets and find one that will drive the bushing but not hit the lever.

As for the press, my small benchtop drill press has an adjustable table. You simply move it up close to the chuck allowing for all the necessary pieces to be stacked under it. Using the handle lower the chuck and apply steady even pressure until the bushing in about 2/3's out and you should be good.

If you need to tap it out just lightly tap on the punch or socket to drive the bushing out far enough.

Swap the parts and then reverse the process driving the bushing in flush with the edges of the lever.

It literally takes longer to explain than it will take you to do it once you have the tools lined up.
 
Joined
Apr 22, 2007
Messages
242
Age
79
Location
Bradenton, FL
Bike
'06 ST1300
STOC #
6854
The ones I got from Ebay were adjustable. They are on my bike now. I used a socket, a tad smaller than the bushing, as a drift and tapped the bushing down. I then use the same socket in my vise to push the assembly back together.
 

e4gulf

I finally got my brake lever on. I used a 1/4" socket bit to punch out the bearing. Note: I had to punch the bearing out from the bottom side of the lever. It would/will not go out from the top side down. From there I just transferred the guts from the old lever to the new one, including the adjusting knob. I learned the hard way that the new knob doesn't work with the old parts.
 
Last edited by a moderator:
Top Bottom