I would like disassemble the lock in the ST1300 pannier so that the key can be removed without having to lock the pannier first. On my previous bike a dealer did this for me. Does anyone know how I can disassemble the lock barrel to get to the inside of the lock?

You are using an out of date browser. It may not display this or other websites correctly.
You should upgrade or use an alternative browser.
You should upgrade or use an alternative browser.
Disassemble St1300 pannier lock
- Thread starter KiwiIM
- Start date
OP
OP
Thanks for the offer but practice is no good if I don't know where to start.
- Joined
- Oct 26, 2020
- Messages
- 2,027
- Location
- Makefield Highlands PA
- Bike
- 2016 ST1300P
- 2025 Miles
- 000545
Spent some time in auto locks many years ago. Your going to want to familiarize yourself with disassembly, Youtube. IIRC the polished bezel has to be removed in order for you to access the wafers (pins, tumblers, whatever you need to call them). One of them is sitting in a position when the key is inserted to stop the key from being removed. It may not be part of the security feature, it is just to stop the key from leaving. You would remove it by pushing it through one side or the other of the cylinder. Again, familiarize yourself with the procedure of disassembly by watching videos. Don't file or grind anything unless you are sure! Honda probably would not have manufactured different cylinder bodies or cases, they would have just added a wafer. I know this is not the exact answer to help you, it will put you down the path to see if you would rather take it to the local locksmith or not.
I don't know if this thread will help or not?
 www.st-owners.com
Josh
ST1300 saddlebag lock repair | Luggage / Fairings
Yesterday I had to fuss with closing / locking my left bag and removing the key. Finally found that the little leaf spring, which is depressed when lowering the inner handle, allows the pivoting lock blade to slide into the recess of said handle, has somehow twisted 90 degrees. This prevents the...
Josh
You don’t need to take anything apart to deactivate the lock PD models do it all the time.
Look down on the tab area and you will see a small brass looking strip,
Simply push that down and turn the lock over it instead of under it and your done.
Look down on the tab area and you will see a small brass looking strip,
Simply push that down and turn the lock over it instead of under it and your done.
CYYJ
Michael
As usual, Larry is spot-on with his advice.You don’t need to take anything apart to deactivate the lock PD models do it all the time.
Look down on the tab area and you will see a small brass looking strip,
Simply push that down and turn the lock over it instead of under it and your done.
See the two pictures at this post: lock spring. You just take the cover off the whole locking assembly (simple, no risk there), then put the key in the lock and turn it back and forth to understand how the spring retains the key (prevents the key from turning when the latch is open). Then you bend the spring as Larry stated, and your problem is solved.
While you are in there, you can put a little bit of lubricant on the moving parts. The whole assembly will then operate much smoother after you put the cover back on.
Michael
- Joined
- Oct 26, 2020
- Messages
- 2,027
- Location
- Makefield Highlands PA
- Bike
- 2016 ST1300P
- 2025 Miles
- 000545
That is so much easier!You don’t need to take anything apart to deactivate the lock PD models do it all the time.
Look down on the tab area and you will see a small brass looking strip,
Simply push that down and turn the lock over it instead of under it and your done.
OP
OP
Hi All,
As I have seen with other threads, I don't want to deactivate the locks, I want to remove the key when they are unlocked but still be able to lock them. And the answer is fairly simple.
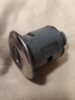
First you need to understand how the key does it's work. There is an outside casing which has two cut-outs on opposite sides on the inside of the casing. There is also a hollow tube, with wafers which can move up or down. The key is inserted into the tube and the wafers move up or down, utilising the empty area of the cut-outs. If you where to use the wrong key, the wafers would not all move into line with the outside of the inner tube, thereby sticking out into the hollow area and preventing you turning the key to unlock the pannier. When you turn the key a quarter turn, the pannier is unlocked. However, because there are no cut-outs at this position on the inside of the casing, the wafers cannot move up or down and therefore the key cannot be removed from the lock. This only happens at the neutral position, which also engages the lock.
Solution: create extra cut-outs on the inside of the casing at the 90 degree positions so that the wafers can move up or down when the key has been turned 90 degrees to unlock the panniers. You will then have a total of four cut-outs (in the form of a cross). To do this you need to remove the the lock from the case. This has been described in other threads. Thereafter remove the silver cover on the top of the lock. I used a small screwdriver and made turning movements to push the inside rim upwards. Ensure that the rim lies on a bit of rag etc so that it doesn't get scratched. There is a small raised level at the back next to the rim which you can use as leverage for the screwdriver. Do this for maximal half of the rim. This allows you to slightly raise the rim and slide it off the rest of the lock, leaving an untouched portion of the rim holding full strength for when you replace it. After this, insert the key in the lock and pull out the inside tube, being careful to keep the wafers in place. Take the outer casing and you will see the two cut-outs on the inside. The next step you can do yourself or have someone do for you. Two additional cut-outs need to be made (drilled) at 90 degree position from the original ones, being careful to leave the back end of the casing whole (about 1 millimetre at the end). Hereafter push the inside tube (and key) back in the casing. Turn it 90 degrees to confirm that you can remove the key (hold the end so that the tube stays in the casing). Take the key out and replace the silver cover. Use a small hammer to flatten the inside rim back to the original position. You can also purchase a replacement silver cover, if needed. Assemble the lock in the pannier again. Now you have a pannier which you can lock or leave unlocked.
Note: The conversations which suggest that you only need to remove the spring from the locking mechanism should be ignored as this prevents you locking the panniers.
Unfortunately I don't have any photo's of what I did, but hopefully the above is sufficiently explained.
Regards, Rene
As I have seen with other threads, I don't want to deactivate the locks, I want to remove the key when they are unlocked but still be able to lock them. And the answer is fairly simple.
First you need to understand how the key does it's work. There is an outside casing which has two cut-outs on opposite sides on the inside of the casing. There is also a hollow tube, with wafers which can move up or down. The key is inserted into the tube and the wafers move up or down, utilising the empty area of the cut-outs. If you where to use the wrong key, the wafers would not all move into line with the outside of the inner tube, thereby sticking out into the hollow area and preventing you turning the key to unlock the pannier. When you turn the key a quarter turn, the pannier is unlocked. However, because there are no cut-outs at this position on the inside of the casing, the wafers cannot move up or down and therefore the key cannot be removed from the lock. This only happens at the neutral position, which also engages the lock.
Solution: create extra cut-outs on the inside of the casing at the 90 degree positions so that the wafers can move up or down when the key has been turned 90 degrees to unlock the panniers. You will then have a total of four cut-outs (in the form of a cross). To do this you need to remove the the lock from the case. This has been described in other threads. Thereafter remove the silver cover on the top of the lock. I used a small screwdriver and made turning movements to push the inside rim upwards. Ensure that the rim lies on a bit of rag etc so that it doesn't get scratched. There is a small raised level at the back next to the rim which you can use as leverage for the screwdriver. Do this for maximal half of the rim. This allows you to slightly raise the rim and slide it off the rest of the lock, leaving an untouched portion of the rim holding full strength for when you replace it. After this, insert the key in the lock and pull out the inside tube, being careful to keep the wafers in place. Take the outer casing and you will see the two cut-outs on the inside. The next step you can do yourself or have someone do for you. Two additional cut-outs need to be made (drilled) at 90 degree position from the original ones, being careful to leave the back end of the casing whole (about 1 millimetre at the end). Hereafter push the inside tube (and key) back in the casing. Turn it 90 degrees to confirm that you can remove the key (hold the end so that the tube stays in the casing). Take the key out and replace the silver cover. Use a small hammer to flatten the inside rim back to the original position. You can also purchase a replacement silver cover, if needed. Assemble the lock in the pannier again. Now you have a pannier which you can lock or leave unlocked.
Note: The conversations which suggest that you only need to remove the spring from the locking mechanism should be ignored as this prevents you locking the panniers.
Unfortunately I don't have any photo's of what I did, but hopefully the above is sufficiently explained.
Regards, Rene
OP
OP
Hi,Spent some time in auto locks many years ago. Your going to want to familiarize yourself with disassembly, Youtube. IIRC the polished bezel has to be removed in order for you to access the wafers (pins, tumblers, whatever you need to call them). One of them is sitting in a position when the key is inserted to stop the key from being removed. It may not be part of the security feature, it is just to stop the key from leaving. You would remove it by pushing it through one side or the other of the cylinder. Again, familiarize yourself with the procedure of disassembly by watching videos. Don't file or grind anything unless you are sure! Honda probably would not have manufactured different cylinder bodies or cases, they would have just added a wafer. I know this is not the exact answer to help you, it will put you down the path to see if you would rather take it to the local locksmith or not.
The tip about removing the polished bezel is what I needed. The solution is to leave the wafers alone and to drill additional cut-outs on the inside of the outer casing, at the 90 degree positions. Hereby the wafers can move up and down when the key is removed at the unlock position. The ST1300 locks probably work differently than what you are used to.
Regards, Rene
Sadlsor
Site Supporter
Another alternative is to buy spare keys (or have copies made), and then buy those little round caps that fit on the top of the keys.
Makes it look like a knob on the bags, and they stay there all the time, unless you want to remove them.
So it's just keeping a key in the lock, requiring only a twist before you pull up the handle to get in the saddlebags.
Makes it look like a knob on the bags, and they stay there all the time, unless you want to remove them.
So it's just keeping a key in the lock, requiring only a twist before you pull up the handle to get in the saddlebags.
Share: