Request Photo Of ST1100 Left Camshaft

John OoSTerhuis

Life Is Good!
Joined
May 10, 2005
Messages
4,827
Location
Bettendorf, Iowa
Bike
1991 SSMST1100
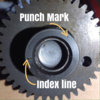
Would someone please post an image of the end of an ST1100 left side (#2&#4 cylinder) camshaft that shows the index line mark and punch mark used in timing belt, valve shim R&R, and camshaft install procedures.

Anyone have a good picture, or have a left cam on the bench or valve cover currently off? Many thanks in advance!

I’d like to confirm the existence of the punch marks mentioned in the Honda Service Manual (p.8-13) and discussed in these threads:

Regards, John
 
Last edited:
Can't get you a picture John, but from what I remember from last year, all info and diagrams in the service manual were accurate.
 
Would someone please post an image of the end of an ST1100 left side (#2&#4 cylinder) camshaft that shows the index line mark and punch mark used in timing belt, valve shim R&R, and camshaft install procedures.

Anyone have a good picture, or have a left cam on the bench or valve cover currently off? Many thanks in advance!

I’d like to confirm the existence of the punch marks mentioned in the Honda Service Manual (p.8-13) and discussed in these threads:

Regards, John
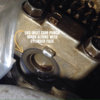
Hi John cam setup photos attached, kind regards Dave savingPNG.jpgsavingPNG.jpgsavingPNG.jpgsavingPNG.jpgsavingPNG.jpgsavingPNG.jpgsavingPNG.jpg
 
Many thanks, Dave! If I use one of your images in the future I’ll be sure to give attribution. What’s your STOC number?

Dang, now I have to make a few annotations in my Service Manual, AND edit a few posts of mine... :doh1: :rolleyes:

Regards, John
 
Last edited:
Thanks for this pictures! I have a thread regarding strange arrangements for my LH camshaft which, in the end, I decided (with Michaels not inconsiderable input) to leave the way it was.

This winter I’ll be tearing the bike down to do a number of things and will be revisiting this issue.

These pictures and the thread discussing cam timing will be invaluable.

Thanks to all for sharing their knowledge so freely!
 
Many thanks, Dave! If I use one of your images in the future I’ll be sure to give attribution. What’s your STOC number?

Dang, now I have to make a few annotations in my Service Manual, AND edit a few posts of mine... :doh1: :rolleyes:

Regards, John
Hi, John , sorry I've given you some extra work...( lol )...please feel free to use any of the photos if they can be of help to anyone ....don't have a STOC number as yet , but will look into getting one, hopefully my ST will be up and running soon, still got what seems like a massive list of things to do , but am slowly working my way through them, kind regards Dave
 
And I had to write the date down on my previously empty "times John O was mistaken" post-it note. :biggrin:

I don’t know John outside of his contributions to this forum but I’d rank his not knowing something about these bikes to pigs flying: possible I suppose, but not likely...
 
GGely said:
pigs flying
Thread Hijack Alert Every time I here the expression '...when pigs fly' I think of this scene from Northern Exposure. No flying cow just a piano but what a great scene. NE may be an acquired taste.


I tangentially relate it to motorcycle riding:

It's not the thing you fling, it's the fling itself.
 
Thanks for the kind words, but there are folks far more knowledgeable than me, I’m just the resident “spring butt” with time on the forums and on his hands. :oops:

As to the camshaft Punch Marks, their only use during a left-side camshafts reinstall is as final reference check after you’re all done, having carefully followed the manual. At that point, with all the cams reinstalled, when you return the #1 cylinder to TDC, crank at T1, the left-side camshafts’ Punch Marks should align with the top of the cylinder head and face OUT. That’s it, the only time...
Hi John, fitted my left hand cams at T1 ( crank static ) with the punch marks facing out....turned the crank over a few times during valve clearance procedure with no problems, cam index lines and punch marks are all lining up where they should during measuring clearances (used the worksheet ;-) Just need to find out why the Honda valve shims seem to have two different part numbers for the same shim ? ( ending in 000 or 003 ) does anyone know ?
 
need to find out why the Honda valve shims seem to have two different part numbers for the same shim ? ( ending in 000 or 003 ) does anyone know ?
Hmmm... they all end in 013. I know I’ve previously posted the Honda ST1100/1300 shim part numbers list but can’t find the list of my attachments with the new software. Here’s a link with the part numbers inserted. HTH

Note: forget about measuring clearances metric. Use inches, you can’t get closer than increments of .001” anyway.

John
 
Here’s another link. No need to do any math. Just measure the clearance in thousandths of an inch, read the marking on the current shim, and select the replacement (one shim size per desired .001” of change) from the list.

Selecting Valve shims
 
Last edited:
Hmmm... they all end in 013. I know I’ve previously posted the Honda ST1100/1300 shim part numbers list but can’t find the list of my attachments with the new software. Here’s a link with the part numbers inserted. HTH

Note: forget about measuring clearances metric. Use inches, you can’t get closer than increments of .001” anyway.

John
Hi, John, I found your list of available shims and part numbers indeed as you say ending in 013, have already noted the shim sizes fitted when decoking the heads and lapping the valves, did all my measurements in mm on Saturday morning, (we went metric in the 70's...lol ) and have arrived at the stage of having to get 10 new shims to bring the clearances into spec....as many were just too tight ( due to the lapping process no doubt ) . Some Honda dealers over this side of the pond do a "trade in " deal on old shims but prices vary from dealer to dealer. Will have to wait till Monday. Thanks for the shim list info, kind regards Dave .......hope this posts ok as I lost connection for a minute and the page layout looks different !
Hmmm... they all end in 013. I know I’ve previously posted the Honda ST1100/1300 shim part numbers list but can’t find the list of my attachments with the new software. Here’s a link with the part numbers inserted. HTH

Note: forget about measuring clearances metric. Use inches, you can’t get closer than increments of .001” anyway.

John
 
Some Honda dealers over this side of the pond do a "trade in " deal on old shims but prices vary from dealer to dealer. Will have to wait till Monday.
those same shims were used on other brands of bikes as well, so don't restrict your search to Honda dealers only. Where in Scotland do you live, I was just over there in July, if you were done with the job a little earlier I'd have brought a dozen or so with me for you to pick through.
 
those same shims were used on other brands of bikes as well, so don't restrict your search to Honda dealers only. Where in Scotland do you live, I was just over there in July, if you were done with the job a little earlier I'd have brought a dozen or so with me for you to pick through.
Am in between Edinburgh and Glasgow (sunny Cumbernauld :) ) , would have been great, will maybe go ahead and order them online as I have lots more to do while waiting on delivery. Currently upgrading all the old crumbling/split original Honda cooling hoses for custom built reinforced multi layer silicone ones ( in white ? ) which are amazingly cheap but excellent quality......just have to source some stainless worm drive clips now........the project continues.......kind regards Dave
 
Back
Top Bottom