Is there much to this job? Hard to see under all the armor. Seems the top bulb is out. Any ideas? Al Melkert dutton ont.

Speedometer bulb replacement on a 2002 1100
- Thread starter Al Melkert
- Start date
CYYJ
Michael
Hello Al:
It's not a difficult job, but it does require a bit of disassembly to get at the back of the instrument cluster.
First, you need to remove the remove the windshield. It is held in place by five fasteners. Be careful to not lose the little black plastic washers directly under the 5 screws, they are very important and I don't think they are still available from Honda.
Next, remove the shiny black plastic part directly above the headlight - the part that has 'HONDA' written on it. To do that, pry out the little "button" at the bottom middle, directly above the headlight (it is a friction-fit part with a little barb on the end of it), then remove the two screws on either side of the part up at the top (these screws will be visible once you remove the windshield). Slide it up about 1/4 inch (it has two hooks that retain it on either side, you have to disengage these), then lift it off. Don't try to force it off without sliding it upwards to release these two little hooks. The hooks break easily, so be gentle when you push it up.
Lastly, remove the light grey colour plastic part that fits directly above the shiny black plastic part. The fasteners for it will be obvious once you have the windshield and shiny black plastic part off.
Now you have access to the back of the instrument cluster, where you can then replace the instrument cluster bulbs. The bulbs are all in a row at the top of the instrument cluster. If I recall correctly, you give the bulb holder a 90 degree twist and it comes out. If you are not sure which bulb is which, take the bulb out and shine a flashlight through the hole - you will then see the illumination if you look at the annunciator light panel above the speedo & tach. Or just turn the ignition on and see what lights up and what doesn't light up.
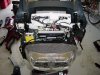
The pictures below are not very good (they are 20 years old), but they are all I have. The motorcycle in the pictures has been dis-assembled far more than what is necessary to replace an instrument cluster bulb.
Michael
Front of Instrument Cluster (the bright white part)

It's not a difficult job, but it does require a bit of disassembly to get at the back of the instrument cluster.
First, you need to remove the remove the windshield. It is held in place by five fasteners. Be careful to not lose the little black plastic washers directly under the 5 screws, they are very important and I don't think they are still available from Honda.
Next, remove the shiny black plastic part directly above the headlight - the part that has 'HONDA' written on it. To do that, pry out the little "button" at the bottom middle, directly above the headlight (it is a friction-fit part with a little barb on the end of it), then remove the two screws on either side of the part up at the top (these screws will be visible once you remove the windshield). Slide it up about 1/4 inch (it has two hooks that retain it on either side, you have to disengage these), then lift it off. Don't try to force it off without sliding it upwards to release these two little hooks. The hooks break easily, so be gentle when you push it up.
Lastly, remove the light grey colour plastic part that fits directly above the shiny black plastic part. The fasteners for it will be obvious once you have the windshield and shiny black plastic part off.
Now you have access to the back of the instrument cluster, where you can then replace the instrument cluster bulbs. The bulbs are all in a row at the top of the instrument cluster. If I recall correctly, you give the bulb holder a 90 degree twist and it comes out. If you are not sure which bulb is which, take the bulb out and shine a flashlight through the hole - you will then see the illumination if you look at the annunciator light panel above the speedo & tach. Or just turn the ignition on and see what lights up and what doesn't light up.
The pictures below are not very good (they are 20 years old), but they are all I have. The motorcycle in the pictures has been dis-assembled far more than what is necessary to replace an instrument cluster bulb.
Michael
Front of Instrument Cluster (the bright white part)
Last edited:
Pull the windshield, 'garnish' and 'screen' above the instrument panel. This will get you to the back of the instruments.
Easy to do, but be careful not to break the little tabs on the plastics, which is also easy to do.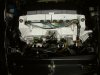
Easy to do, but be careful not to break the little tabs on the plastics, which is also easy to do.
Last edited:
Hello Al:
It's not a difficult job, but it does require a bit of disassembly to get at the back of the instrument cluster.
First, you need to remove the remove the windshield. It is held in place by five fasteners. Be careful to not lose the little black plastic washers directly under the 5 screws, they are very important and I don't think they are still available from Honda.
Next, remove the shiny black plastic part directly above the headlight - the part that has 'HONDA' written on it. To do that, pry out the little "button" at the bottom middle, directly above the headlight (it is a friction-fit part with a little barb on the end of it), then remove the two screws on either side of the part up at the top (these screws will be visible once you remove the windshield). Slide it up about 1/4 inch (it has two hooks that retain it on either side, you have to disengage these), then lift it off. Don't try to force it off without sliding it upwards to release these two little hooks. The hooks break easily, so be gentle when you push it up.
Lastly, remove the light grey colour plastic part that fits directly above the shiny black plastic part. The fasteners for it will be obvious once you have the windshield and shiny black plastic part off.
Now you have access to the back of the instrument cluster, where you can then replace the instrument cluster bulbs. The bulbs are all in a row at the top of the instrument cluster. If I recall correctly, you give the bulb holder a 90 degree twist and it comes out. If you are not sure which bulb is which, take the bulb out and shine a flashlight through the hole - you will then see the illumination if you look at the annunciator light panel above the speedo & tach. Or just turn the ignition on and see what lights up and what doesn't light up.
The pictures below are not very good (they are 20 years old), but they are all I have. The motorcycle in the pictures has been dis-assembled far more than what is necessary to replace an instrument cluster bulb.
Michael
Front of Instrument Cluster (the bright white part)
Many thanks Michael for your reply and help. Just nice to know what to expect before tearing things apart. I couldnt find any info for this job. You just made it a piece of cake. Thanks again. Al Melkert.
CYYJ
Michael
Hi Al:
No problem, that's what we're all here for.
Just three cautions, which I have learned from the school of hard knocks:
1) Don't lose the little plastic washers that fit between the windshield and the screws that retain the windshield.
2) Be really gentle when you are removing that shiny black plastic piece - after taking the fasteners out, press it upwards gently to disengage the tangs on the sides.
3) Don't overtorque the windshield fasteners when you put them back on. "Snug" is OK, "Cranked down real tight" is not OK. The windshield fasteners fit into expanding rubber plugs, all you need to do is ensure that the plug on the other side is expanded a bit. Chances are that because the plug is very old, it has retained its expanded shape, hence the warning about not over-tightening.
FYI, all the screws on the bike that you think are Phillips head are actually JIS (Japanese Industrial Specification) screws. Although you can use a Phillips screwdriver on them if you are in a pinch and have to do urgent work immediately, it's far better to get a JIS screwdriver. Using a Phillips screwdriver on JIS screws will chew up the heads of the screws because it can't grip the screw securely. See the latter half of this post for more information about JIS Screwdrivers: click here.
Michael
Erdoc48
Site Supporter
- Joined
- Jan 25, 2009
- Messages
- 1,444
- Age
- 59
- Location
- Myrtle Beach, SC/ Sometimes Colorado
- Bike
- 94/00/04 STs, FSC600
I consider myself a bit of a spazz when it comes to doing work like this, but I was able to change out my bulb on the 94 and it wasn’t all that bad, so if I can do it...
Hi,
Just revising this thread, and I know I saw it elsewhere, but can't find it again on Search.
What LEDs replace the Stanley 12V 1.7W dash bulbs? Most of the LEDs I see are 5W, which I guess would still be okay since they shouldn't get hot.
Just revising this thread, and I know I saw it elsewhere, but can't find it again on Search.
What LEDs replace the Stanley 12V 1.7W dash bulbs? Most of the LEDs I see are 5W, which I guess would still be okay since they shouldn't get hot.
")