ST-1100 Body Panels

Joined
Apr 20, 2025
Messages
5
Age
23
Location
Louisville, KY
Bike
ST-1100
Hello, me again :)

I know I can find replacement body panels through places like E-Bay, but I was wondering if anyone knew the exact names of certain parts I'm looking for. A lot of the body is in fine condition, but there are some parts of the body which are heavily damaged cosmetically, and some seem to be missing entirely.

I'm wondering if you guys know what these parts would be called so I know what to buy. Also, somewhat related, but wondering if there are any alternate seats I can buy? The seat is in fine condition, but I was just curious about some more comfortable ones.

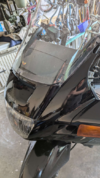
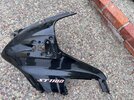
Image 1: The whole front middle piece above the headlight which holds the windshield is broken. We used zipties to hold it into place because the actual method of connection is broken.

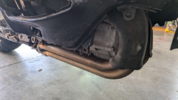
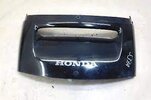
Image 2: The empty sockets hanging loose tells me something was here that is now missing. Any idea what this was? Was it one big piece? Its the same on the opposite side.

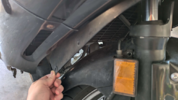
Image 3: May be related to the part missing from image 2. Screws arent able to hold this piece in place.
 

Attachments

  • image_2025-04-22_190219297.png
    image_2025-04-22_190219297.png
    991.2 KB · Views: 35
  • image_2025-04-22_190333828.png
    image_2025-04-22_190333828.png
    734.9 KB · Views: 34
  • image_2025-04-22_190344261.png
    image_2025-04-22_190344261.png
    641 KB · Views: 34
Under the windsheild you are missing at least 3 "well nuts" IF the fairing is still all there that would be all you need to hold the shield. The rubber well nuts fit inside the fairing and then you put a 5mm screw in there to tighten it.
To cover the Exhaust you need a Belly pan and a bunch of Screws to hold them in place, they are still available and you will probably want the real oem ones. the Belly pan fits in behind the piece you are holding and you will need a plastic lock insert.
CLIP, SPLASH SHIELD Plastic lock insert.
90657-SB0-003
NUT, COWL SETTING (5MM) Well nuts
90111-KW3-003
SCREW, PAN (6X14) To hold the belly pan
90113-MM5-000
 
Last edited:
If pic 1 is about the zip ties through the windshield - there are rubber grommets that snap fit in the bodywork and a 5 mm panhead screw (with certain washers) secure the windshield to the boddork -
17 - 90111-KW3-003 - Grommet
18 - 90504-964-000 - Thrust Washer
09 - 90651-MT3-000 - Clip
16 - 90109-SB6-000 - Truss Screw 5mmX1mm

1745366414687.png

07- 64220-MT3-000ZB Left lower cowl
08- 64221-MT3-000ZB Right lower cowl
Bunch of fasteners

1745366788385.png
 
I like the Corbin seat for the ST1100. There are several seat options. Take your time finding one, if you get in a hurry they can be expensive and you want one that works for you.
 
the good news is I have a used belly pan available, the bad news is shipping these larger parts cross-country isn't cheap.

At least the belly pan can be disassembled into its 3 component pieces so it will fit into a long box, but it doesn't have to be very deep. But I'm finding that type of box is a bit difficult to locate, after a certain length they tend to get tall and wide as well.

PM me for details.
 
Under the windsheild you are missing at least 3 "well nuts" IF the fairing is still all there that would be all you need to hold the shield. The rubber well nuts fit inside the fairing and then you put a 5mm screw in there to tighten it.
To cover the Exhaust you need a Belly pan and a bunch of Screws to hold them in place, they are still available and you will probably want the real oem ones. the Belly pan fits in behind the piece you are holding and you will need a plastic lock insert.
CLIP, SPLASH SHIELD Plastic lock insert.
90657-SB0-003
NUT, COWL SETTING (5MM) Well nuts
90111-KW3-003
SCREW, PAN (6X14) To hold the belly pan
90113-MM5-000
The parts the windshield connects to are all snapped off, so the well nuts wont be able to hold onto anything. Any idea what those parts are called? They're to the left and right of the middle plastic part, and connect between the mirror plastics, if that makes sense.

Also I'll look into the belly pan, the screws, and the plastic lock insert, thanks!
 
The parts the windshield connects to are all snapped off, so the well nuts wont be able to hold onto anything. Any idea what those parts are called? They're to the left and right of the middle plastic part, and connect between the mirror plastics, if that makes sense.
I have the part that says "Honda" on the front, which contains the 3 lower well nuts for the windshield, so that might solve some of your problem. I'm not 100% sure, but I think the 2 mounting holes to attach that part are in the upper fairing, with clip nuts, so you'll have to see if those attachment points are OK. If they're just missing the clip nut part, I have a couple of those I could spare as well, but I'm getting low on them. If you're missing several of them I think you can probably buy a package of them online somewhere, they're 5mm x 0.8 threads.


And there's a plastic plug at the bottom of the piece I mentioned that fits into a hole below the Honda decal that holds the front part down, but I don't have that. You can probably improvise something for that fastener, its not threaded, its just an interference fit.

take the windshield completely off and take some pictures of what's underneath. Some of the fasteners in that area go into the upper fairing, some go into the grey cover for the instrument cluster, and I can't recall which ones go where. Its possible some tabs may have cracked off in a tip-over or crash, or it may be as simple as the clip nuts got lost and they used zip ties instead. I crashed mine several years ago, breaking the upper fairing and instrument cover, and none of those mounting points were damaged, so I'm crossing my fingers that yours might be OK too once you get in there and look.
 
Last edited:
Here are 2 pictures of the upper left cowl. This one is 100% intact as far as I know.
The center piece that goes on top of that is called a windshield Garnish. 3rd picture is the Garnish you can see the places where the windshield will attach.
Make SURE the garnish has all the tabs intact.
The Garnish seems to be still available look at #7
 

Attachments

  • Upper left cowl 1.jpg
    Upper left cowl 1.jpg
    262.7 KB · Views: 8
  • Upper left Cowl 2.jpg
    Upper left Cowl 2.jpg
    292.6 KB · Views: 8
  • Front Garnish.jpg
    Front Garnish.jpg
    5.3 KB · Views: 9
Last edited:
Back
Top Bottom