CYYJ
Michael
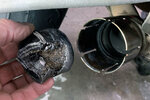
While servicing my ST this winter, I noticed that there was evidence of blow-by (leakage) where the two mufflers connect to the exhaust system. I took the mufflers off and had a look at the gaskets - they were in pretty rough shape, and both of the mufflers had quite a bit of gasket material melted onto the forward end of the muffler, where the muffler assembly slips into the exhaust system. I ordered two replacement gaskets (about $20 each).
Blow-By (leakage) at old gasket
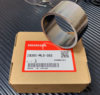
The gaskets arrived, and they are an interesting looking part. They are a 'greasy-feeling' part, but they are not coated with any lubricant. They consist of a fine wire mesh structure that is surrounded on all sides by some form of slippery metal or plastic coating - perhaps graphite. From the appearance of the seam on the new gaskets, it looks like they are manufactured as a flat strip, and then rolled into a donut-like shape.
New Gasket
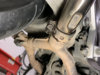
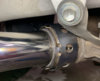
I removed the mufflers by loosening the two bolts on the clamp around each gasket. About a year ago, I found these bolts were very rusted and seized up - understandable, I guess, considering they are constantly exposed to road spray generated by the rear wheel. I managed to get the two bolts completely out of each clamp, and after cleaning the bolts, I coated them liberally with Honda anti-seize compound. After re-installing them, I thoroughly coated the exposed threads above the nuts with more anti-seize. One year later, it was very easy to remove the bolts from these clamps.
Muffler Clamps
Once I had the muffler and the clamp off, I was able to easily remove the remains of the old gasket by just sliding a slotted screwdriver into one of the slits in the side of the exhaust system. The old gasket deformed when I removed it, and the wire mesh internal structure was evident. Fascinating construction.
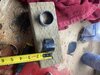
Old Gasket
As you can see from the photo above, there was very little of the old gasket stuck to the inside of the exhaust pipe. I was able to remove what little there was inside the exhaust pipe with some coarse sandpaper.
The muffler itself was another story. There was a great amount of the old gasket stuck to the outside of the forward end of the muffler, and it had fused with the muffler. It took a lot of work with a wire brush and sandpaper to clean the remains of the old gasket off the outside of the forward end of the muffler. My guess is that when the mufflers get removed for a rear tire or brake pad change, we rotate them to wiggle them out of the gasket (or just rotate them to get them out of the way, without removing them), and over time, this chews up the inside of the gasket. Honda actually recommends that the gaskets be changed every time the muffler is removed. I have never done this, and I don't know anyone who does. But, after about 55,000 miles and probably half-a-dozen muffler removals, the gaskets on my bike were in poor condition.
Gasket Residue on Mufflers
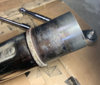
Where that residue came from
(inside of old gasket, before removal)

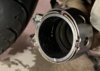
It was easy to install the new gasket. I had to pry the 'petals' of the exhaust pipe out about 1 mm each to make room for the new gasket to fit, but once I did that, it slid right in. It is not necessary to push the gasket all the way in to the fully-seated position, because when you re-install the exhaust pipe, the big ring on the forward end of the exhaust pipe (visible in the photo above) will ram the gasket home. The gasket is quite fragile, and I think if I had tried to push it in all the way with my fingers or a tool, I probably would have broken it.
New Gasket in Place
(not quite fully seated)
Ramming the new gasket in with the muffler
Honda recommends that the two bolts on the clamp be torqued to 22 N·m (16 ft-lbs). Because I re-lubricated the threads on the bolts with anti-seize, I was reluctant to tighten them to this torque - I assume the torque value given is for dry threads. I don't think it is necessary to tighten the clamps up any more than what is necessary to give the gaskets a "gentle squeeze", with emphasis on the word "gentle". The clamps are not holding anything in place - the mufflers are securely held in place by two bolts that attach to the frame, further aft on the muffler.
I kind of suspect that at some time in the past, someone had really reefed those two clamps tight, and by doing that, crushed the internal structure of the gasket. Once the thick mesh gasket has been crushed, it's not going to seal the junction at all, and there is no way to 'un-deform' it.
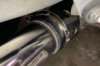
I didn't buy new muffler clamps, but if I ever have to do the job again, I think I will replace the two muffler clamps at the same time I replace the gaskets. Physically, my clamps were in pretty good condition - the rust on them was superficial and easily polished off - but they were less than perfectly circular, as you can see in the photos above and below. The clamps are fairly thick steel, and I think that new clamps would have done a better job of evenly compressing all the petals of the exhaust pipe around the new gasket.
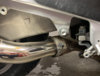
The photo below shows everything put back together again. It's possible that I didn't fully ram in the gasket, and that the little tang at the 3 o'clock position on the clamp is supposed to fit around the aft side of the metal ring on the forward end of the muffler. But, the two bolts that hold the muffler in place (much further aft along the muffler) lined up perfectly with the muffler in the position below, and I was reluctant to try to bang the gasket further into the exhaust pipe.
Michael
Job Done
Blow-By (leakage) at old gasket
The gaskets arrived, and they are an interesting looking part. They are a 'greasy-feeling' part, but they are not coated with any lubricant. They consist of a fine wire mesh structure that is surrounded on all sides by some form of slippery metal or plastic coating - perhaps graphite. From the appearance of the seam on the new gaskets, it looks like they are manufactured as a flat strip, and then rolled into a donut-like shape.
New Gasket
I removed the mufflers by loosening the two bolts on the clamp around each gasket. About a year ago, I found these bolts were very rusted and seized up - understandable, I guess, considering they are constantly exposed to road spray generated by the rear wheel. I managed to get the two bolts completely out of each clamp, and after cleaning the bolts, I coated them liberally with Honda anti-seize compound. After re-installing them, I thoroughly coated the exposed threads above the nuts with more anti-seize. One year later, it was very easy to remove the bolts from these clamps.
Muffler Clamps
Once I had the muffler and the clamp off, I was able to easily remove the remains of the old gasket by just sliding a slotted screwdriver into one of the slits in the side of the exhaust system. The old gasket deformed when I removed it, and the wire mesh internal structure was evident. Fascinating construction.
Old Gasket
As you can see from the photo above, there was very little of the old gasket stuck to the inside of the exhaust pipe. I was able to remove what little there was inside the exhaust pipe with some coarse sandpaper.
The muffler itself was another story. There was a great amount of the old gasket stuck to the outside of the forward end of the muffler, and it had fused with the muffler. It took a lot of work with a wire brush and sandpaper to clean the remains of the old gasket off the outside of the forward end of the muffler. My guess is that when the mufflers get removed for a rear tire or brake pad change, we rotate them to wiggle them out of the gasket (or just rotate them to get them out of the way, without removing them), and over time, this chews up the inside of the gasket. Honda actually recommends that the gaskets be changed every time the muffler is removed. I have never done this, and I don't know anyone who does. But, after about 55,000 miles and probably half-a-dozen muffler removals, the gaskets on my bike were in poor condition.
Gasket Residue on Mufflers
Where that residue came from
(inside of old gasket, before removal)
It was easy to install the new gasket. I had to pry the 'petals' of the exhaust pipe out about 1 mm each to make room for the new gasket to fit, but once I did that, it slid right in. It is not necessary to push the gasket all the way in to the fully-seated position, because when you re-install the exhaust pipe, the big ring on the forward end of the exhaust pipe (visible in the photo above) will ram the gasket home. The gasket is quite fragile, and I think if I had tried to push it in all the way with my fingers or a tool, I probably would have broken it.
New Gasket in Place
(not quite fully seated)
Ramming the new gasket in with the muffler
Honda recommends that the two bolts on the clamp be torqued to 22 N·m (16 ft-lbs). Because I re-lubricated the threads on the bolts with anti-seize, I was reluctant to tighten them to this torque - I assume the torque value given is for dry threads. I don't think it is necessary to tighten the clamps up any more than what is necessary to give the gaskets a "gentle squeeze", with emphasis on the word "gentle". The clamps are not holding anything in place - the mufflers are securely held in place by two bolts that attach to the frame, further aft on the muffler.
I kind of suspect that at some time in the past, someone had really reefed those two clamps tight, and by doing that, crushed the internal structure of the gasket. Once the thick mesh gasket has been crushed, it's not going to seal the junction at all, and there is no way to 'un-deform' it.
I didn't buy new muffler clamps, but if I ever have to do the job again, I think I will replace the two muffler clamps at the same time I replace the gaskets. Physically, my clamps were in pretty good condition - the rust on them was superficial and easily polished off - but they were less than perfectly circular, as you can see in the photos above and below. The clamps are fairly thick steel, and I think that new clamps would have done a better job of evenly compressing all the petals of the exhaust pipe around the new gasket.
The photo below shows everything put back together again. It's possible that I didn't fully ram in the gasket, and that the little tang at the 3 o'clock position on the clamp is supposed to fit around the aft side of the metal ring on the forward end of the muffler. But, the two bolts that hold the muffler in place (much further aft along the muffler) lined up perfectly with the muffler in the position below, and I was reluctant to try to bang the gasket further into the exhaust pipe.
Michael
Job Done
Last edited: