
I am just going to preface this by saying this was done on the cheap, an upholster quoted $520-$575 (300-330 Euro) to recover one seat and i have two that need completing and this was for just a basic recover without piping or panels. Yes you can buy pre-made covers for 90-120 euro but i am in New Zealand and things take 2-3 months to arrive or don't arrive at all (lost in post) and sometimes they just dont offer shipping to New Zealand, its just not as easy as you think. This is about having a bit of fun and potentially learning something new. All up cost was $18 (9 Euro) and i still have enough material to do a solo seat.
Quote from Local Upholster 450-500 plus GST (VAT) at 15% = (300-330 Euro)

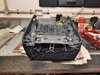
Cut out a pattern in card for top and sides
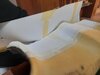
Templates for top and sides created
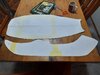
Traced the templates and added a margin for seam to sew and staple things together.
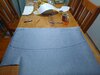
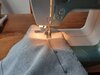
Cut out the panels and stitched one side on
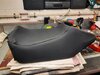
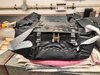
Loose fitting
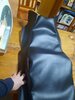
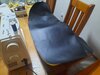
Bit of fitting using clips
Yeah a bit saggy in parts, but so am i, i can live with it knowing i did the work.
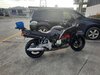
First ride to work of the new Season with new non faded and non ripped seat, still attaching side panels, left them off to get through inspection faster. Lunch box strapped to top box frame..
ST1100 Addendum Solo Seat Recovering
For the second seat the process was exactly the same with a couple of exceptions as follows. I used pins to hold the two halves together on the seam rather than judging by eye, i don't think this really added a lot of extra quality but its a very good idea and going to improve you chances of success. Remember sharp end of pin towards the foot of the sewing machine otherwise you might not be able to remove pin when it gets close to the foot.
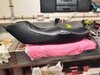
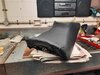
Overall its okay, there are a few crinkles and i am hoping some time in the sun and my ass sculpting it into the correct shape will improve it over time. Some spots from CRC that flew off the pneumatic staple gun which i will clean off later.
80% B+ But improving a little on the last one
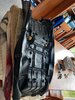
Yes i might have got a bit trigger happy...
Quote from Local Upholster 450-500 plus GST (VAT) at 15% = (300-330 Euro)
Cut out a pattern in card for top and sides
Templates for top and sides created
Traced the templates and added a margin for seam to sew and staple things together.
Cut out the panels and stitched one side on
Loose fitting
Bit of fitting using clips
Yeah a bit saggy in parts, but so am i, i can live with it knowing i did the work.
First ride to work of the new Season with new non faded and non ripped seat, still attaching side panels, left them off to get through inspection faster. Lunch box strapped to top box frame..
ST1100 Addendum Solo Seat Recovering
For the second seat the process was exactly the same with a couple of exceptions as follows. I used pins to hold the two halves together on the seam rather than judging by eye, i don't think this really added a lot of extra quality but its a very good idea and going to improve you chances of success. Remember sharp end of pin towards the foot of the sewing machine otherwise you might not be able to remove pin when it gets close to the foot.
Overall its okay, there are a few crinkles and i am hoping some time in the sun and my ass sculpting it into the correct shape will improve it over time. Some spots from CRC that flew off the pneumatic staple gun which i will clean off later.
80% B+ But improving a little on the last one
Yes i might have got a bit trigger happy...
Attachments
-
 133.3 KB Views: 3
Last edited: