Article [13] ST1300 - Clutch Slave Cylinder Replacement

Excellent thread and thank you for the contributors.

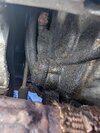
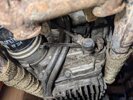
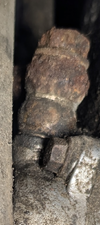
Got my first ST a few weeks ago and found this mess under when I took off the lower fairing to do an oil change a few days ago. Had ordered OEM CSC seals, spring and bonjo washers as preventive service as bike is at 54k miles. Reservoir is at minimum level and quite dirty inside.

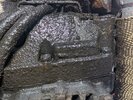
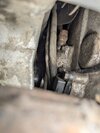
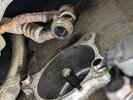
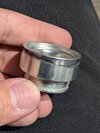
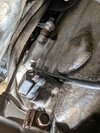
I've cleaned up a fair bit. I suspect one of the previous owners did the CSC rebuild but didn't use the right size washers - 3rd (top) washer missing too perhaps. Leak seems to be from the bottom half of the bonjos.

Before I tackle this job, do I need any additional parts? I'm not sure what damage caked brake fluid would have done to the bonjos and the bonjo bolt. Potential washers mating surfaces issue? What to look out for?

Thanks for your guidance.
 

Attachments

  • PXL_20260404_131814452.jpg
    PXL_20260404_131814452.jpg
    169.7 KB · Views: 20
  • PXL_20260404_131506550.jpg
    PXL_20260404_131506550.jpg
    263.3 KB · Views: 19
  • PXL_20260404_172240117.jpg
    PXL_20260404_172240117.jpg
    158.2 KB · Views: 19
  • PXL_20260404_172151498.jpg
    PXL_20260404_172151498.jpg
    102.2 KB · Views: 20
  • Screenshot_20260404-201618.png
    Screenshot_20260404-201618.png
    876.2 KB · Views: 23
Got the CSC off today. It had little bit of gunk on the inside bottom. Suspect the seals and gasket were replaced at some point as gasket condition was decent and intact upon removal. Outer leak was from the banjos. 2 washers had not central crush circles and one didn't crush at all - probably wasn't torqued down properly.

Cleaned all up to inspect and one area of the cylinder is uneven when running the finger from bottom up - bigger patch discoloured area in picture. Piston seal has a rough'ish centre strip on half or less of it change in texture, whereas remainder was smooth. I have replacement seals but not going to risk reusing this CSC due to uneven area. New complete OEM CSC is on the way along with a new banjo bolt.

Had excellent pointers from many in this thread. Got an extra long reach double swivel head ratchet wrench 12/13mm (as shown in picture by @Igofar) which cracked open the banjo bolt easily. Bike on centre stand allows the left hand to reach over to fully seat the ratchet on the bolt head. Rusty as heck that was so got a wire brush on it prior to removal. This bike has been on salted roads here for sure. Other useful tool suggested here was long reach hose grip pliers to remove and install the bolt. Couldn't find a swivel 8mm socket online so had to crack open with a short 8mm socket on 1/4 ratchet. Left side csc bolt was a left hand index and middle finger job that was awfully slow and took ages!

Reservoir emptied and cleaned, all fluid out, old gasket removed and everything cleaned waiting for new CSC to be delivered.

No vaseline to hand but tested very very light application of Liqui Moly 3312 silicone grease on old washers and it sticks well so will use that. @MaxPete

Need to determine how much of a turn on the ratchet on torque wrench to get 34N.m - another excellent tip here. Thanks @Igofar

It's going to be a manual bleed (no vacuum bleeder) so planning to slow fill the CSC with a syringe whilst piston is facing down. Press piston in and out a few times to get fluid in the seal and then fill to the start of bolt threads on the cylinder side. Hoping this approach would remove any air around and behind the piston prior to install on the block. With bleed nipple open, reservoir filled and gravity feed it may be achievable to not have any air inside the csc. Sensible approach?

Also, should flat side of the washers be up, i.e. outward from CSC? Came across a video where a motorbike mechanic stated this when doing a csc rebuild.
 

Attachments

  • PXL_20260408_201446086.jpg
    PXL_20260408_201446086.jpg
    132.4 KB · Views: 7
  • PXL_20260408_204340883.jpg
    PXL_20260408_204340883.jpg
    211.2 KB · Views: 6
  • PXL_20260408_204745372.jpg
    PXL_20260408_204745372.jpg
    164.9 KB · Views: 7
  • PXL_20260408_212416483.jpg
    PXL_20260408_212416483.jpg
    124.5 KB · Views: 6
Last edited:
Awesome.
I was just reading on another forum yesterday, where a poor guy was cleaning up his front brake master cylinder, after a previous owner had allowed it to gum up.
Using a torque wrench to the specified 24nm, he stripped the threads on it AND the banjo bolt.
Became an ordeal, obviously, but with a used MC and new hose finally got it repaired.
Just a cautionary note, I guess.
Sounds like something I could foul up.
But seems like you are on the road to success -- nice work.
 
My next concern is the rusted bleed line now so going to order a new one. Don't want to be repeating this fiddly work for a good few years hopefully.
 
Last edited:
Good job @Verve - nicely done. I'm sure this will see you to the end of riding your ST.

From what I can tell, most ST1300s (and perhaps the 1100s as well) seem to have CSC problems after about 8-12 years in service. I'm sure it depends on the local environment (temperature swings, humidity levels, etc.) - and my environment here in Canada is likely among the most severe with cold winters and very hot summers.

The issues all appear to be rooted in corrosion and the deterioration of the seals which is likely rooted in moisture in the fluid (which is known to be hygroscopic - it "soaks up" water).

Nonetheless, I'd bet that if the clutch and brake hydraulic systems were flushed and refilled with new fluid every 3-5 years, none of these problems would be coming up or would be much decreased.

Pete
 
Last edited:
New CSC and bleed pipe in. Getting the bleed pipe mounting bolt out and fitting new in took some time to route it the same way. This tested my patience, as had to remove the left fairing too and keeping the pipe in position whilst screwing in the bolt was a PITA!

Could not figure out the right torque method using wrench spanner. 34nm on torque wrench with spanner took some pressure but didn't want to apply anywhere near that to the banjo bolt - it felt a lot. Washers have light silicone grease on so took it easy - could have done without grease as an afterthought as middle one was slotted easily with a long circle nose plier. Tightened by feel for now. Will fill up and bleed tomorrow and check for any leaks and tighten bit by bit if there is a leak. Have spare set of new washers if I've cocked it up already.

Once all bled and no leaks, going to spray XCP rust protection on bleed pipe. One that came off is corroded badly. Going to clean up the rust to check if there's a hole in it.
 

Attachments

  • PXL_20260417_174234489.jpg
    PXL_20260417_174234489.jpg
    71.4 KB · Views: 10
  • PXL_20260417_174241979.jpg
    PXL_20260417_174241979.jpg
    100.4 KB · Views: 10
  • PXL_20260417_202718290.jpg
    PXL_20260417_202718290.jpg
    165.8 KB · Views: 10
Back
Top Bottom