Article [13] ST1300 - Tip over bars on the CHEAP

The gap between the two open ends of the right-hand bar in your picture looks to be greater than the gap in my picture. If you were to force the lower bar end a little further backwards and upwards, it will align with the hole as well as close the gap to be similar to what I have.

My right-hand side;

RH Side 01.jpg

My left-hand side;

LH Side 01.jpg
 
If you were to force the lower bar end a little further backwards and upwards,

For sure. I can force them together, or upwards, I am using a vice and clamps. The issue is to force them backwards (so that the holes get closer another 0.25), and to lock them in this position until I can bolt them to the bike.
 
Last edited:
For sure. I can force them together, or upwards, I am using a vice and clamps. The issue is to force them backwards (so that the holes get closer another 0.25), and to lock them in this position until I can bolt them to the bike.
That is what needs to be done. All of us who have installed these have had the same forces to deal with, so it is feasible. Most of us managed it using the worm gear clamps to hold them to the right spacing and the necessary brute force to get them to where we needed them. I am sure that you will prevail as well.
 
I know a lot of you like those tip over bars and I do too, but I can't justify the cost.

So once again I set out to find a less expensive way to get a similar look.

I started out by purchasing some GL1800 crash guards that looked very similar to the tip over bars available out there. NOTE: Not all crash bars from the Gold Wings look like these. If you are going to do this mod, they have to be the same ones.

When they arrived I noticed some key differences:
The steel is fatter, there is a curve them, and the holes do not pair up to the bike. But I had already spent $25 on them from eBay and I was going to make them work. It turned out to be easier than I thought.

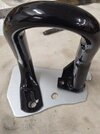
I positioned them on the bike to curve around the passenger's ankle. I got a piece of rectangular steel and welded the bars onto them. At that point it was just a matter of putting them into the drill press and re-drilling the holes in the correct spots.

This added some thickness that I wasn't ready for. I went down to the local Carzone shop and had to get some metric bolts that were about ?†longer than the factory ones on the bike.

I taped off the bars and painted the new steel black. I bolted them on with some lock-tight to make sure they weren't coming loose and I couldn't be happier with the way they turned out.

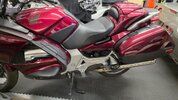
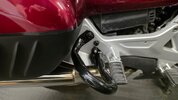
They are very strong and sturdy. They come out to the edge of the bags and they don't interfere with my wife's feet. (that was the biggy.)

Enjoy the pictures of the end result. I have misplaced the pictures of the process but I am sure you get the idea.

Check out my albums for this and other mods that I have done on my bike.

How much for the lot???
 
I just jumped into this after studying this article, and Amazon availability ($54 for the pair).
I'm guessing that the reproduction bars are never going to be like OEM, but pretty close.
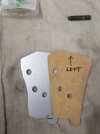
I made my own template, had two blank base plates cut out, and went to work.
My goal was to keep the rear foot pegs for convenience, but still clear the saddlebag lid.
During my work I found the right & left bars weren't as precise as my mounting plates. Out came the die grinder to align the holes, and a little bit of bending in the vice.
All in all, I think it came out okay.
The most irritating part was that the sub-frame shifted when I removed the left side bolts, even though I did one side at a time.
If you have long bolts (more than 2 1/4 long), cut off the heads and use them for alignment studs. remove one OEM bolt at a time and replace with studs for work.

Note: The "small" bolt hole on the lower end now has a bolt from the back side with a bevel head, counter sunk to be level with the plate. That has to be tightened down with locktite before the installation of the plate/bar assembly. I used an additional short bolt to hold the other end of the bar in place while I did this.
I didn't have access to a welder, and wasn't sure if this would be the final position or not.
 

Attachments

  • Done.jpg
    Done.jpg
    119.2 KB · Views: 2
  • Lft Side-1.jpg
    Lft Side-1.jpg
    148.4 KB · Views: 2
  • Right Side Done.jpg
    Right Side Done.jpg
    71.2 KB · Views: 2
  • Template-3.jpg
    Template-3.jpg
    149.5 KB · Views: 2
Last edited:
Back
Top Bottom