
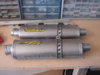
Was curious how long my mufflers had gone, and they seemed a bit on the noisy side, so ordered two packing kits from Two Brothers.

The included instructions are fairly straightforward.

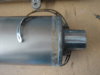
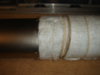
Removal of the mufflers was easy enough, as they slip on to the forward exhaust pipes.

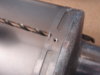
Pop off the rivets with the included drill bit, being sure to drill perpendicular to the muffler surface at that location.

You should have just a ring that starts spinning when you've drilled through the top part of the rivet. The remaining part may need to be drilled further to get the band clear.

I removed the band entirely before focusing on the rest of the rivet in the hole so the end cap can be removed.

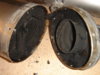
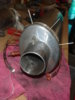
Protect your clothes, bench, hands appropriately for the gunk on the inside of the muffler.

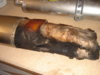
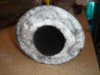
The first inner liner sort of disintegrated when I started pulling on it. I worked the second around in a circle while pulling and it pretty much came out intact. It helps to remove the logo rivets as they stick out on the inside, catching on both the old and new packing. There are enough rivets (16) to do both ends of the muffler, or one end and the logo and have a few left over.

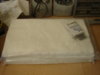
The inner liner is wrapped with wire. The instructions say to leave it intact and wrap the new packing around it. I hit the first one with the airhose to see how much I could clean off. There wasn't much removed, so I didn't bother on the second.

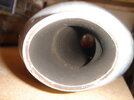
Clean out the inside as much as possible to provide a smooth surface for the new packing. I was surprised by the amount of moisture inside. Pretty sure it's not due to washing (if you've seen my bike, you'd not question that fact) but don't see any drain holes either, so prob not hurting anything on the stainless.

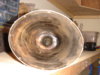
The new packing wraps in a circle and doesn't quite naturally conform to the oval muffler shape.

The first packing slid right in; the second was a bit thicker and didn't want to go in as easily. A little coercion here and there helps align things later.

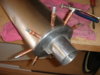
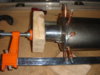
Be sure to get the liner aligned inside the outlet fitting before trying to push the packing/liner all the way down. Same on the inlet fitting. The fitting went around the liner well before being fully seated inside the muffler itself. Check as required from inside both the exit and entrance holes.

It's difficult to keep pressure on the fitting while trying to conform the shape so I used some extra 'hands'. Just be careful not to crimp or tear the muffler if using tools or clamping. A little force goes a long way, as does pushing the packing further inside away from the flanges.

I have some clecos that I used to keep the fitting in place while attaching the band. Use whatever you can once you get one/several holes lined up to ensure they all are correct (did you put the fitting in the same way it came out?) before starting to final rivet.

I chose to put all the rivets in with just minor pressure first before final squeezing. That way if they needed to move to adjust, they didn't have to do it with full pressure on them. Seemed to work. I started with the top rivet/hole each time I cleco'd, or riveted, to include initial fitting insertion, band, and final rivets. The overlap at the bottom came together without any tension at all, exactly where it was at the beginning.

I used some high temp RTV when I slipped the mufflers back onto the pipes. I intended to put some on the fittings when I reinserted them, but given the struggle I had with the second, am glad I didn't. It would have been all over the place, and I really don't think it is necessary there anyway. The fitting is tight, the packing is right there, and the band/rivets keep it well secure.
All in all, not a difficult job, just a dirty one. I didn't notice much sound level difference when I ran the bike up, but at least now I know when it was done and can schedule the next using that information.
The included instructions are fairly straightforward.
Removal of the mufflers was easy enough, as they slip on to the forward exhaust pipes.
Pop off the rivets with the included drill bit, being sure to drill perpendicular to the muffler surface at that location.
You should have just a ring that starts spinning when you've drilled through the top part of the rivet. The remaining part may need to be drilled further to get the band clear.
I removed the band entirely before focusing on the rest of the rivet in the hole so the end cap can be removed.
Protect your clothes, bench, hands appropriately for the gunk on the inside of the muffler.
The first inner liner sort of disintegrated when I started pulling on it. I worked the second around in a circle while pulling and it pretty much came out intact. It helps to remove the logo rivets as they stick out on the inside, catching on both the old and new packing. There are enough rivets (16) to do both ends of the muffler, or one end and the logo and have a few left over.
The inner liner is wrapped with wire. The instructions say to leave it intact and wrap the new packing around it. I hit the first one with the airhose to see how much I could clean off. There wasn't much removed, so I didn't bother on the second.
Clean out the inside as much as possible to provide a smooth surface for the new packing. I was surprised by the amount of moisture inside. Pretty sure it's not due to washing (if you've seen my bike, you'd not question that fact) but don't see any drain holes either, so prob not hurting anything on the stainless.
The new packing wraps in a circle and doesn't quite naturally conform to the oval muffler shape.
The first packing slid right in; the second was a bit thicker and didn't want to go in as easily. A little coercion here and there helps align things later.
Be sure to get the liner aligned inside the outlet fitting before trying to push the packing/liner all the way down. Same on the inlet fitting. The fitting went around the liner well before being fully seated inside the muffler itself. Check as required from inside both the exit and entrance holes.
It's difficult to keep pressure on the fitting while trying to conform the shape so I used some extra 'hands'. Just be careful not to crimp or tear the muffler if using tools or clamping. A little force goes a long way, as does pushing the packing further inside away from the flanges.
I have some clecos that I used to keep the fitting in place while attaching the band. Use whatever you can once you get one/several holes lined up to ensure they all are correct (did you put the fitting in the same way it came out?) before starting to final rivet.
I chose to put all the rivets in with just minor pressure first before final squeezing. That way if they needed to move to adjust, they didn't have to do it with full pressure on them. Seemed to work. I started with the top rivet/hole each time I cleco'd, or riveted, to include initial fitting insertion, band, and final rivets. The overlap at the bottom came together without any tension at all, exactly where it was at the beginning.
I used some high temp RTV when I slipped the mufflers back onto the pipes. I intended to put some on the fittings when I reinserted them, but given the struggle I had with the second, am glad I didn't. It would have been all over the place, and I really don't think it is necessary there anyway. The fitting is tight, the packing is right there, and the band/rivets keep it well secure.
All in all, not a difficult job, just a dirty one. I didn't notice much sound level difference when I ran the bike up, but at least now I know when it was done and can schedule the next using that information.
Attachments
-
 DSC03402.JPG145.2 KB · Views: 21
 -
 DSC03403.JPG142.6 KB · Views: 19
 -
 DSC03404.JPG145.7 KB · Views: 16
 -
 DSC03407.JPG135 KB · Views: 16
 -
 DSC03408.JPG126.1 KB · Views: 17
 -
 DSC03409.JPG135.4 KB · Views: 17
 -
 DSC03411.JPG156.8 KB · Views: 18
 -
 DSC03413.JPG150 KB · Views: 19
 -
 DSC03414.JPG156.5 KB · Views: 20
 -
 DSC03415.JPG145.1 KB · Views: 20
 -
 DSC03416.JPG149.9 KB · Views: 20
 -
 DSC03417.JPG137 KB · Views: 18
 -
 DSC03418.JPG140.5 KB · Views: 19
 -
 DSC03419.JPG141.7 KB · Views: 19
 -
 DSC03420.JPG154.2 KB · Views: 19
 -
 DSC03421.JPG139.8 KB · Views: 21
Last edited by a moderator: