- Joined
- May 6, 2008
- Messages
- 6,187
- Age
- 66
- Location
- Lompoc, California
- Bike
- 07 & 12 ST1300A
- SPOT
- LINK
- STOC #
- 8057
I have installed the Honda Faring deflectors on my ST 1300. They work great and keep the heat off of you and they also look very nice IMHO!
I had a problem with one of my inspection covers on the right side as it started coming loose on the top of the deflector. This happened when I was using my ST on a Fire break road in Yosemite. I won't go into that story here.
I have seen several members here that have lost their inspection covers along with the deflector cover. You can replace the inspection cover easy through Honda but try to buy just the deflector cover for this. Good luck as Honda wants to sell you a complete replacement deflector set at a very high price.
Well here is an easy fix to secure your faring deflector covers along with your inspection cover. It is about a 10 minute fix after you have the parts.
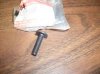
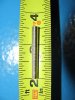
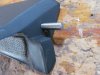
Parts needed are 2 metal dowels about 1 1/2" long, the thickness should be about 9/64 to 3/16. The ones that I have installed are tapered 3/16 to 9/64. You do not need to get the tapered ones but I think that they work better than the same size dowels. I got my dowels at the local Ace Hardware store and you should find them at any hardware or auto parts store.

Tools needed are a drill and 9/64 drill bit.

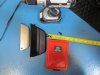
I drilled the faring deflector cover first in the middle of the "V" section seen here


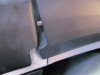
I then drilled the "V" section on the faring deflector on the bike as seen here

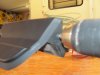
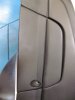
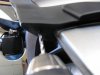
You can then reinstall the Inspection covers with the improved deflector covers and they will be nice and secure with the plastic pin installed at the bottom.


I hope this helps out anyone with the deflectors and I would recommend this fix even for new deflectors as they are a lot stronger this way.
Mike
I had a problem with one of my inspection covers on the right side as it started coming loose on the top of the deflector. This happened when I was using my ST on a Fire break road in Yosemite. I won't go into that story here.
I have seen several members here that have lost their inspection covers along with the deflector cover. You can replace the inspection cover easy through Honda but try to buy just the deflector cover for this. Good luck as Honda wants to sell you a complete replacement deflector set at a very high price.
Well here is an easy fix to secure your faring deflector covers along with your inspection cover. It is about a 10 minute fix after you have the parts.
Parts needed are 2 metal dowels about 1 1/2" long, the thickness should be about 9/64 to 3/16. The ones that I have installed are tapered 3/16 to 9/64. You do not need to get the tapered ones but I think that they work better than the same size dowels. I got my dowels at the local Ace Hardware store and you should find them at any hardware or auto parts store.
Tools needed are a drill and 9/64 drill bit.
I drilled the faring deflector cover first in the middle of the "V" section seen here
I then drilled the "V" section on the faring deflector on the bike as seen here
You can then reinstall the Inspection covers with the improved deflector covers and they will be nice and secure with the plastic pin installed at the bottom.
I hope this helps out anyone with the deflectors and I would recommend this fix even for new deflectors as they are a lot stronger this way.
Mike
Attachments
-
 IMG_0478 (1024x768).jpg403.7 KB · Views: 3,513
 -
 IMG_0482 (1024x768).jpg350.6 KB · Views: 3,487
 -
 IMG_0479 (768x1024).jpg432.3 KB · Views: 3,493
 -
 IMG_0483 (1024x768).jpg452.4 KB · Views: 3,488
 -
 IMG_0484 (1024x768).jpg426 KB · Views: 3,478
 -
 IMG_0485 (768x1024).jpg334.6 KB · Views: 3,413
 -
 IMG_0486 (768x1024).jpg334.3 KB · Views: 3,439
 -
 IMG_0487 (1024x768).jpg318.5 KB · Views: 3,471
Last edited by a moderator: