
Here are some pics:
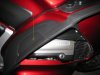
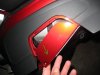
If you have the Fairing Deflectors it looks like this, left arrow to the access panel and right arrow to the Maintenance Lid:

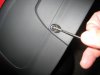
Take a small object like a screwdriver and push the center of the push-pin in and you'll feel it 'pop'.

Then, pull the push-pin out

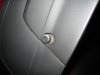
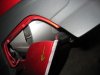
If you don't have the fairing deflectors, this is similar to what it will look like:

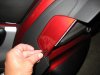
Pull the bottom of the access panel outward, if you don't do this and try to pull from above, you'll break off a tab:

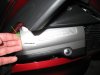
Now, pull down on the access panel and it will come away from the fairing:

Now, put your fingers in the slot on the rearward part of the Maint Lid and pull outward. It's a very tight fit, some bikes not as tight.
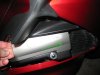
You may have to wiggle it a little but you should feel it give just a little, there is a rubber grommet there that you are pulling away from the pin

Now, you and start pushing the Maint Lid towards the front of the bike, sometimes it doesn't take much effort and sometimes you need to pull from the front part of the Lid


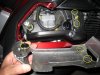
Below, with the Maint Lid removed, you can see the attachment points so the next time it will be easier to visualize:

If you have the Fairing Deflectors it looks like this, left arrow to the access panel and right arrow to the Maintenance Lid:
Take a small object like a screwdriver and push the center of the push-pin in and you'll feel it 'pop'.
Then, pull the push-pin out
If you don't have the fairing deflectors, this is similar to what it will look like:
Pull the bottom of the access panel outward, if you don't do this and try to pull from above, you'll break off a tab:
Now, pull down on the access panel and it will come away from the fairing:
Now, put your fingers in the slot on the rearward part of the Maint Lid and pull outward. It's a very tight fit, some bikes not as tight.
You may have to wiggle it a little but you should feel it give just a little, there is a rubber grommet there that you are pulling away from the pin
Now, you and start pushing the Maint Lid towards the front of the bike, sometimes it doesn't take much effort and sometimes you need to pull from the front part of the Lid
Below, with the Maint Lid removed, you can see the attachment points so the next time it will be easier to visualize:
Attachments
-
 IMG_1329.JPG81.8 KB · Views: 2,783
 -
 IMG_1330.JPG58.8 KB · Views: 2,677
 -
 IMG_1331.JPG44.8 KB · Views: 2,638
 -
 IMG_1332.JPG72.7 KB · Views: 2,670
 -
 IMG_1333.JPG80.8 KB · Views: 2,651
 -
 IMG_1334.JPG67.7 KB · Views: 2,625
 -
 IMG_1335.JPG79.5 KB · Views: 2,657
 -
 IMG_1336.JPG69.8 KB · Views: 2,625
 -
 IMG_1337.JPG90.3 KB · Views: 2,639
 -
 IMG_1338.JPG121.2 KB · Views: 2,914
Last edited:


