Article [13] ST1300 - Pre-load Fluid Replacement

dduelin

Tune my heart to sing Thy grace
Site Supporter
Joined
Feb 11, 2006
Messages
9,677
Location
Jacksonville
Bike
GL1800 R1200RT NC700
2024 Miles
010688
STOC #
6651
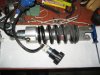
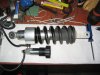
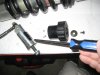
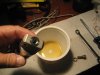
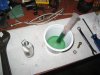
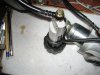
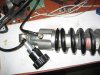
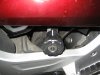
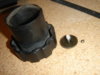
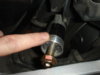
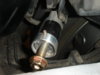
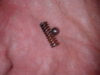
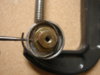
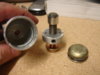
Here are some pictures I took when I serviced the preload adjuster on a spare shock I have. I bought this off the forum with 9,000 miles on it. 10,000 miles later it took 12 clicks for the adjuster to start working. In the first pic the preload is completely screwed in or to the Hard setting and I measured 6.5 mm of preload on the spring which is all she had at that time. Pic 2 the adjuster is screwed all the way out and the spring is the full length as allowed by the shock body. In Pic 3 I have removed the adjuster knob. The ball and spring that make up the clicker are lying between the adjuster body and the knob. I am pointing at the hole the spring and ball are in when assembled. If the ball flies out when removing the knob and is lost you can go to Ace Hardware and get a 4mm or 5/32 ball bearing to replace the lost one. That is what I did. Pic 4 shows the hole in the end of the body and the original fluid that came out. It wasn't bad looking, just not enough of it. In Pic 5 you can see the large adjustable wrench and the 10mm wrench used to remove the banjo (the hose) fitting. Also there I have some Bel Ray 5 wt fork oil and a syringe I used to fill the adjuster body. I saw 5 wt fork oil used in a Gold Wing DIY article on refilling a Showa preload adjuster and well, I had some on the shelf so that is what I used. In Pic 6 I have reassembled the hose and the knob back on and am pointing to where the ball fits just under the edge of the knob. Pic 7 shows now there is 9.7 mm of preload on the spring - a gain of 3.2 mm. The adjuster takes up at the first click now. Pic 8 shows the preload adjuster of the shock that is on my bike now. Because the clicker eventually gets crud in it and doesn't click much I painted a white dot and 2 white lines 180 degrees apart that correspond to "clicks" so I can keep track of preload and replicate the settings I want. I always release all preload on the shock now when the bike is in the garage. I hope this slows the loss of adjustment that seems to dog the Showa adjuster Honda uses on the ST1300. It seems to work so far.
 

Attachments

  • IMG_8212.JPG
    IMG_8212.JPG
    232.7 KB · Views: 1,912
  • IMG_8211.JPG
    IMG_8211.JPG
    235.9 KB · Views: 1,671
  • IMG_8214.JPG
    IMG_8214.JPG
    174.8 KB · Views: 2,215
  • IMG_8216.JPG
    IMG_8216.JPG
    189.9 KB · Views: 1,864
  • IMG_8219.JPG
    IMG_8219.JPG
    207.9 KB · Views: 1,722
  • IMG_8222.JPG
    IMG_8222.JPG
    202.7 KB · Views: 1,749
  • IMG_8224.JPG
    IMG_8224.JPG
    215.3 KB · Views: 1,593
  • IMG_8227.JPG
    IMG_8227.JPG
    188.3 KB · Views: 1,466
Additional notes from me just doing this 'service' after way too long. Ref my album for pics. You can remove the adjustment knob before removing the valve (pic). The ball and spring should be at the 12 o'clock position (Pic 3), just put your finger over that location when removing the knob and the ball should be kept fairly close-by. My spring was a bit 'depressed' into the hole and didn't even push the ball up at all when I took off the adjustment knob. I had to grab it and pull it up before removing the valve so it didn't disappear into the unknown areas of the engine/garage floor while flopping around (pic). Having the knob off helps to push the valve out between the spring and rear master cylinder, as mentioned previously. The hose has to be removed from the two keeper clips at the forward edge of the rear fender (pic) and I also removed it from the clip under the seat to give me more maneuvering ability. I found it easier to pull it almost all the way out the top (it won't go all the way, trust me, I tried!) and reorient it for going through the final opening bolt first (pic). The banjo bolt is removed as stated; mine was a bit tight, didn't put it on that tight when reassembled but shouldn't be a problem. Be sure to note the orientation (mine was about 45 degrees to the right, viewed from the banjo bolt end with the label facing forward). The fluid that came out was plenty dirty but there wasn't much left of it. Refilling would have been fine at this point but looking into the hole at the plunger, I saw enough crud there to make me pause. I didn't just want to push all that crud into the hose and shock.

So I went a step further. There is a snap-ring keeper on the threaded assembly at the outer part of the valve that, if removed, allows you to clean the piston, check the rubber seal, and clean the valve chamber. I solved the problem of the ring moving around every time I tried to 'grab' an end by drilling a small hole opposite the spring hole, just behind the ring seat area (pic). Then I simply used an awl to push the end of the spring out of the seat and worked it around and off. Be sure to put some grease on the end of the pushrod/inside the piston cup prior to reassembly. It goes back together easily and the ring solidly clicks into place when it's seated, just like any snap-ring. There was a fair amount of whitish crud inside the cylinder (pic).

Bear in mind, once you've serviced the valve and attached the banjo bolt again, the entire unit will be a bit 'longer' threading it back through because the fluid doesn't allow it to fully compress to it's removal size (if yours is like mine, it almost bottomed out before it built tension). Be patient and try to minimize bending/twisting stress on the hose just off the banjo bolt as you maneuver it back through to the left side. Reassembly is straightforward, ask if you run into problems.
 

Attachments

  • DSC03391.JPG
    DSC03391.JPG
    156.4 KB · Views: 257
  • DSC03392.JPG
    DSC03392.JPG
    136.6 KB · Views: 258
  • DSC03393.JPG
    DSC03393.JPG
    151.6 KB · Views: 256
  • 2012-10-27 20.19.54.jpg
    2012-10-27 20.19.54.jpg
    46.4 KB · Views: 251
  • DSC03395.JPG
    DSC03395.JPG
    141.2 KB · Views: 257
  • DSC03396.JPG
    DSC03396.JPG
    158 KB · Views: 254
  • DSC03400.JPG
    DSC03400.JPG
    142.5 KB · Views: 266
  • DSC03401.JPG
    DSC03401.JPG
    148.6 KB · Views: 261
Last edited:
I had this problem earlier this year and (having spoken to my local Honda dealer) was expecting to have to replace the shock. However I just removed the adjuster and fed it through the bike to the other side and opened it up, cleaned & topped the resevoir up with fork oil, and it has done 12k miles and is still 'biting' after 2 clicks!
I did'nt see the need to dismantle the or remove the shock, and as this job only took me 20 mins in the end, I have added it to my service schedule to be done every 12k.
The other thing that I've added to the schedule is replacing the rear brake caliper slide bolt on every pad chage due to having had a seized caliper and having to spend ages overhauling the caliper when I just needed to change the dammed bolt!!:eek::
 
I used Honda fork oil in mine. It doesn't have to do anything more than push out the preload sleeve on the shock, so a light weight oil should work fine. The biggest concern is using something that won't attack the seals. Hydralic Jack oil is just that, a light weight hydralic oil that you put in automotive floor jacks or bottle jacks. Transmission fluids have all kind of additives in them. I'm not sure I would want that in there, but to each his own. Gear oil is way to heavy.

Another step that I added to this procedure was to bleed the air out of the system when done. With the adjuster filled, the hose attached, and still out of the bike. I held the adjuster up higher than the shock and turned it so that the banjo bolt was on top and tapped on the adjuster and hose to help move any air bubble to the highest point. Then I dialed in just enough preload to feel some resistance. Then crack open the banjo bolt. The preload on the shock spring should push out any air and some fluid. I did this twice. The second time I had only fluid come out when I cracked open the bolt. My reason for doing this is that the air in the system will compress, while the oil will not. This air will then act liike it's own spring, compressing and releasing with any load on the shock spring. This will mess with your suspension settings.
 
OK, that was easier than I thought, so much so that I did it twice, because I forgot to push the inner piston all the way back down after draining what little oil was in there. Make sure to note the orientation of the hydraulic hose coming off the adjuster. Took me a couple tries to get it right again. Also, you guys that say you thread it out between the battery and shock without removing the knob, I don't believe you. Removing the knob is pretty simple, just make sure you have your hand around the bottom of the knob to make sure the spring and bearing don't go flying. All told, doing the procedure twice, including several adjustments to the hydraulic line orientation only took about 45 minutes. I expect if there is a next time, it would probably only take 20 minutes. Now, I feel resistance at about half a turn instead of over half the way in. Rear shock feels much better now dialed in a little over half way. I realized that before adding oil, at halfway in but with no resistance, I actually had NO preload dialed in. A 10mm socket or wrench, a Philips screwdriver and a 5mm hex head or Allen wrench (for the side panel bolts) are all the tools you need and a small bottle of Gunk hydraulic jack oil will cost you less than $10 and last for quite a while.

Great instructions guys. Thanks a lot.
 
I have found an even easier short cut! Instead of removing the knob, spring and detent ball, then removing the (2) 10mm bolts, unclipping the line from the fender, loosening the rear master cylinder bolt, and feeling the whole assembly over to the right side etc.....

New improved method:
1. Remove left side cover
2. Observe how the unit is bolted on
3. Instead of removing the 10mm bolts, follow the mounting bar upwards to where it bolts to the frame by the lift handle. You'll see (1) 10mm bolt. simply remove this one bolt, and gently pull the line free from the front of the rear fender. You can then simply turn the entire unit upside down on the left side of the bike without removing anything else. You now have a bar to hang onto while you loosen the banjo fitting. As far as having the line point in the correct position, I simply observe where it was before you loosen it, or mark it with a sharpie. I can now R&R one of these in about 10 minutes! Hope this helps.
 
Never had to remove the knob to thread out through the right side, honest. But.. I will try the latest, greatest method from Iggy next time round.. :yes:

bk
 
Just did the job, great tips guys!
I just left the unit on the side it was on and took off the rod that holds it. I marked the banjo bolt with some paint for reassembly orientation.
I dumped out what was in it and opened it all the way to the softest position then pushed inside the oil hole with a screwdriver to push the piston all the way down. Then I poured some shock oil into it and drained it a couple of times to flush it out. I then topped it off and reassembled it to the banjo.
I then turned it in until I felt friction, then I cracked the banjo to let air out. I repeated this a couple of times, I think it displaces air in the hydraulic line to the shock. I then took the unit off again, pushed the piston all the way down again and refilled with oil. I then reassembled it again and voil? I had tension right away!
Very easy job and I am sure it will prove to show a noticeable improvement in loading abilities on the bike.
 
There was an issue with the thread, I'll see about getting Igofar if he can add them back.
 
One thing I have read about several times when referring to the rear shock adjustment, is how many "clicks" the knob moves. My knob doesn't click, and never has since I got the bike last year. The knob turns with a bit of resistance, and can be turned in or out, but no clicks. I'm getting ready to do the fluid change in mine tomorrow, but wanted to address this inconsistency between my shock and other's.

Edit: I pulled it apart tonight, and found the knob had a lot of gunk buildup & dirt. I'll clean it really well while its apart, and I have a feeling I'll be able to feel the clicks.

Jim
 
The click is made by a spring loaded ball bearing and two opposed depressions inside the knob. The inside of the knob could be worn or there is crud compacted in the hole the spring sits in. You will know tomorrow.
 
I called my local Honda dealer and they looked up the factory recommended fluid, which was SS-8. Followed the directions above, which worked very well, and my preload works great. It had been less than half full and did not work well. Great advice.
 
Wow, what a piece of cake...er.....pie that was. I followed Igofar's instructions and was done in about 15 minutes. The old fluid was milky and not much there. I filled with 10wt fork oil, and got tension after about 1/2 turn. Just like new, or better!
 
I finally got around to doing mine. I have had my preload cranked all the way up to the max setting. Basically mine was at 25 clicks before there was any resistance. Now I am at about 1 click.
 
WOW! How easy this is! Did mine this evening.

26 clicks till engagement - now only 2 clicks.

I have been putting this off for a while now cause anything that should only take 20 minutes will take me 2 hours. Don't understand why, just does.
This took me only 20 minutes. (Except for the drive to town to get the oil. :rolleyes:)

Nice write up!
 
Have ridden about 9K miles since adding fluid. Around half of those miles are two up with nearly 400 lb. combined rider weight, plus gear in bags. A little fluid must have leaked, because it takes about 1.5 turns (3 clicks) to get pressure. It took less than 1/2 turns (1 click) to get back pressure when I first added fluid. Wondered if anyone else had the experience of having to add fluid again that soon.
 

Attachments

  • Places Ridden Map.jpg
    Places Ridden Map.jpg
    16.6 KB · Views: 28
Top Bottom