Article [13] ST1300 - Air Filter Replacement (How-To)

Joined
Jun 2, 2011
Messages
8
Location
Salinas, CA
Bike
2004 ST1300
As I didn't already see a how-to post for changing the air filter on ST1300s, I thought I'd post some pics. It's a pretty straightforward process that should take ~60 minutes, start to finish–especially if you've never done it before. Note: Perform these steps on a near-empty tank.

Step 1) Remove seats and the two 8mm bolts toward front of tank.
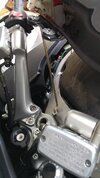
Step 2) Loosen the 10mm bolt and nut in the image below. They are located in front of the seat-height adjuster. This will allow you to slide back the tank an inch or two so that it clears the bar risers in the next step - make sure to push the seat-height adjuster towards the rearmost slot called the maintenance slot.

Step 3) After sliding tank back, gently lift the front of it being careful not to scratch/ding it against the bar risers. I used a bungee cord to hold the tank in a lifted position. (See image below.) You can also temporarily remove the retaining cable to get more clearance.

Step 4) Remove the nine Phillips screws holding the box cover on. Note: As others have suggested, it's probably best NOT to remove the two front screws. Doing so could risk dropping them into a hard-to-reach area. Also, there's a small wiring harness that's easy to disconnect, which will allow you to completely remove the box cover. I did this so I could wipe clean the underside of the cover.

Step 5) With the box cover removed, you can remove any visible debris and wipe clean any oil residue. I used the home vacuum cleaner with crevice wand to remove remnants of a dead bug.

Step 6) Proceed to swap the air filter then reassemble.


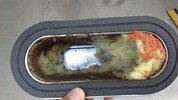
As you can tell, I used a replacement from Emgo (http://www.amazon.com/gp/product/B008Y363Y2/ref=oh_aui_detailpage_o01_s00?ie=UTF8&psc=1) and did not use any type of grease to help seat the filter. (Others may suggest differently.)

Hope this helped.
 

Attachments

  • rev_tank.slide.bolt.jpg
    rev_tank.slide.bolt.jpg
    161.5 KB · Views: 484
  • rev_bungee.jpg
    rev_bungee.jpg
    164.6 KB · Views: 741
  • rev_box.cover1.jpg
    rev_box.cover1.jpg
    161.3 KB · Views: 704
  • rev_box.open1.jpg
    rev_box.open1.jpg
    161.2 KB · Views: 760
  • rev_filter.both.jpg
    rev_filter.both.jpg
    163.3 KB · Views: 654
Last edited by a moderator:
Re: Air Filter Replacement (How-To)

Thanks everyone for posting these. It made replacing the filter a snap. I love the people on here: so helpful!
 
...As others have suggested, it's probably best NOT to remove the two front screws. Doing so could risk dropping them into a hard-to-reach area.
That is very wise advice. I didn't read it carefully enough when I changed my air filter, and sure enough, I dropped one of the front two screws and it disappeared way down into the bowels of the engine. It took me nearly an hour to find the darn screw.

I think Honda actually made the wells that those two front screws fit into extra-deep, in order to permit the screws to be left in place after they have been loosened from the fastener below.

Michael
 
Since there's no reason to remove the funnels to remove/replace the air filter, yes the tabs should be bent over.

I'm thinking he was checking out the stuff located under the airbox and decided to get some pics for someone doing an air filter R/R...
 
Since there's no reason to remove the funnels to remove/replace the air filter, yes the tabs should be bent over.

I'm thinking he was checking out the stuff located under the airbox and decided to get some pics for someone doing an air filter R/R...

Good point, Mellow. As the pictures can attest, mine were not bent over the Phillips screws holding on the air funnels, so I left them alone. Are they bent on a new bike?
 
Great article, thanks.
But I can suggest this one enhancement. Instead of using a bunjee cord to hold the Gas tank up, use the provided metal rod specifically for that purpose tucked in its' place under the passenger seat. I am including a couple photoes to show it.
20160402_114627-1.jpg
20160402_115312-1.jpg
 
Last edited:
Rayads - thanks for the photo. I knew there was one but didn't know where. I was using a 2 x 4 (a lot harder to store under the seat.)
 
Just did my own filter (refreshed the already-installed K&N) and I saw that little metal rod under the passenger seat - wondered what it was for! It's amazing what little pieces of info you can pick up around here!

Many thanks! I will use this in the future!
 
I have an 04 ST13 with 25K. It has the same air filter that came from factory. Anyone think I need to check it or can I take it up to 50K and then change it. I ride on paved roads, like most of us.
 
I have an 04 ST13 with 25K. It has the same air filter that came from factory. Anyone think I need to check it or can I take it up to 50K and then change it. I ride on paved roads, like most of us.

I would recommend that you at least check it, just for the peace of mind. It isn't hard to do, just don't get in a hurry or lose your patience.
Note there are a couple of errors in the original post. At some point after removing the seats and before step 3, the front seat adjuster must be moved rearward to the maintenance position. In step 3 he suggests the retaining strap can be temporarily removed from the tank for added clearance; don't do that - I have seen one or two posts that point out the reason for the strap is to prevent raising the tank too high and possibly compromise the integrity of the hose that carries gas from the upper tank to the lower one. A leaking hose there is the last thing you want to happen.
 
Did mine at 30K....was pretty dirty. I'd go ahead and do it. Amazon has them (OEM) for as little at $18 LOTS better gas mileage too.
I have an 04 ST13 with 25K. It has the same air filter that came from factory. Anyone think I need to check it or can I take it up to 50K and then change it. I ride on paved roads, like most of us.
 
The owner's manual covers the procedure very well (including the prop rod) but browsing thru the how to article prompted me to check out the filter to see if the prior owner had changed it recently. The outside was looking pristine. Not so much with the inside/filter side:

image.jpg
(Click on image to enlarge)
Mice/rodents!! Winter storage issue. Seems a screen on the front of the air inlet would be a good idea.
Cleaned it up temporarily with the shop vac and compressed air. Ordered a new one.
Maybe the gas mileage will improve!
 
Re: Air Filter Replacement (How-To)

I just did the air filter replacement. One of the fuel tank bolts was not screwing in as easy. I still tightened it. The other one I was able to screw in almost by hand. as far as I could see the holes were lined up as good as I could do. Any one see a problem. should I un screw an try tightening again?. Also I did not have any grease, so I applied a very thin coting of motor oil. any concerns on that. thanks
 
Re: Air Filter Replacement (How-To)

I just did an air filter replacement. One of the tank bolts was not screwing in as easy. So I had to use a socket/extension to screw it in. The other one I was able to screw in by hand and then tighten with socket. As far as I could tell the holes were lined up pretty good. Anyone see a problem with this. Should I unscrew and try tightening again? Also, I did not have any grease, so I applied a very thin coating of motor oil before seating the filter. Any concerns here. Thanks.
 
Back
Top Bottom