Smallville
Scott
This is my first attempt at a How to article so bear with me.
Starter Valve synch for ST1300. Special thanks to Blrfl for letting me borrow his Carbtune manometer.
Remove seat. Move seat bracket to maintenance position. Loosen 10mm bolt holding rear of tank down.

Remove two 8mm bolts holding down front of tank.

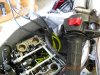
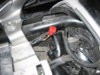
Locate prop rod located under where the rear seat would be. Raise tank by pulling backwards first and then lift front up. Install prop rod as shown. You can remove one of the chrome caps if you wish, and place end of prop rod in bolt head.

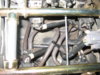
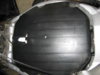
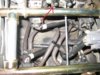
Now you should be looking at the top of the air box.

I like to go ahead and unclip the IAT sesor (white connection on rear of air box). Then proceed to remove all screws holding down top of air box. nine in all. A good magnetic tip screw driver works well as if you drop a screw, it may be gone for good. However usually the wind up on the rubber mat under the Throttle bodies. DAMHIK.
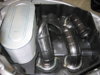
Once the air box lid is removed you should see this.

Remove air filter. Remove snorkles and bases. Two screws hold each snorkle on. Each has a metal tab bent over it to prevent it from backing out. Use a flat blade screwdriver to gently pry them open. Once the snorkle is removed two screws hold the base on. Some people have had trouble getting these loose. This is where a good screw driver comes in handy. Although some have found a impact driver was needed. I was lucky and all mine broke free easily. Remember where each snorkle came from as it will make reassembly easier.

Once you remove the last base, you will gently pull up on the air box base and find that there are two rubber hoses attached. The back on is easiest to remove first. They are held on with a spring clamp. You can squeeze them by hand to remove. I find it better to remove the clamp untill reassembly as they tend to slide on the hose.
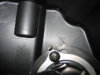
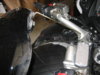
Once the air box base is out of the way you want to look for this.

This is the T that you will disconnect each hose from to obtain your readings.
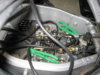
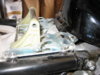
Before we can remove the vacuum hoses first remove the IAT sensor from the air box lid and plug it back into the connector. Now start the bike and allow to warm up to operating temp. Shut bike off. Remove each vacuum hose that leads to each cylinder. One will remain as it runs to the map sensor. Block off each PAIR suction hoses. In the picture you can see the green things I use to pinch off the hoses. Start bike (you may have to give it a little throttle) and hold engine speed above 2000 rpm for 5 seconds or more untill FI light blinks. The bike should idle now. Attach your vacuum hoses to your guage and adjust each cylinder to match cylinder number 1.
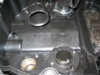
Adjusment screw.


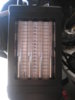
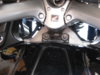
Once all are adjusted correctly it should look like this.

When finished. Reassembly is in the opposite order. To reset the ECM. Find the ECM connector located under where the rear seat would be.

With the engine stop switch in RUN and the iginition off. Jump the brown and Green/pink wires. Turn the ignition on. Remove jumper wire. The FI lights for about 5 seconds. During this time short the wires again. The Fi light should start blinking. Shut off ignition.
During reassembly if you forget how a snorkle was aimed, there are indicators on the snorkle and air box base that you can line up.

Reassemble and start. Check idle and adjust if needed.
Overall not a bad job. I would reccomend placing some anti-seize on the screws that hold the snorkle base down to the throttle bodies. Also remember that snug is tight enough for the snorkle, base and air box cover.
Starter Valve synch for ST1300. Special thanks to Blrfl for letting me borrow his Carbtune manometer.
Remove seat. Move seat bracket to maintenance position. Loosen 10mm bolt holding rear of tank down.
Remove two 8mm bolts holding down front of tank.
Locate prop rod located under where the rear seat would be. Raise tank by pulling backwards first and then lift front up. Install prop rod as shown. You can remove one of the chrome caps if you wish, and place end of prop rod in bolt head.
Now you should be looking at the top of the air box.
I like to go ahead and unclip the IAT sesor (white connection on rear of air box). Then proceed to remove all screws holding down top of air box. nine in all. A good magnetic tip screw driver works well as if you drop a screw, it may be gone for good. However usually the wind up on the rubber mat under the Throttle bodies. DAMHIK.
Once the air box lid is removed you should see this.
Remove air filter. Remove snorkles and bases. Two screws hold each snorkle on. Each has a metal tab bent over it to prevent it from backing out. Use a flat blade screwdriver to gently pry them open. Once the snorkle is removed two screws hold the base on. Some people have had trouble getting these loose. This is where a good screw driver comes in handy. Although some have found a impact driver was needed. I was lucky and all mine broke free easily. Remember where each snorkle came from as it will make reassembly easier.
Once you remove the last base, you will gently pull up on the air box base and find that there are two rubber hoses attached. The back on is easiest to remove first. They are held on with a spring clamp. You can squeeze them by hand to remove. I find it better to remove the clamp untill reassembly as they tend to slide on the hose.
Once the air box base is out of the way you want to look for this.
This is the T that you will disconnect each hose from to obtain your readings.
Before we can remove the vacuum hoses first remove the IAT sensor from the air box lid and plug it back into the connector. Now start the bike and allow to warm up to operating temp. Shut bike off. Remove each vacuum hose that leads to each cylinder. One will remain as it runs to the map sensor. Block off each PAIR suction hoses. In the picture you can see the green things I use to pinch off the hoses. Start bike (you may have to give it a little throttle) and hold engine speed above 2000 rpm for 5 seconds or more untill FI light blinks. The bike should idle now. Attach your vacuum hoses to your guage and adjust each cylinder to match cylinder number 1.
Adjusment screw.
Once all are adjusted correctly it should look like this.
When finished. Reassembly is in the opposite order. To reset the ECM. Find the ECM connector located under where the rear seat would be.
With the engine stop switch in RUN and the iginition off. Jump the brown and Green/pink wires. Turn the ignition on. Remove jumper wire. The FI lights for about 5 seconds. During this time short the wires again. The Fi light should start blinking. Shut off ignition.
During reassembly if you forget how a snorkle was aimed, there are indicators on the snorkle and air box base that you can line up.
Reassemble and start. Check idle and adjust if needed.
Overall not a bad job. I would reccomend placing some anti-seize on the screws that hold the snorkle base down to the throttle bodies. Also remember that snug is tight enough for the snorkle, base and air box cover.
Attachments
-
 starter valve 002.JPG121.2 KB · Views: 1,155
 -
 starter valve 004.JPG85.3 KB · Views: 1,097
 -
 starter valve 005.JPG133.9 KB · Views: 1,005
 -
 starter valve 006.JPG92 KB · Views: 1,018
 -
 starter valve 007.JPG122.4 KB · Views: 953
 -
 starter valve 008.JPG120.7 KB · Views: 914
 -
 starter valve 009.JPG91.5 KB · Views: 886
 -
 starter valve 010.JPG111.6 KB · Views: 904
 -
 starter valve 011.JPG114.7 KB · Views: 913
 -
 starter valve 013.JPG97.4 KB · Views: 901
 -
 starter valve 014.JPG133 KB · Views: 960
 -
 starter valve screw.jpg72.2 KB · Views: 966
Last edited by a moderator:
")