Getting to Know the Bike

OP
OP
draser
Joined
Mar 6, 2024
Messages
45
Age
70
Location
Detroit
Bike
2003 Honda ST1300
Be damned if I would send it to them.
Worst case scenario I can use a shop in the states but, where's the fun in that... I'll just order a line with proper end fittings and do it m'self.

You're a while away from this yet - but I'll post it while I remember. You may find it useful. There is s useful post for taking a fairing off and identifying the nuts and bolts so that you can put them all back together again. I provide a link to that.
Thank you, my fairings - while in good condition thank God - came with missing fasteners and/or wrong fasteners so your help will be appreciated!! When I get there I'll have to order what's missing. I did find a few fasteners within the bike as I was taking it apart but I feel I'm still short a bunch.

You can re-fill it just like the OEM Honda shock, which Honda, Penske, Progressive, and everyone else will tell you ONLY they can do it
My thoughts exactly...

Filling the fluid line for the rear shock is relatively easy. Theres a thread on here somewhere. I bought a brand new Honda replacement and it came with (about) 10 clicks of free space before it started to move the preload - so my very first job was to refill that. It is impossible for me to get it so that there is no air at all in there, but if you fill the lines up, move the piston a few times and bolt the banjo bolt with fluid flowing out as you tighten - well I got it to just two clicks. Standard OEM is 7 clicks.
Yeah, it reminds me when I rebuilt the rear shocks with fluid reservoirs on my Magna, main problem (obviously) was getting as much air out as possible while filling with fluid.
 
OP
OP
draser
Joined
Mar 6, 2024
Messages
45
Age
70
Location
Detroit
Bike
2003 Honda ST1300
Thank you all for your replies, getting there slowly but surely. It seems that my rear wheel "flange bearings" are missing a few balls here and there so the order went out, also added the needle bearing for the shock lower attachment point as there was some play in the bearing/bushing assembly. Working on pressing out the needle bearing.
 

jfheath

John Heath
Site Supporter
Joined
Mar 18, 2006
Messages
2,834
Age
70
Location
Ilkley, W Yorkshire, UK
Bike
2013 ST1300 A9
2024 Miles
000679
STOC #
2570
There are a couple of significant 'O' rings that fit in the disassembled wheel. Make sure that these are in place/replaced.

Parts 23 and 22 on this diagram. They will be numbered differently on other fiches.

1714085636459.png
 
OP
OP
draser
Joined
Mar 6, 2024
Messages
45
Age
70
Location
Detroit
Bike
2003 Honda ST1300
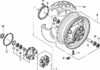
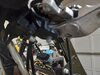
So today, having cleaned the clutch slave from all the crystalized fluid/moisture stuff, below - some corrosion on the outside of SC body but inside bore in shiny good condition, piston just have discoloration:

20240427_142340.jpg

And the engine side of it, after several cleaning "sessions":

20240427_143408.jpg

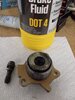
The clutch line form MC to the SC was previously flushed until clear liquid came out. Torqued SC by feel due to location and inaccessibility. Next the brake fluid went in, the vac pump went to the service port of SC and fun begun... Actually it went pretty fast, got all air out and lever feels harder than before, reminds me of the Magna after installing a Vesrah heavy duty clutch springs, definitely harder than when I bought it.

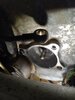
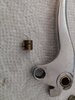
Noticed a lot of squealing while pulling the lever so I had to take it apart. Found an acorn (??) nut on the pivot screw:

20240427_155102.jpg

and, just for kicks, looking at the brake lever... guess what... no nut (typical by now..):

20240427_155113.jpg

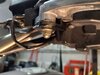
Long story short, I ended up with 2 locking nuts (from my stock) for the levers. Looking at the brass piece that has the boss for the MC pushrod, there was ribbing/rough surface on the one side:

20240427_153923.jpg

Which, after removing with some 1000 grit sandpaper, greasing and reinstalling, took care of the lever squealing.

And now I have a working clutch. Moving on to the brakes next, let the fun begin..
 
Top Bottom