
CYYJ
Michael
A few years ago, I made a post asking for suggestions to solve a problem I was having with my 2001 ST 1100 - the clutch wasn't fully disengaging when I pulled it in, and the moto wanted to creep ahead when stopped at traffic lights. It was also difficult for me to find neutral when the engine was running, and impossible for me to walk the bike backwards when the engine was running, the bike was in gear, and I had the clutch lever fully pulled in.
The general consensus from forum members who replied to my post was as follows:
1) Bleed the clutch system and make sure there are no air bubbles in the clutch hydraulic system.
2) Check the condition of the clutch lever, the clutch lever bushing especially, and if necessary, rebuild the clutch master cylinder.
3) Replace the clutch slave cylinder.
There's a really great write-up about how to inspect and overhaul the clutch lever & master cylinder at this post. I didn't do the work myself, I asked my Honda dealer to do it for me. They fully rebuilt the clutch master cylinder and properly bled the system, but the problem remained.
This past week I replaced the clutch slave cylinder. This article will explain how to do that.
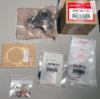
Before you begin, you will need the following parts:
Clutch slave cylinder (it's a complete assembly)
500 ml or more of DOT 4 brake fluid
The above two items are essential. The following items may also be needed:
Gasket for the clutch slave cylinder
Two exhaust manifold gaskets
4 crush washers
Rubber seal that fits over the pushrod
1) Parts Required / Optional
These are the parts described above
It is very easy to access the clutch slave cylinder on the ST 1100. It's right up front, directly behind the front wheel.
2) Clutch Slave Cylinder Location
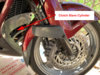
If you remove the grey colour Tupperware that runs around the bottom of the bike (it is comprised of three pieces, but can be removed as one unit), you have full access to the clutch slave cylinder. At first glance, it looks like this will be a 5 minute job, because the part is only held in place by 3 bolts. Unfortunately, it is not possible to get access to the bolt on the left side of the picture below (on the right side of the motorcycle) with a normal wrench or socket... you have to disconnect the exhaust header assembly on the right side of the motorcycle and press it about half an inch downward in order to get access to that bolt.
3) The Problem Fastener
To get access to the 4 bolts that hold the right hand side exhaust header in place, you have to remove a heck of a lot of Tupperware (see photo 9 at the very end of this post), and then the heat shield over the header, and finally a mounting bracket that blocks removal of the heat shield.
4) Three bolts holding heat shield have been removed

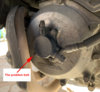
Once you have the exhaust header heat shield out of the way, you can remove the bolts that hold the exhaust header in place. Take a look at the picture directly above, and you will see that there is a little gap between the engine block and the two (rusted) plates that hold the header & header gaskets into the recess in the engine block. I suggest that before you attempt to loosen the nuts that hold the header attached to the engine block, you spray a whole lot of PB Blaster, WD 40, or some other penetrating oil into that gap and let it run downwards over the studs that you see in the picture below.
Take care not to let the penetrating fluid spray upwards onto the studs, because the studs are actually threaded into the block. I didn't have any such penetrating fluid available when I did this work at an oasis in the south of Morocco, and it was very difficult to remove the nuts. As you can see in the photo below, one of the studs (rear one on the foremost cylinder) unscrewed from the block.
Once you have the four nuts removed, you can pull the header downwards about 1/4 of an inch (6 mm) to half an inch (12 mm) to free the header from the recess it fits into on the engine block. That will give you sufficient clearance at the front of the engine to remove that third "problem" fastener that holds the clutch slave cylinder in place.
5) Right Side Header, bolts removed, pulled downwards about half an inch

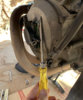
Before you remove the three small bolts that hold the clutch slave cylinder in place, disconnect the hydraulic line from the part. When you do this, all the fluid in the hose will drain out, so, have a container ready to catch the fluid.
Now remove the three bolts holding the clutch slave cylinder in place. You can use a screwdriver, as shown below, to gently pry the cylinder forward and release it from the engine. You can also fit the screwdriver behind the bleed nipple and pry forward there. I didn't have any difficulty removing the cylinder - it had been there for 17 years.
6) Prying the cylinder off the engine
When the cylinder cover popped off, some parts that were included with the new clutch slave cylinder kit still remained inside the engine. I just lifted them out with my fingers. The original gasket was in excellent condition, so, I did not bother to replace it, even though I had a new gasket on hand.
7) A few bits of the slave cylinder assembly remained behind - just lift them out
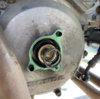
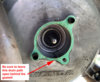
There is a small groove at the bottom of the recess that the slave cylinder assembly fits into. There is also a small notch behind the gasket (not visible in the photo below) that is there to enable any fluid that drains into that recess to drain out the front of the engine case. It is very important that you ensure that the recess is clean & free of debris, and that the notch behind the gasket is open to allow fluid to drain.
If, in the future, the new slave cylinder develops an internal leak, any brake fluid that leaks out of it will then flow down into the recess at the bottom and flow out through the little gap behind the gasket. This will indicate to you that you have had a failure within the slave cylinder assembly.
8) Keep this fluid pathway open!
In the photo above, you can see a rubber ring surrounding the push-rod. I bought a spare for that part (shown in the bottom middle of the first photo above), but, like the gasket, it was in surprisingly good condition, so I left it alone and did not install the spare.
Installing the new part is simple: Just install it, tighten the three bolts (don't overtighten them, remember, the engine case is aluminum, not steel), then hook up the hose to the new unit, and now you are ready to bleed the system.
There is a bleed valve on the top of the slave cylinder - its position is obvious. Start bleeding there, at that valve, by taking the cover off the clutch master cylinder and adding new DOT 4 brake fluid. My experience was that I felt no resistance at all at the clutch lever when I pumped it, but I was able to fill the hydraulic line with fluid and eventually get all the bubbles out... that took about 100 compressions of the clutch lever. Very little fluid moved down the line with each compression.
The next step, which is not documented in the service manual and has been a source of headaches and great frustration to many owners (see post #21 this discussion for a description of the problem I encountered, and posts #23 and #24 on the same discussion for the solution that PaulCB and ST-ABSU provided me with) is to bleed the clutch hydraulic system at the banjo fitting of the clutch master cylinder.
It seems that it doesn't help to just turn the handlebars so that the clutch reservoir is level, you need to crack the banjo bolt up at the connection to the master cylinder to get trapped air out of there. You only have to crack the bolt a tiny bit (about 1/4 of a turn, no more), and then slowly operate the clutch lever. You will then see a whole whack of bubbles come out of the banjo fitting, and after you have tightened up the banjo fitting, you'll see a stream of bubbles coming up from the compensating port of the clutch master cylinder. Then, all of a sudden, you will feel normal resistance when you pull the clutch lever in.
This article assumes that the reader knows how to bleed brake (& clutch) systems, so, I won't go into detail about protecting the paint from the brake fluid, etc. It is noteworthy that very little fluid needs to be drained out at the master cylinder banjo bolt to get rid of the air in the system at that location. I just stuffed a facecloth underneath the banjo bolt (between the lower part of the banjo bolt and the handlebar tube), and that was sufficient to absorb the wee bit of fluid I needed to bleed out in order to get rid of air trapped in the master cylinder's piston. But, if you value the paint on your false fuel tank cover, take the time to thoroughly protect it before you crack that banjo bolt.
Once you have bled the air out of the master cylinder piston by cracking the banjo bolt holding the hose onto the end of the master cylinder, you will then have normal resistance when you pull the clutch lever, and you can finish bleeding any air that remains in the hose and in the slave cylinder via the bleed port on the slave cylinder. Only a few strokes of the clutch lever will be required, and you will see that you get a very large quantity of fluid expelled from the slave cylinder bleed valve, compared to what you got when you were pulling the clutch lever and feeling no resistance.
Once the bleeding is complete, you just put the right exhaust header back in place (change the two gaskets if you can get them out - I couldn't get them out), secure the header with the four bolts. There is a special procedure for re-installing these bolts: Tighten them in pairs (each cylinder) to 10 N·m torque (very little torque!), then tighten the two cylinders one at a time again to 17 N·m torque (that's not any more torque than what you could apply to a screwdriver using your non-dominant hand). Don't over-torque them!
Now, put the heat shield back in place, secure the heat shield with its fasteners, put that small bracket highlighted in photo 4 ("these two also have to be removed") back in place, and then put all the Tupperware back together.
I was concerned that the motorcycle might lurch forward when I started it, perhaps because I had done something wrong and the clutch was still engaged when I had the clutch lever pulled in. So, before I started the motorcycle for the first time, I rolled it up against a building, nose first with the front wheel against the building wall, and started it in that position. The clutch worked perfectly.
It took me about 3 hours to do this job, but that was with no prior experience and with no tools other than what I had in my travel kit.
9) The oasis where I did the work, in Southern Morocco
All that Tupperware has to come off to get access to the right hand header - there ain't no escaping this level of disassembly.

Epilogue
Unfortunately, replacing the clutch slave cylinder did not solve my problem. The moto still wants to creep forward when the clutch is pulled in. The creeping problem only arises when the engine is warm, it is not present with a cold (newly-started) engine.
I now know that whatever is causing this problem, it is not the clutch master cylinder, air in the system, or the clutch slave cylinder.
The Service Manual for the ST 1100 lists the following potential problems, in this order, if the moto wants to creep forward with the clutch pulled in:
1) Warped plate
2) Loose clutch lock nut
3) Oil too high, improper viscosity, or additive used ['additive' implies that energy conserving oil has been used in the engine]
4) Air in system
5) Low fluid level
6) Leaking or sticking hydraulic system.
I can rule out items 4, 5, and 6 based on the work that has already been done. Item 3 is a possibility - the oil level is correct, and the present oil specification (both viscosity and non-energy conserving) is correct, but it is possible that my Honda dealer may have put the wrong type of oil into the engine in the past. Not likely, but possible.
There is also a chance that the 17 year old clutch hydraulic hose is getting weak and swelling a bit when pressure is applied. It's also possible that the pin that fits into the slave cylinder and pushes the clutch assembly inwards (visible in photo 8) might be shorter than spec due to wear. I doubt that item 2 in Honda's list (loose clutch lock nut) is the cause, simply because it is very difficult to release that nut, it is attached with several procedures to prevent it from loosening.
Next, I'm going to change the clutch plates, and replace the pin that is visible in photo 8. The pin is cheap, I don't think it is the cause of the problem but it is something I can rule out easy enough by replacing it. My clutch operates just fine so far as propelling the motorcycle forward is concerned, but if improper oil has been used in the past, I don't know how long - if ever - it will take for the problem caused by oil additives to wash away. The bike has 200,000 km (125,000 miles) on it with the original clutch, so, replacing the clutch plates is probably a good idea just from a preventative maintenance point of view.
If I could get hold of a new clutch hose, I would install one. The hose is no longer available from Honda. I wrote Galfer last month, and asked them if I could buy a clutch hose (rather than a complete kit to replace every hose on the motorcycle), but they did not reply to me. If anyone knows where I can get a new clutch hose, please let me know.
Michael
The general consensus from forum members who replied to my post was as follows:
1) Bleed the clutch system and make sure there are no air bubbles in the clutch hydraulic system.
2) Check the condition of the clutch lever, the clutch lever bushing especially, and if necessary, rebuild the clutch master cylinder.
3) Replace the clutch slave cylinder.
There's a really great write-up about how to inspect and overhaul the clutch lever & master cylinder at this post. I didn't do the work myself, I asked my Honda dealer to do it for me. They fully rebuilt the clutch master cylinder and properly bled the system, but the problem remained.
This past week I replaced the clutch slave cylinder. This article will explain how to do that.
Before you begin, you will need the following parts:
Clutch slave cylinder (it's a complete assembly)
500 ml or more of DOT 4 brake fluid
The above two items are essential. The following items may also be needed:
Gasket for the clutch slave cylinder
Two exhaust manifold gaskets
4 crush washers
Rubber seal that fits over the pushrod
1) Parts Required / Optional
These are the parts described above
It is very easy to access the clutch slave cylinder on the ST 1100. It's right up front, directly behind the front wheel.
2) Clutch Slave Cylinder Location
If you remove the grey colour Tupperware that runs around the bottom of the bike (it is comprised of three pieces, but can be removed as one unit), you have full access to the clutch slave cylinder. At first glance, it looks like this will be a 5 minute job, because the part is only held in place by 3 bolts. Unfortunately, it is not possible to get access to the bolt on the left side of the picture below (on the right side of the motorcycle) with a normal wrench or socket... you have to disconnect the exhaust header assembly on the right side of the motorcycle and press it about half an inch downward in order to get access to that bolt.
3) The Problem Fastener
To get access to the 4 bolts that hold the right hand side exhaust header in place, you have to remove a heck of a lot of Tupperware (see photo 9 at the very end of this post), and then the heat shield over the header, and finally a mounting bracket that blocks removal of the heat shield.
4) Three bolts holding heat shield have been removed
Once you have the exhaust header heat shield out of the way, you can remove the bolts that hold the exhaust header in place. Take a look at the picture directly above, and you will see that there is a little gap between the engine block and the two (rusted) plates that hold the header & header gaskets into the recess in the engine block. I suggest that before you attempt to loosen the nuts that hold the header attached to the engine block, you spray a whole lot of PB Blaster, WD 40, or some other penetrating oil into that gap and let it run downwards over the studs that you see in the picture below.
Take care not to let the penetrating fluid spray upwards onto the studs, because the studs are actually threaded into the block. I didn't have any such penetrating fluid available when I did this work at an oasis in the south of Morocco, and it was very difficult to remove the nuts. As you can see in the photo below, one of the studs (rear one on the foremost cylinder) unscrewed from the block.
Once you have the four nuts removed, you can pull the header downwards about 1/4 of an inch (6 mm) to half an inch (12 mm) to free the header from the recess it fits into on the engine block. That will give you sufficient clearance at the front of the engine to remove that third "problem" fastener that holds the clutch slave cylinder in place.
5) Right Side Header, bolts removed, pulled downwards about half an inch
Before you remove the three small bolts that hold the clutch slave cylinder in place, disconnect the hydraulic line from the part. When you do this, all the fluid in the hose will drain out, so, have a container ready to catch the fluid.
Now remove the three bolts holding the clutch slave cylinder in place. You can use a screwdriver, as shown below, to gently pry the cylinder forward and release it from the engine. You can also fit the screwdriver behind the bleed nipple and pry forward there. I didn't have any difficulty removing the cylinder - it had been there for 17 years.
6) Prying the cylinder off the engine
When the cylinder cover popped off, some parts that were included with the new clutch slave cylinder kit still remained inside the engine. I just lifted them out with my fingers. The original gasket was in excellent condition, so, I did not bother to replace it, even though I had a new gasket on hand.
7) A few bits of the slave cylinder assembly remained behind - just lift them out
There is a small groove at the bottom of the recess that the slave cylinder assembly fits into. There is also a small notch behind the gasket (not visible in the photo below) that is there to enable any fluid that drains into that recess to drain out the front of the engine case. It is very important that you ensure that the recess is clean & free of debris, and that the notch behind the gasket is open to allow fluid to drain.
If, in the future, the new slave cylinder develops an internal leak, any brake fluid that leaks out of it will then flow down into the recess at the bottom and flow out through the little gap behind the gasket. This will indicate to you that you have had a failure within the slave cylinder assembly.
8) Keep this fluid pathway open!
In the photo above, you can see a rubber ring surrounding the push-rod. I bought a spare for that part (shown in the bottom middle of the first photo above), but, like the gasket, it was in surprisingly good condition, so I left it alone and did not install the spare.
Installing the new part is simple: Just install it, tighten the three bolts (don't overtighten them, remember, the engine case is aluminum, not steel), then hook up the hose to the new unit, and now you are ready to bleed the system.
There is a bleed valve on the top of the slave cylinder - its position is obvious. Start bleeding there, at that valve, by taking the cover off the clutch master cylinder and adding new DOT 4 brake fluid. My experience was that I felt no resistance at all at the clutch lever when I pumped it, but I was able to fill the hydraulic line with fluid and eventually get all the bubbles out... that took about 100 compressions of the clutch lever. Very little fluid moved down the line with each compression.
The next step, which is not documented in the service manual and has been a source of headaches and great frustration to many owners (see post #21 this discussion for a description of the problem I encountered, and posts #23 and #24 on the same discussion for the solution that PaulCB and ST-ABSU provided me with) is to bleed the clutch hydraulic system at the banjo fitting of the clutch master cylinder.
It seems that it doesn't help to just turn the handlebars so that the clutch reservoir is level, you need to crack the banjo bolt up at the connection to the master cylinder to get trapped air out of there. You only have to crack the bolt a tiny bit (about 1/4 of a turn, no more), and then slowly operate the clutch lever. You will then see a whole whack of bubbles come out of the banjo fitting, and after you have tightened up the banjo fitting, you'll see a stream of bubbles coming up from the compensating port of the clutch master cylinder. Then, all of a sudden, you will feel normal resistance when you pull the clutch lever in.
This article assumes that the reader knows how to bleed brake (& clutch) systems, so, I won't go into detail about protecting the paint from the brake fluid, etc. It is noteworthy that very little fluid needs to be drained out at the master cylinder banjo bolt to get rid of the air in the system at that location. I just stuffed a facecloth underneath the banjo bolt (between the lower part of the banjo bolt and the handlebar tube), and that was sufficient to absorb the wee bit of fluid I needed to bleed out in order to get rid of air trapped in the master cylinder's piston. But, if you value the paint on your false fuel tank cover, take the time to thoroughly protect it before you crack that banjo bolt.
Once you have bled the air out of the master cylinder piston by cracking the banjo bolt holding the hose onto the end of the master cylinder, you will then have normal resistance when you pull the clutch lever, and you can finish bleeding any air that remains in the hose and in the slave cylinder via the bleed port on the slave cylinder. Only a few strokes of the clutch lever will be required, and you will see that you get a very large quantity of fluid expelled from the slave cylinder bleed valve, compared to what you got when you were pulling the clutch lever and feeling no resistance.
Once the bleeding is complete, you just put the right exhaust header back in place (change the two gaskets if you can get them out - I couldn't get them out), secure the header with the four bolts. There is a special procedure for re-installing these bolts: Tighten them in pairs (each cylinder) to 10 N·m torque (very little torque!), then tighten the two cylinders one at a time again to 17 N·m torque (that's not any more torque than what you could apply to a screwdriver using your non-dominant hand). Don't over-torque them!
Now, put the heat shield back in place, secure the heat shield with its fasteners, put that small bracket highlighted in photo 4 ("these two also have to be removed") back in place, and then put all the Tupperware back together.
I was concerned that the motorcycle might lurch forward when I started it, perhaps because I had done something wrong and the clutch was still engaged when I had the clutch lever pulled in. So, before I started the motorcycle for the first time, I rolled it up against a building, nose first with the front wheel against the building wall, and started it in that position. The clutch worked perfectly.
It took me about 3 hours to do this job, but that was with no prior experience and with no tools other than what I had in my travel kit.
9) The oasis where I did the work, in Southern Morocco
All that Tupperware has to come off to get access to the right hand header - there ain't no escaping this level of disassembly.
Epilogue
Unfortunately, replacing the clutch slave cylinder did not solve my problem. The moto still wants to creep forward when the clutch is pulled in. The creeping problem only arises when the engine is warm, it is not present with a cold (newly-started) engine.
I now know that whatever is causing this problem, it is not the clutch master cylinder, air in the system, or the clutch slave cylinder.
The Service Manual for the ST 1100 lists the following potential problems, in this order, if the moto wants to creep forward with the clutch pulled in:
1) Warped plate
2) Loose clutch lock nut
3) Oil too high, improper viscosity, or additive used ['additive' implies that energy conserving oil has been used in the engine]
4) Air in system
5) Low fluid level
6) Leaking or sticking hydraulic system.
I can rule out items 4, 5, and 6 based on the work that has already been done. Item 3 is a possibility - the oil level is correct, and the present oil specification (both viscosity and non-energy conserving) is correct, but it is possible that my Honda dealer may have put the wrong type of oil into the engine in the past. Not likely, but possible.
There is also a chance that the 17 year old clutch hydraulic hose is getting weak and swelling a bit when pressure is applied. It's also possible that the pin that fits into the slave cylinder and pushes the clutch assembly inwards (visible in photo 8) might be shorter than spec due to wear. I doubt that item 2 in Honda's list (loose clutch lock nut) is the cause, simply because it is very difficult to release that nut, it is attached with several procedures to prevent it from loosening.
Next, I'm going to change the clutch plates, and replace the pin that is visible in photo 8. The pin is cheap, I don't think it is the cause of the problem but it is something I can rule out easy enough by replacing it. My clutch operates just fine so far as propelling the motorcycle forward is concerned, but if improper oil has been used in the past, I don't know how long - if ever - it will take for the problem caused by oil additives to wash away. The bike has 200,000 km (125,000 miles) on it with the original clutch, so, replacing the clutch plates is probably a good idea just from a preventative maintenance point of view.
If I could get hold of a new clutch hose, I would install one. The hose is no longer available from Honda. I wrote Galfer last month, and asked them if I could buy a clutch hose (rather than a complete kit to replace every hose on the motorcycle), but they did not reply to me. If anyone knows where I can get a new clutch hose, please let me know.
Michael
Last edited:
")