
MileHigh
Juvenile delinquent
This article and related pictures where performed on a 2006 ST1300, non ABS.
Fluid replacement for ABS models is exactly the same.
This article is for fluid replacement only. If you have clutch problems or, need to replace clutch components, those should be be taken care of first.
Service interval is every 12,000 miles or 2 years. Whichever comes first. YMMV
This procedure can be performed by one person. A second person is an added bonus.
Although not required, it is advisable to have-
*A basic understanding of hydraulic clutch systems.
*A basic understanding of the ST1300 hydraluic clutch system
* A Service manual. Honda manual preferred. **Even with it's faults.**
Tool list
This article utilizes an air operated vacuum pump LINKY This model does require a decent air compressor with at least a 20 gal. tank and, able to produce 4.3 SCFM @ 90 PSI.
A hand operated vacuum pump will work just as well. LINKY Your hand and wrist will get tired after a while though.
Long Phillips screwdriver
10mm, 6 point box end wrench
5mm Allen hex bit
Pocket screwdriver
Also, a 2 foot length of 1/4? aquarium tubing. Visit your local pet store for this.
Materials list
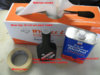
1 (one), sealed, new 12oz bottle of Honda DOT 4 brake fluid. Do not use brake fluid from a previously opened container. It will have absorbed moisture.
Shop rags or towels. Don't use kitchen paper towels. They don?t hold up and have lots of lint
Denatured alcohol
Masking tape
Fender covers or large beach/bath towels and, large plastic trash bags. The plastic bags can be placed over the fender covers or towels for excellent paint protection.
This article differs slightly from the service manual but, will accomplish the same result.
Differences in the service manual are -
A pressure bleeder is shown being used on the clutch master cylinder reservoir. Good luck finding an adapter, for the clutch reservoir, to utilize a pressure bleeder.
I finished the vacuum bleed with a manual bleed since, the clutch lever had waaaaaaay too much free travel and, the clutch disengaged way too early.
The clutch lever felt very mushy after the fluid replacement with the vacuum bleed and, required a quick, 2 step manual bleed.
Lets get started.
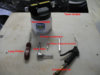
Here is all the tools you need. Both for panel removal and bleeding. Only item not shown is a 2 foot length of aquarium tubing from your local pet store. Tubing is listed in the "Tool list."

Materials needed

You only have to remove one panel!! The left lower cowl

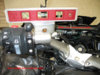
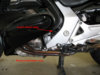
Component location


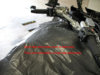
Cover that painted tank! Use a plastic trash bag as well.

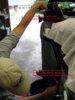
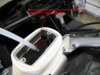
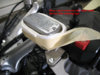
Turn handle bars towards the right to level clutch master cylinder reservoir

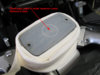
Wipe any dirt/dust from reservoir & cover

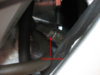
Clean any dirt/dust from under bleed screw cap

Wrap the clutch fluid reservoir with a shop towel. Secure with masking tape

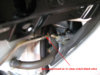
Connect extraction hose to bleeder

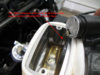
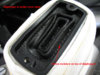
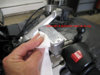
Remove reservoir cover

Diaphragm plate is under cover

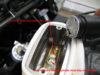
Diaphragm is under cover plate. Notice moisture, it will be cleaned later

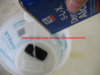
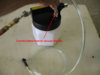
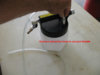
Turn on vacuum bleeder, remove old fluid from reservoir

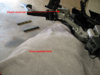
Suck out any crud on sides and bottom of reservoir

Refill with fresh fluid

Connect bleed hose attachment to bleeder

Ready to bleed. Install 10mm, 6 point wrench over bleed screw. Place rubber boot over bleed screw.

Start bleeding. Don't allow reservoir to run empty!


When done vacuum bleeding, fill reservoir to proper level
Clean reservoir cover, diaphragm plate & diaphragm with denatured alcohol

At this point, I reinstalled diaphragm, diaphragm cover plate and, reservoir cover.
I checked "feel" of clutch lever and, started the bike to check operation.
The lever felt like it had too much free travel "mushy feel" and, the bike wanted to launch with almost zero clutch travel!!
I followed up with a manual "finish" bleed.
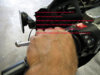
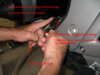
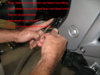
To perform the manual "finish" bleed, install your 10mm wrench on the bleed screw. Next, attach a 2 foot length of aquarium tubing to the clutch bleed screw.
Pump the clutch lever until you feel resistance. Hold the lever against the resistance.
Open the bleed screw slightly until the clutch lever starts to close (pull closer.)
Repeat a couple of times until the clutch lever feels correct. A nice, smooth, full pull with complete clutch disengagement. You might even want to start the bike to double check.
The clutch lever should have minimal free travel. I could not find any specs in the service manual nor, owners manual.
After properly done, it appears to have 1/8 - 1/4" free travel.
Manual "finish" bleed needed to complete fluid replacement


Remove reservoir cover and, fill clutch reservoir to proper level after after manual "finish" bleed.
Go ride!
Fluid replacement for ABS models is exactly the same.
This article is for fluid replacement only. If you have clutch problems or, need to replace clutch components, those should be be taken care of first.
Service interval is every 12,000 miles or 2 years. Whichever comes first. YMMV
This procedure can be performed by one person. A second person is an added bonus.
Although not required, it is advisable to have-
*A basic understanding of hydraulic clutch systems.
*A basic understanding of the ST1300 hydraluic clutch system
* A Service manual. Honda manual preferred. **Even with it's faults.**
Tool list
This article utilizes an air operated vacuum pump LINKY This model does require a decent air compressor with at least a 20 gal. tank and, able to produce 4.3 SCFM @ 90 PSI.
A hand operated vacuum pump will work just as well. LINKY Your hand and wrist will get tired after a while though.
Long Phillips screwdriver
10mm, 6 point box end wrench
5mm Allen hex bit
Pocket screwdriver
Also, a 2 foot length of 1/4? aquarium tubing. Visit your local pet store for this.
Materials list
1 (one), sealed, new 12oz bottle of Honda DOT 4 brake fluid. Do not use brake fluid from a previously opened container. It will have absorbed moisture.
Shop rags or towels. Don't use kitchen paper towels. They don?t hold up and have lots of lint
Denatured alcohol
Masking tape
Fender covers or large beach/bath towels and, large plastic trash bags. The plastic bags can be placed over the fender covers or towels for excellent paint protection.
This article differs slightly from the service manual but, will accomplish the same result.
Differences in the service manual are -
A pressure bleeder is shown being used on the clutch master cylinder reservoir. Good luck finding an adapter, for the clutch reservoir, to utilize a pressure bleeder.
I finished the vacuum bleed with a manual bleed since, the clutch lever had waaaaaaay too much free travel and, the clutch disengaged way too early.
The clutch lever felt very mushy after the fluid replacement with the vacuum bleed and, required a quick, 2 step manual bleed.
Lets get started.
Here is all the tools you need. Both for panel removal and bleeding. Only item not shown is a 2 foot length of aquarium tubing from your local pet store. Tubing is listed in the "Tool list."
Materials needed
You only have to remove one panel!! The left lower cowl
Component location
Cover that painted tank! Use a plastic trash bag as well.
Turn handle bars towards the right to level clutch master cylinder reservoir
Wipe any dirt/dust from reservoir & cover
Clean any dirt/dust from under bleed screw cap
Wrap the clutch fluid reservoir with a shop towel. Secure with masking tape
Connect extraction hose to bleeder
Remove reservoir cover
Diaphragm plate is under cover
Diaphragm is under cover plate. Notice moisture, it will be cleaned later
Turn on vacuum bleeder, remove old fluid from reservoir
Suck out any crud on sides and bottom of reservoir
Refill with fresh fluid
Connect bleed hose attachment to bleeder
Ready to bleed. Install 10mm, 6 point wrench over bleed screw. Place rubber boot over bleed screw.
Start bleeding. Don't allow reservoir to run empty!
When done vacuum bleeding, fill reservoir to proper level
Clean reservoir cover, diaphragm plate & diaphragm with denatured alcohol
At this point, I reinstalled diaphragm, diaphragm cover plate and, reservoir cover.
I checked "feel" of clutch lever and, started the bike to check operation.
The lever felt like it had too much free travel "mushy feel" and, the bike wanted to launch with almost zero clutch travel!!
I followed up with a manual "finish" bleed.
To perform the manual "finish" bleed, install your 10mm wrench on the bleed screw. Next, attach a 2 foot length of aquarium tubing to the clutch bleed screw.
Pump the clutch lever until you feel resistance. Hold the lever against the resistance.
Open the bleed screw slightly until the clutch lever starts to close (pull closer.)
Repeat a couple of times until the clutch lever feels correct. A nice, smooth, full pull with complete clutch disengagement. You might even want to start the bike to double check.
The clutch lever should have minimal free travel. I could not find any specs in the service manual nor, owners manual.
After properly done, it appears to have 1/8 - 1/4" free travel.
Manual "finish" bleed needed to complete fluid replacement
Remove reservoir cover and, fill clutch reservoir to proper level after after manual "finish" bleed.
Go ride!
Attachments
-
 10106.jpg84.5 KB · Views: 773
 -
 10107.jpg70.8 KB · Views: 707
 -
 10108.jpg58.3 KB · Views: 694
 -
 10111.jpg65.4 KB · Views: 693
 -
 10112.jpg79.4 KB · Views: 701
 -
 10113.jpg77.9 KB · Views: 748
 -
 10114.jpg78.9 KB · Views: 718
 -
 10115.jpg55.4 KB · Views: 663
 -
 10116.jpg75.2 KB · Views: 644
 -
 10117.jpg68.2 KB · Views: 654
 -
 10118.jpg73.2 KB · Views: 618
 -
 10119.jpg88.4 KB · Views: 613
 -
 10120.jpg58.2 KB · Views: 592
 -
 10121.jpg63.8 KB · Views: 590
 -
 10122.jpg47.6 KB · Views: 586
 -
 10123.jpg82.1 KB · Views: 604
 -
 10124.jpg72 KB · Views: 654
 -
 10125.jpg79.1 KB · Views: 609
 -
 10126.jpg88.5 KB · Views: 606
 -
 10127.jpg78.2 KB · Views: 585
 -
 10128.jpg46.6 KB · Views: 614
 -
 10129.jpg81 KB · Views: 626
 -
 10130.jpg95.8 KB · Views: 583
 -
 10131.jpg96.7 KB · Views: 569
 -
 10132.jpg71.8 KB · Views: 563
Last edited by a moderator:


