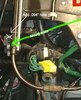
So, after beginning to have the seemingly common issue of the screen on my bike going up, but not down, I tore the front upper fairing off and decided i was determined to fix this.
I checked my voltages / grounds at the plugs for the up and down relays. Verified that I wasnt getting voltage to energize the relay coil on the down side, even with the switch depressed.
I took apart the left grip pod, and ohm'd through the switch at the bar. It checked good. That left my down limit switch as the only culprit.
These switches are tiny. I was hesitant to break one open, as it would likely mean a new $400 assembly if I was wrong, or physically broke it.
But, my determination to be a cheapskate won out...
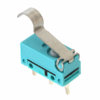
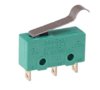
I (gently) pried the "top" portion (with the mechanical arm) off of the switch. (Be very careful, as the little "tabs" on the corners that hold it on are easily broken.)
After getting the switch apart, I lightly sanded both sides of the "clicky" portion of the contact (that looks like it would be the problem area) and reassembled it, thinking I fixed it. No dice. Still no movement and no voltage at the relay coil.
I took the switch all the way apart this time, to figure it out.
In the photos below, you'll see the inner workings of the microswitch and how it works. The "spring" for lack of a better term acts as a part of the circuit.
When the windshield assembly moves down (or up) it depresses the silver lever outside the switch. This pushes in on a small black plastic tab that passes through the green housing, and pushes down on the middle of the spring/conductor, causing it to make contact and "click".
The small curved section of the spring/contact makes contact with the center "post" inside the switch, being held there in tension by the other end going around the "post" on the end of the switch. (This "post" is not part of the circuit)
The center "post" that the curved part of the spring goes against, is where the corrosion was in my case.
I cleaned it well with contact cleaner and a wire brush (gently).
I gently reassembled the switch, and reinstalled the switches on the drive assembly.
Viola! She works like a champ now.
Here are some illustrations, so you can see what you are getting into before attempting this...
First, the diagram I used...
Windshield Wiring Diagram


Hope this helps save some folks some money. (It certainly saved me $400).
-Tim
I checked my voltages / grounds at the plugs for the up and down relays. Verified that I wasnt getting voltage to energize the relay coil on the down side, even with the switch depressed.
I took apart the left grip pod, and ohm'd through the switch at the bar. It checked good. That left my down limit switch as the only culprit.
These switches are tiny. I was hesitant to break one open, as it would likely mean a new $400 assembly if I was wrong, or physically broke it.
But, my determination to be a cheapskate won out...
I (gently) pried the "top" portion (with the mechanical arm) off of the switch. (Be very careful, as the little "tabs" on the corners that hold it on are easily broken.)
After getting the switch apart, I lightly sanded both sides of the "clicky" portion of the contact (that looks like it would be the problem area) and reassembled it, thinking I fixed it. No dice. Still no movement and no voltage at the relay coil.
I took the switch all the way apart this time, to figure it out.
In the photos below, you'll see the inner workings of the microswitch and how it works. The "spring" for lack of a better term acts as a part of the circuit.
When the windshield assembly moves down (or up) it depresses the silver lever outside the switch. This pushes in on a small black plastic tab that passes through the green housing, and pushes down on the middle of the spring/conductor, causing it to make contact and "click".
The small curved section of the spring/contact makes contact with the center "post" inside the switch, being held there in tension by the other end going around the "post" on the end of the switch. (This "post" is not part of the circuit)
The center "post" that the curved part of the spring goes against, is where the corrosion was in my case.
I cleaned it well with contact cleaner and a wire brush (gently).
I gently reassembled the switch, and reinstalled the switches on the drive assembly.
Viola! She works like a champ now.
Here are some illustrations, so you can see what you are getting into before attempting this...
First, the diagram I used...
Windshield Wiring Diagram
Hope this helps save some folks some money. (It certainly saved me $400).
-Tim
")