Article [13] ST1300 - LED Mirrors - Now you get noticed with STYLE

DakotaJoe

You can call me Scott
Joined
Sep 18, 2009
Messages
37
Location
Way Southern Arizona
Bike
Honda ST1300
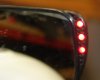
I love this mod. Not only is it safety oriented, it looks spectacular! One of my biggest concerns has always been that I can be seen. Especially at night. And I have had my share of being cut off because someone didn't see my signal. So that is why I figured I would put the 3 LEDs in each mirror at the farthest edge so I get noticed.

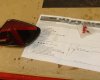
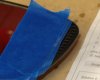
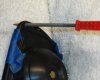
Take off the mirrors and clean them well. Tape off the edge where you will be drilling, you don't want to slip or have the drill jump out of the hole and damage the glass.

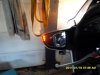
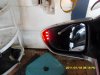
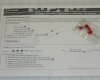
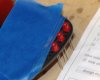
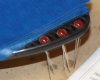
I placed the LEDs in by their leads just to check the look and found the holes that I wanted filled with LED light.

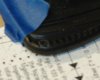
I used my dremel and a small carbide bit to ream out the ovals into nice circles. I drilled these out from behind because the front hole is smaller than the rear. I finished the rough work and then cleaned things up with a round file.

The file leaves some gray fuzzy residue around the holes. No biggy, a quick flash of a lighter from behind smoothes that right out.

The holes should be big enough where the LED is snug but not not work itself back out. This will actually happen if the hole is too small.

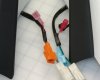
Before gluing anything, check the polarity of the LEDs to make sure they are going to work and attach to each other without crossing wires all over the place. Not all LEDs are polarity minded. I wasn't aware of that until I hooked these up. Must be a Chinese Diode thing because these worked no matter how I hooked them up.

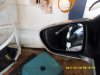
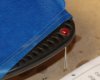
I wiped the holes and LED with a wet rag because I used superglue around the rim of the LEDs to secure them and water activates superglue. If you use too much glue, it will ooze out the sides and make a white residue. You don't want that so don't do it.

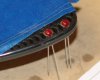
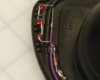
I let it sit for a few hours because I hate gluing my fingers together. I then used some small pliers to bend the leads where I wanted them and soldered everything together. You have to use a 120 ohm resistor on the positive side because 3 LEDs tied in serial will not last with 12V pooring through them.

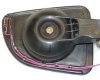
I glued the wires to the back of the mirrors with hot glue. I attached solderless connectors to the wires and they were done. The negative wire would go to the bolt for ground and the other would attach to the orange or light blue wire in the mirror housing.

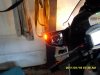
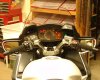
On to the mirror housing. I shaved off a small bit of the insulation on the signal wire (orange or light blue) and soldered a small piece of wire to it. Then connected the corresponding solderless connector to the wire. A little electrical tape and we were ready to test. Once you check them out, put your mirrors back on your bike and you'll look as cool as me going down the street.....okay, maybe not as cool, but you will be on your way. :)

I have posted more pictures with more descriptions and a bit of a numbering system in the event someone wants to try this out. See my albums for this and other modifications.

Related Links:
LED series/parallel array wizard-http://led.linear1.org/led.wiz
 

Attachments

Last edited by a moderator:

sirepair

Let's RIDE!
Site Supporter
Joined
Jun 7, 2007
Messages
3,233
Location
Chillicothe, Ohio
Bike
2003 ST1100P
STOC #
7105
Re: LED Mirrors - Now you get noticed with STYLE

Nicely done and a great write-up! Thanks for sharing!!
 

Stump

Site Supporter
Joined
Jun 29, 2008
Messages
443
Location
Las Vegas, Nv
Bike
VFR1200X
STOC #
7591
Re: LED Mirrors - Now you get noticed with STYLE

Great tutorial!! Thanks for the extra work!!
 
Joined
Mar 16, 2008
Messages
308
Location
Brakpan, South Africa
Bike
2004 ST1300ABS
STOC #
7481
Re: ST1300-LED Mirrors - Now you get noticed with STYLE

Thanks Joe
This was a concern to me too.
I copied what you did and here are my results

Had to change them from red to orange cause here in South Africa we use orange to indicate turning direction.

Big thanks
 

Attachments

OP
OP
DakotaJoe

DakotaJoe

You can call me Scott
Joined
Sep 18, 2009
Messages
37
Location
Way Southern Arizona
Bike
Honda ST1300
Re: ST1300-LED Mirrors - Now you get noticed with STYLE

Those look great!.. I had no idea about the orange. Does that mean the front and rear turn signals are also orange?
 
Joined
Mar 16, 2008
Messages
308
Location
Brakpan, South Africa
Bike
2004 ST1300ABS
STOC #
7481
Re: ST1300-LED Mirrors - Now you get noticed with STYLE

Yes in SA we indicate via orange coloured lenses front and rear. Avoids confusion when they are also pulsing as per normal.
I really like the led conversion. Thanks
 
Joined
Jul 30, 2007
Messages
48
Location
Webster, NY
Bike
ST1300
Re: ST1300-LED Mirrors - Now you get noticed with STYLE

Very Nice !!!
Now I have a winter project.
 
Joined
Aug 25, 2009
Messages
3
Location
Princeton, Illinois
Bike
1996 ST-1100
Re: ST1300-LED Mirrors - Now you get noticed with STYLE

Nice Mod, where did you purchase the parts? Looks like a great winter project!
 
Joined
Aug 1, 2006
Messages
317
Location
Alexandria, VA
Bike
2013 K1600GTL
STOC #
6612
Re: ST1300-LED Mirrors - Now you get noticed with STYLE

+1 Where did you get the leds, resisters and solderless connectors?

JD
 
OP
OP
DakotaJoe

DakotaJoe

You can call me Scott
Joined
Sep 18, 2009
Messages
37
Location
Way Southern Arizona
Bike
Honda ST1300
Re: ST1300-LED Mirrors - Now you get noticed with STYLE

That is what I did. I just picked the parts up from the local electronics parts store...I did however have to buy 200 of the resistors because they did not sell them individually. Need a couple? Send a PM with your address and I will drop them in an envelope.
 
Joined
Jan 28, 2005
Messages
193
Location
Owasso, Ok.
Bike
2014 Kawasaki C14
STOC #
445
Re: ST1300-LED Mirrors - Now you get noticed with STYLE

I hope they gave you a good price. The pair I bought were like .60 each.
 
OP
OP
DakotaJoe

DakotaJoe

You can call me Scott
Joined
Sep 18, 2009
Messages
37
Location
Way Southern Arizona
Bike
Honda ST1300
Re: ST1300-LED Mirrors - Now you get noticed with STYLE

They did, I don't think I paid $5 for the whole lot. That is why I don't mind sending them out to askers.
 
Joined
Aug 6, 2007
Messages
4,216
Age
49
Location
Grant, MN (aka Stillwater)
Bike
ST1100 & ST1300
STOC #
6145
Re: ST1300-LED Mirrors - Now you get noticed with STYLE

Well I just did the hard part. The holes have been drilled and filed. I test fitted my LEDs and it looks good. I went with a high intensity Amber LED I need to get them stuck in there and bust out the hot glue gun to glue it up to finish this Farkle.
 

ourside

Bob & Tricia
Joined
Nov 26, 2009
Messages
42
Location
Buena Park, CA
Bike
03 ST1300
Re: ST1300-LED Mirrors - Now you get noticed with STYLE

Looks great, got to do this mod to my bike..
 
Joined
Dec 26, 2010
Messages
12
Location
Sidney, BC
Bike
05 ST-A
STOC #
8349
Just performed this mod yesterday...took me about 4 hours, not including time to research, purchase parts, etc. I also added a fourth dash light to each side of the circuit as described in another thread elsewhere on this forum. Great addition, since it required little extra time and resources, but it did lead to a slight problem, see below.

Great, clear instructions led to an easy install. Here are a couple of things I had to figure out, and some observations.

1. Not sure how visible the lights are from my blind-spot, as suggested earlier. Now that the lights are installed, and my bike on its centre stand, lights in mirrors are hard to see without moving into 'my lane', or back to where the rear indicators are already visible. I have considered heating my mirror covers to bend them out on the outer edge, but don't think I would have the gonads to heat expensive painted parts.

2. LED's that I installed are all water clear, but emit different wavelengths in service. I like this as it avoids the double red pimples on my dash light, and the lights in my mirror housing are virtually invisible until lit.

3. When gluing in LEDs using cyanoacrylate glue, allow a small drop to be added to the lights while housed in place, and from above the plastic that will show after install. Otherwise, the glue will seep downwards and collect where the glue will show after install (don't ask.) Same is true for the dash lights.

4. I drilled out holes with a 3/16" drill, which produces a nice round hole the right size for a perfect fit of the 5 mm LEDs that I used. When drilling the dash I placed a piece of masking tape on the sloping lip of the dash, found the centre by referencing the dash mounting holes (I had to remove the windshield, dash cover etc. to easily wire these lights) and then marked the vertical centre of the lip, about 3" either side of centre, which produced mounting holes directly over the dash lights...looks great, lights are identical colour compared to dash lights, but reflect nicely in the windshield as a reminder for errant turn indicator cancellor (me.)

5. The instructions were clear, and I appreciated the photos. The only one that was missing was one showing the connection to the bikes harness. I have included one of mine. The SAE connector is to the dash light, in series, to allow an easy disconnect. Note the white wire to ground on the mirror mounting bolt.

6. My LEDs produced between 1.6 and 1.9V measured with my multimeter, as opposed to the 3V 'standard' suggested in the LED Center webpage. In their calculator, 4 lights of 2V require a 220 Ohm resistor. I used two 120 Ohm resistors in series...which allowed for the rounding off of the LED voltage, and a slight upward surge above 12V from the bike's source. I played with the calculator to get a feel for the way that the number of lights, light voltage and source voltage would affect the resistor required, which helped.

Only had one problem...when I flipped on my indicator after a rough install, and before buttoning up my plastic, nothing...sh*t. Considered ripping out the whole thing for a minute, then decided that the problem must be either the wire tap...ripped that off to find copper showing, nope...or I reversed the polarity of the dash light (the only one that I could not easily check.) Snipped off the light, reversed poles on the wiring, flipped on my indicator, and voila...Checked the other side's dash light by plugging into the errant, now working side, and all was well there.
I had forgotten that the lights have a small flat on the base of the light, to indicate negative, or simply screwed up, in spite of my knowing that...all's well that ends well.

Thanks again for the great mod. Here is a link to my install:

https://picasaweb.google.com/stoddartbob/BikePhotos?authkey=Gv1sRgCMuMnoHKn9eWPQ#5582221897773461490
 
OP
OP
DakotaJoe

DakotaJoe

You can call me Scott
Joined
Sep 18, 2009
Messages
37
Location
Way Southern Arizona
Bike
Honda ST1300
Just performed this mod yesterday...took me about 4 hours, not including time to research, purchase parts, etc. I also added a fourth dash light to each side of the circuit as described in another thread elsewhere on this forum. Great addition, since it required little extra time and resources, but it did lead to a slight problem, see below.

Great, clear instructions led to an easy install. Here are a couple of things I had to figure out, and some observations.

1. Not sure how visible the lights are from my blind-spot, as suggested earlier. Now that the lights are installed, and my bike on its centre stand, lights in mirrors are hard to see without moving into 'my lane', or back to where the rear indicators are already visible. I have considered heating my mirror covers to bend them out on the outer edge, but don't think I would have the gonads to heat expensive painted parts.

2. LED's that I installed are all water clear, but emit different wavelengths in service. I like this as it avoids the double red pimples on my dash light, and the lights in my mirror housing are virtually invisible until lit.

3. When gluing in LEDs using cyanoacrylate glue, allow a small drop to be added to the lights while housed in place, and from above the plastic that will show after install. Otherwise, the glue will seep downwards and collect where the glue will show after install (don't ask.) Same is true for the dash lights.

4. I drilled out holes with a 3/16" drill, which produces a nice round hole the right size for a perfect fit of the 5 mm LEDs that I used. When drilling the dash I placed a piece of masking tape on the sloping lip of the dash, found the centre by referencing the dash mounting holes (I had to remove the windshield, dash cover etc. to easily wire these lights) and then marked the vertical centre of the lip, about 3" either side of centre, which produced mounting holes directly over the dash lights...looks great, lights are identical colour compared to dash lights, but reflect nicely in the windshield as a reminder for errant turn indicator cancellor (me.)

5. The instructions were clear, and I appreciated the photos. The only one that was missing was one showing the connection to the bikes harness. I have included one of mine. The SAE connector is to the dash light, in series, to allow an easy disconnect. Note the white wire to ground on the mirror mounting bolt.

6. My LEDs produced between 1.6 and 1.9V measured with my multimeter, as opposed to the 3V 'standard' suggested in the LED Center webpage. In their calculator, 4 lights of 2V require a 220 Ohm resistor. I used two 120 Ohm resistors in series...which allowed for the rounding off of the LED voltage, and a slight upward surge above 12V from the bike's source. I played with the calculator to get a feel for the way that the number of lights, light voltage and source voltage would affect the resistor required, which helped.

Only had one problem...when I flipped on my indicator after a rough install, and before buttoning up my plastic, nothing...sh*t. Considered ripping out the whole thing for a minute, then decided that the problem must be either the wire tap...ripped that off to find copper showing, nope...or I reversed the polarity of the dash light (the only one that I could not easily check.) Snipped off the light, reversed poles on the wiring, flipped on my indicator, and voila...Checked the other side's dash light by plugging into the errant, now working side, and all was well there.
I had forgotten that the lights have a small flat on the base of the light, to indicate negative, or simply screwed up, in spite of my knowing that...all's well that ends well.

Thanks again for the great mod. Here is a link to my install:

https://picasaweb.google.com/stoddartbob/BikePhotos?authkey=Gv1sRgCMuMnoHKn9eWPQ#5582221897773461490
Glad everything worked out. The install looks great!
 
Joined
Jul 15, 2010
Messages
55
Location
So Cal
Bike
ST1300
STOC #
4018
Your two bikes look gorgeous! Great pictures.
Sold the ST1100... should have kept it, but storage space get's to be an issue when you have four bikes already and no more room in the existing garage.
http://home.ix.netcom.com/~tinkler/ST2.htm

Also sold my 2001 VFR800Fi last year. Should have kept that one too...
http://home.ix.netcom.com/~tinkler/VFR.html

and the 1992 CB750 NightHawk... and...
http://home.ix.netcom.com/~tinkler/NHawk.htm

Great shot of me riding the VFR and ST11
http://www.photosbytink.com/rockstorephotos/

TINK
 
Top Bottom