treemuncher
Vegetation Terrorist
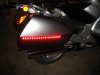
In my never ending quest to farkelize my ride in a unique and safer fashion, I found some 15" long 18 led light strips at Walmart. I did a search on the site for an install like this but I found nothing. So, I will share my thoughts and ideas so that I may save others time and trouble if they desire to add the same farkelization.
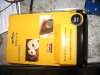
My original purchase was from the clearance rack and I had to go to a larger city Walmart to find a matching light strip. The batteries that power the "try me" switch also fit some electronic calipers - that helps offset the cost of the item in future savings.

These fit perfectly on the sides of the saddlebags and the red lights are perfect markers for the rear of the bike.

The only problem I have is that I don't want to disconnect wires every time I remove the bag. So, why not build a quick disconnect for the power into the bag mounting system?

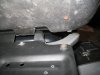
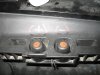
The 2 rubber pads on top of the saddlebags are the perfect location and they are electrically insulated. The top clamp that pushes down on these pads is metal and is grounded to the frame, already. 50% of the problem is solved. A paper thin strip of copper soldered onto a power wire and dielectrically glued to the clamp solves the other 50%.

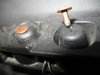
The rubber stops were removed, then drilled out to accept the wires & rivets, pads were re-installed, wired through the pads and copper rivets for the contacts were soldered to the ends of the wires. The copper rivets were then installed into the drilled out holes in the rubber stops.

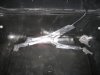
The wiring inside the saddlebags was secured with my favorite metal duct seal tape (strong stuff). I only had to drill one hole in each bag where the wiring from the light strip had to enter the inside of the bag.

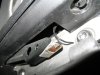
There is an existing factory hole just large enough to get the wiring through underneath the rubber pads. Disconnect the inner bag limit strap and secure the wiring with the bags WIDE open. Run the wiring through the little loops at the bottom of the bag hinge and this will keep the wiring guided during opening and closing of the bags. This will be the only part of my wiring that is exposed. The rest is secured underneath the tape for a clean install.
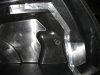
Everything worked out real slick. The only problem I encountered was when I used a fat copper washer to provide 12v(+) power on the bottom of the clamp mechanism. The thickness induced too much load on the double sided foam tape and eventually shorted to the clamp. A very thin, as in paper thin, strip of copper was needed to be used so as to alleviate this problem. A 0.5 or 1.0 amp fuse is also required before the power line gets to the clamp in case of a repeat of this problem. So far, so good.
I've still got to get some fuses and a fuse holder to finish my install. Other than the permanent wiring, the job is done. I hope that the glue that comes on these strips holds on for a long time. If it does not, I will search around for some better quality lighting. Advance Auto had some better strips with a lifetime warranty but they were not in stock and had a hefty price tag. Now that I know I can wire this system my way, it will be worth the investment to buy better lighting.
If you have trouble finding the copper rivets or sheeting, pm me and I can make up a kit to help you along. I've got lots of rivets and plenty of copper sheet kicking around the shop.
Maybe now it is time to install a switch and interior lighting for the hardbags????
My original purchase was from the clearance rack and I had to go to a larger city Walmart to find a matching light strip. The batteries that power the "try me" switch also fit some electronic calipers - that helps offset the cost of the item in future savings.
These fit perfectly on the sides of the saddlebags and the red lights are perfect markers for the rear of the bike.
The only problem I have is that I don't want to disconnect wires every time I remove the bag. So, why not build a quick disconnect for the power into the bag mounting system?
The 2 rubber pads on top of the saddlebags are the perfect location and they are electrically insulated. The top clamp that pushes down on these pads is metal and is grounded to the frame, already. 50% of the problem is solved. A paper thin strip of copper soldered onto a power wire and dielectrically glued to the clamp solves the other 50%.
The rubber stops were removed, then drilled out to accept the wires & rivets, pads were re-installed, wired through the pads and copper rivets for the contacts were soldered to the ends of the wires. The copper rivets were then installed into the drilled out holes in the rubber stops.
The wiring inside the saddlebags was secured with my favorite metal duct seal tape (strong stuff). I only had to drill one hole in each bag where the wiring from the light strip had to enter the inside of the bag.
There is an existing factory hole just large enough to get the wiring through underneath the rubber pads. Disconnect the inner bag limit strap and secure the wiring with the bags WIDE open. Run the wiring through the little loops at the bottom of the bag hinge and this will keep the wiring guided during opening and closing of the bags. This will be the only part of my wiring that is exposed. The rest is secured underneath the tape for a clean install.
Everything worked out real slick. The only problem I encountered was when I used a fat copper washer to provide 12v(+) power on the bottom of the clamp mechanism. The thickness induced too much load on the double sided foam tape and eventually shorted to the clamp. A very thin, as in paper thin, strip of copper was needed to be used so as to alleviate this problem. A 0.5 or 1.0 amp fuse is also required before the power line gets to the clamp in case of a repeat of this problem. So far, so good.
I've still got to get some fuses and a fuse holder to finish my install. Other than the permanent wiring, the job is done. I hope that the glue that comes on these strips holds on for a long time. If it does not, I will search around for some better quality lighting. Advance Auto had some better strips with a lifetime warranty but they were not in stock and had a hefty price tag. Now that I know I can wire this system my way, it will be worth the investment to buy better lighting.
If you have trouble finding the copper rivets or sheeting, pm me and I can make up a kit to help you along. I've got lots of rivets and plenty of copper sheet kicking around the shop.
Maybe now it is time to install a switch and interior lighting for the hardbags????
Attachments
-
 68.2 KB Views: 1,948
 -
 56.3 KB Views: 1,876
 -
 76.9 KB Views: 1,892
 -
 75.1 KB Views: 1,938
 -
 47.2 KB Views: 1,877
 -
 68.6 KB Views: 1,827
Last edited by a moderator: