( UPDATE: Turned out to be a coolant leak ) Oil leak after riding ( with pictures )

Thanks as always @SMSW , super helpful. I did try to put water on the puddle of fluid and the results seem to point towards it being oil...pic attached...
 

Attachments

  • 8640BCD1-A7B7-452A-9C6C-D9DDB8D911A3.jpeg
    8640BCD1-A7B7-452A-9C6C-D9DDB8D911A3.jpeg
    145 KB · Views: 26
Last edited:
Second thoughts ( maybe ), water beads like this on this garage floor many feet away from the motorcycle also...

In other news...the coolant reservoir seems to be completely empty...it’s hard to tell, but I believe that to be the case, pics attached for expert opinions...

Lastly, @SMSW , are the clamps in the attached pics the ones you’re referring to tightening as a path of least resistance?

Thanks as always all!
 

Attachments

  • FDF82ADF-5617-4C4C-8929-3E1FB911CC76.jpeg
    FDF82ADF-5617-4C4C-8929-3E1FB911CC76.jpeg
    153.5 KB · Views: 32
  • 52BBA5C9-A555-499A-9387-FB1FE0D6FD80.jpeg
    52BBA5C9-A555-499A-9387-FB1FE0D6FD80.jpeg
    73 KB · Views: 33
  • C3F4DDA5-61F0-4D22-BDF8-9A45AFCF281A.jpeg
    C3F4DDA5-61F0-4D22-BDF8-9A45AFCF281A.jpeg
    62.7 KB · Views: 31
  • 86968449-662B-4F59-94F5-F286C94302E0.jpeg
    86968449-662B-4F59-94F5-F286C94302E0.jpeg
    38.2 KB · Views: 32
  • D1BE42EB-9DD8-4B6A-8873-33BC759D3BEF.jpeg
    D1BE42EB-9DD8-4B6A-8873-33BC759D3BEF.jpeg
    39.9 KB · Views: 29
I decided to go ahead and remove the plastics so I could see a little better. My money is on a coolant leak, given that the reservoir seems to be bone dry.

I think my next step is to clean it all up, ride it, and see what we have?

Although maybe I need to add coolant before doing that??

Pics attached in case it’s helpful.
 

Attachments

  • 59A84616-B34C-43CA-B3F1-7EFA927B41CF.jpeg
    59A84616-B34C-43CA-B3F1-7EFA927B41CF.jpeg
    109.3 KB · Views: 41
  • 86B837BA-D670-4176-BECA-F8583FC7EE99.jpeg
    86B837BA-D670-4176-BECA-F8583FC7EE99.jpeg
    89.5 KB · Views: 42
  • 0DA84AE2-0B19-4B9C-B8E8-945E0DB15F97.jpeg
    0DA84AE2-0B19-4B9C-B8E8-945E0DB15F97.jpeg
    106.8 KB · Views: 42
  • 6F2598D5-13F6-4557-8A5B-C5F965BD7292.jpeg
    6F2598D5-13F6-4557-8A5B-C5F965BD7292.jpeg
    123.3 KB · Views: 41
  • F21C66B1-E611-45C6-9305-E15B62C8FBA2.jpeg
    F21C66B1-E611-45C6-9305-E15B62C8FBA2.jpeg
    118 KB · Views: 41
  • 3ED5CDA8-6BF9-479B-88DD-16A6F2FA38BE.jpeg
    3ED5CDA8-6BF9-479B-88DD-16A6F2FA38BE.jpeg
    109.9 KB · Views: 39
Or, if you are allergic to cleaning the whole garage floor (can't do only one area), put a clean piece of cardboard down on the floor under the bike w/ some aluminum foil or saran wrap on top of the cardboard.

Those clamps are aftermarket, not OEM. These are the so called Breeze Clamps - note they are called constant tension clamps. Your worm drive clamps are ok and cheap - I really don't know how they hold up over the long term - but a few guys have said their constant tension clamps have lasted leak free for years and years.

Yup, add coolant. BTW, I used (and others here use) Honda Type 2 AF purchased at a dealer. I priced 3 dealers w/in 20 miles of my house and got prices ranging from 19.95 to 29.95 a gallon.
 
And these are the heat shrink type. BTW, when you have a few hours, you might cruise through the McMaster-Carr catalog. They have an amazing assortment of hardware at pretty much list prices. However, their customer service is absolutely top notch. Open an account - come up with a fictitious name and tell them you are interested in cash (credit card) sales. How about Jose's Motorcycle Repairs?
 
So next steps...bearing in mind I am not remotely mechanically minded, but will try anything once...
If you are "not remotely mechanically minded", taking the bike apart to inspect and replace the coolant hoses, thermostat, etc. in the V of the engine is NOT the kind of job you want to attempt to do. Getting into the V of the engine requires major disassembly of the motorcycle - you need to take off all of the lower fairing panels, remove the upper fuel tank, remove the airbox, and remove the throttle bodies. It's a big job that requires a lot of time, a reasonably complete set of tools (including JIS screwdrivers), a Honda Service Manual for the ST 1300, and confidence in your own ability to complete a big, complex job.

You could take the moto to a Honda dealer, if you have a dealer nearby that you have confidence in. My guess is that it will take about 8 to 10 hours of labour to get the job done.

An alternative, which might be better, would be to contact a fellow forum member who has done the job themselves and make arrangements with them to do the job together with them. I don't know anyone in the San Jose area who would be interested in doing this with you. I do know that Larry (@Igofar ) in Arizona has both the skill and the equipment needed to complete this job, and I can recommend him to you without hesitation. I'm not sure exactly where in Arizona he is, you can contact him directly if you wish.

The amount of disassembly needed to correct either an oil leak (from the galley plug) or an antifreeze leak is identical. When the bike is apart, both possibilities can be investigated and corrected.

Michael
 
If you are "not remotely mechanically minded"....
I disagree to the extent that Tim is not "not remotely mechanically minded". He has already removed the fairing, and investigating a coolant leak himself will teach him a lot. Going in from the front - removing the wheel, radiator, etc. is not a big job. It will give him an excellent idea of whether the leak is accessible from this way or not, and in fact, most leaks are due to the clamps or a rotted overflow tank hose.

I have backed off larger maintenance issues myself in recent years more because I simply do not want to get involved in a big job than mechanical ability or tool ownership. That is always an option for all of us, and certainly for Tim if he feels overwhelmed.

Your suggestion of calling another, more experienced owner is an excellent one. Heck, I wish I lived closer to you.
 
You’re way too kind Peter, at best I’m someone who should know their limitations better, but is always willing to try.

I cleaned up the bike, dried it off, ran it for a few minutes and saw the leak coming from next to the square weep hole. I couldn’t tell if it came from the curved groove or out of the square hole itself. I also wasn’t sure if this was “leftovers” from before I cleaned it...

Pics attached in case they offer clues.

Next steps...buy coolant, refill what seems to be empty reservoir ( is it really as easy as adding coolant to the full line in the reservoir? ), ride a little and see if I can reproduce it a bit better...

If I can repro this as a coolant leak with some clue as to where it originates it will likely be time for the bike to visit a mechanic, hopefully I’ll have saved myself a bit by removing all the plastics and diagnosing this somewhat for them...

Thanks as always for the ongoing help, you all are amazing.
 

Attachments

  • A959D006-ED13-42CE-BA7B-09AD94EC96F3.jpeg
    A959D006-ED13-42CE-BA7B-09AD94EC96F3.jpeg
    61.6 KB · Views: 55
  • C2DEC8D5-131C-481E-B8CD-8B4120537BAD.jpeg
    C2DEC8D5-131C-481E-B8CD-8B4120537BAD.jpeg
    62.5 KB · Views: 55
  • 8737975F-EDEE-487E-B71B-2950A5BA0BF0.jpeg
    8737975F-EDEE-487E-B71B-2950A5BA0BF0.jpeg
    60.9 KB · Views: 57
  • E6A9DEA3-68F4-4795-994E-57295679012B.jpeg
    E6A9DEA3-68F4-4795-994E-57295679012B.jpeg
    44.8 KB · Views: 56
Next steps...buy coolant, refill what seems to be empty reservoir ( is it really as easy as adding coolant to the full line in the reservoir?
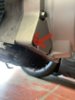
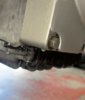
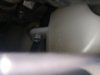
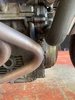
Congratulations on the excellent job you did cleaning up the engine and identifying the leak. It doesn't matter if the liquid is coming out of the square hole or out of the gap between the front panels of the engine, the conclusion is the same either way.

A couple of suggestions for you:

1) While you have the fairings off, aim a garden hose into the V of the engine to rinse out any dried coolant that may be in there. It's best to have the bike parked with the front wheel pointed downhill when you do this.

2) Refilling the antifreeze reservoir is as simple as you suggest - you just add the premixed coolant (buy it at a Honda automobile dealer). Be aware, though, that if the reservoir is dry now, the level in the reservoir will drop rapidly as air gets eliminated from within the cooling system. So don't draw any conclusions about leakage rate until the motorcycle has gone through half a dozen thermal cycles, from cold engine to fully warmed up & riding for a while at different throttle settings. Once all the air has evacuated from the cooling system, coolant loss via the leaks in the V will stabilize and you can then make a judgement call about how soon you need to attend to the leaks.

You can speed this process up a bit by removing the cap from the radiator and adding coolant directly to the radiator. I suggest you do this, because if your reservoir is dry, it is 99% certain that the coolant level in the radiator is low. Just be sure that the engine is stone-cold (has sat overnight) before removing the rad cap.

If you already have the left lower fairing off, take a moment to remove the coolant reservoir and clean it out. It is much easier to see the level of the coolant in the reservoir if the inside and outside surfaces of the reservoir are clean. Fill it up with water & Simple Green, let it soak for a bit, then add a small handful of rice and shake it vigorously. That will clean the inside of the reservoir. At the same time, check the overflow hose that attaches to the top of the reservoir, and the suction hose that attaches to the bottom - make sure they are unobstructed.

-------------------

@SMSW has suggested (post 28) going in from the front, via the radiator, to identify and correct the leakage. I very much respect SMSW's knowledge, and I appreciate what his rational is for this suggestion, but I don't think that's a good idea in your case. Going in from the front is an option for someone who is already familiar with the layout of the components inside the V - it's not the best approach for someone doing the job for the first time. See the photos below, which show the view from the front (radiator removed) and from the top (fuel tank, airbox, and throttle bodies removed).

Michael

View from Front (Throttle Bodies removed - there won't be this much space above if you only go in from the front)
IMG_9763.JPG

View from Top
Hose Clamps 1.jpg
 
Thanks so much @CYYJ , really appreciate the help!!

A couple of quick questions:

1) When you mention the garden hose pointed at “the V”...where exactly are we talking about?

2) Are there other coolant options that would work? Not sure I’ll have access to a Honda dealership, are there things at auto parts stores that will do the same thing?

3) When adding coolant directly to the radiator, do I just fill from the cap it until it looks completely full?

Thank you again!!
 
1) When you mention the garden hose pointed at “the V”...where exactly are we talking about?
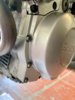
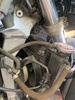
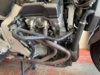
Try to get some low-pressure water from a garden hose up into the area under the airbox, between the two cylinder banks. That will wash out any dried coolant residue in the "V" of the engine. Below is a picture of the "V" after removal of the fuel tank, airbox, and throttle bodies. You can see the two cylinder heads on either side (the dark grey parts). Just squirt some water up above the cylinder heads, from the side of the bike.

2) Are there other coolant options that would work? Not sure I’ll have access to a Honda dealership, are there things at auto parts stores that will do the same thing?
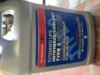
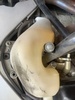
Just go to a Honda automobile dealership - they are everywhere - and buy a jug of the stuff pictured below. You don't have to go to a Honda bike dealer.

The packaging might look a bit different in the USA - the jug pictured is Canadian, with a bilingual label. The product is called "Honda Type 2 Coolant".

3) When adding coolant directly to the radiator, do I just fill from the cap it until it looks completely full?
Correct. Fill it until it overflows a bit, that will allow you to check and see if the hose running from the radiator filler neck to the coolant reservoir is free and clear.

Michael

V of Engine
Engine V.jpg

Honda Type 2 Coolant

Honda Coolant.jpg
 
hopefully I’ll have saved myself a bit by removing all the plastics and diagnosing this somewhat for them...
Maybe you will save something if your mechanic is an indie. But dealer types seem to want to chart flat rate.

But in carefully removing and storing the Tup yourself you can eliminate the possibility of a careless wrench scuffing or damaging it or loosing any fasteners. Knowing the problem as you do it should definitely save you the cost of a lengthy diagnosing.
 
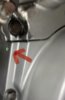
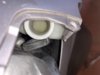
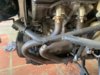
the first thing you must to ID a liking source is to clean the area. It will be a lot easier. :nuts:

Totally agree. Go buy a can of Gunk engine cleaner or similar brand, get the motor clean, then cover from where the leak accumulates to every possible source with baby powder. Just a light dusting will do. Take a ride and then you'll be able to trace where the leak is coming from because of the powder.

My apologies, I missed where it was cleaned up in post 29.
 
Last edited:
Thanks again @CYYJ ! Really appreciate all the help.

I was able to get the coolant from a Honda auto dealership ( pic attached for what it looks like here in the USA ). I removed the coolant reservoir, it was BONE DRY. I then cleaned it up really well using simple green and water and reinstalled.

I refilled the radiator with the new coolant, there actually wasn’t a lot missing, I would guess the radiator was no more than 1/4 empty, max. I then refilled the coolant reservoir to the full line.

I then ran low pressure water from a garden hose into the V from both sides, I then let it dry out on the sloping driveway. Made sure the engine was all clean and dry again.

Once dry I took the bike for a 45 minute ride at higher than usual RPMs. When I get back I can see a slight weep from the square hole, nothing from the curved drain line at the front of the motor. Picture attached.

I feel like a ride like this would historically result in a much larger leak. Is it possible the leak has lessened due to having the radiator and reservoir filled correctly?

Reservoir is at the same level as it was pre-test ride.

What next? And THANK YOU again.
 

Attachments

  • 7FD9FBCF-8A00-4972-A3FA-5C04B803399C.jpeg
    7FD9FBCF-8A00-4972-A3FA-5C04B803399C.jpeg
    84.9 KB · Views: 36
  • AD459FAC-D986-4C4C-B8B6-48F17187AE0F.jpeg
    AD459FAC-D986-4C4C-B8B6-48F17187AE0F.jpeg
    94 KB · Views: 35
Last edited:
I feel like a ride like this would historically result in a much larger leak. Is it possible the leak has lessened due to having the radiator and reservoir filled correctly?
No, filling the radiator & reservoir would likely not cause a reduction in the leak rate.

My guess - strictly a guess, but an educated one - is that by cleaning up the engine, including flushing out the "V" in the middle, you have got rid of any dried coolant residue that might have been getting flushed out due to riding in the rain, etc., and you are now seeing a more accurate indication of the leak rate.

Like I mentioned before, you won't be able to get an accurate estimate of the leak rate until the bike has gone through about half a dozen thermal cycles, this to allow the cooling system to completely fill with coolant from the reservoir (in other words, eliminate any air pockets in the radiator, etc.). Once this has happened, you can evaluate the leak rate based on the decline of coolant in the reservoir bottle, rather than by looking at the outside of the engine for evidence of leakage.

Michael
 
Thanks so much Michael, this is all really helpful. I'm hopeful that maybe the leak isn't as bad as I initially suspected and can leave it to work on in the rainy season here in CA. :)
 
Congratulations on your diligence. It usually pays off with a solution.

I chased a leak, actually a slow drip....just a drop or three overnight, for days. I keep the under the skirt areas clean so there was no trail in accumulated dust to indicate where it's origin, only that it was exiting under the clutch cylinder. No dried residue or corrosion at hose connections at all. Pulled off the side and lower plastic and ran the engine to three bars and shut it off. Several times an evening for several days and finally saw the drip forming...while the engine was beginning to cool, a single drop of water drop sneaked out of the lower right hose from the radiator...just one...it grew until it could run down to the elbow of the hose and onto the floor. cleaned up both fittings, replaced the hose and both clamps....no more dripping. Sometimes these can be hair pulling aggravating to find. I miss outright splits and really big floor puddles....makes the problem easier to find.
 
I believe Dduelin has mentioned before that you are able to access some or all of the clamps up top by removing the rad. If your looking to snug them up and not wanting to get into the work involved in removing the throttle bodies, this may be your answer... much less work. If I'm mistaken, I'll apologize now Dave.
Also, I'm wondering if you can attach a new length of hose to the overflow hose and pull the old one out while pulling a new one in. Has anyone tried this? Your overflow hose could have a hole in it
 
Back
Top Bottom