I've wanted some auxilliary light brackets for some LED lights that I purchased this summer, but couldn't really find a good location. I didn't want them fork mounted for the possible jiggling and closeness to rocks and debris. I considered a location under the headlight, but in the end decided that the best location for me was to make some brackets that would bolt into the rear view mirror bolts similar to the police model brackets.
So today, and the 2nd day of my newly found retirement, I headed over to my friend Bob's shop where we built the brackets. Here's how I did it.
I started by removing the mirror covers and the little spacer that fills the gap between the mirror and the fairing and creating rough template like the following. Nothing special, it's just a way of gaining perspective on the task.

Then it was some cutting, grinding, filing and welding. We had to make four spacers as well as the bracket and the mounting arm. We also had to acquire some longer 10mm bolts.
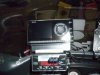
Some Grinding:

Some Welding:

This was followed by numerous fittings and tweakings which led to these brackets:

After paint, they are a bit more presentable:


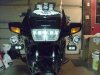
Mounted up, they look like the following:


And the finished product with the lights installed is pretty nice. The mounts are very solid.

Now I need to do the wiring part of the project which will include adding a Fuzeblocks fuse panel and a switch for the lights.
The lights, BTW, are VisionX (www.visionxusa.com) which I purchased from AZ Motosports at the LD Rider National Convention in Denver last August. The left one is a 10 watt flood LED and the right side is a 10 watt spot.
It's actually a pretty easy project, but takes a bit of time (most of the day) to do the actual 2 off fabrication.
So today, and the 2nd day of my newly found retirement, I headed over to my friend Bob's shop where we built the brackets. Here's how I did it.
I started by removing the mirror covers and the little spacer that fills the gap between the mirror and the fairing and creating rough template like the following. Nothing special, it's just a way of gaining perspective on the task.
Then it was some cutting, grinding, filing and welding. We had to make four spacers as well as the bracket and the mounting arm. We also had to acquire some longer 10mm bolts.
Some Grinding:
Some Welding:
This was followed by numerous fittings and tweakings which led to these brackets:
After paint, they are a bit more presentable:
Mounted up, they look like the following:
And the finished product with the lights installed is pretty nice. The mounts are very solid.
Now I need to do the wiring part of the project which will include adding a Fuzeblocks fuse panel and a switch for the lights.
The lights, BTW, are VisionX (www.visionxusa.com) which I purchased from AZ Motosports at the LD Rider National Convention in Denver last August. The left one is a 10 watt flood LED and the right side is a 10 watt spot.
It's actually a pretty easy project, but takes a bit of time (most of the day) to do the actual 2 off fabrication.
 oPoST1: