enricher binding

Joined
Jul 28, 2007
Messages
3,155
Location
finger lakes ny
Bike
1999 ST1100
STOC #
7959
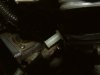
About to put the carbs back on after the coolant hose project, and notice the starter enricher system on the left side is binding. Seems to be the plunger/valve on the front (2) carb, far left on carb picture. When I loosen the set screw on the rod, eliminating No 2, things work fine. What to do?
Did not do this prior, and pretty sure I didn't bang anything I shouldn't.

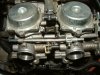
For those needing to find those pesky drain screws, they are at the bottom of the picture. And, speaking of the carb drain, how the heck does one hook that hose back up underneath the carbs? No room to work.
 

Attachments

  • DSCF00017.JPG
    DSCF00017.JPG
    280.5 KB · Views: 21
  • DSCF0006.JPG
    DSCF0006.JPG
    296.7 KB · Views: 21
Last edited:
And, speaking of the carb drain, how the heck does one hook that hose back up underneath the carbs? No room to work.

I'm guessing maybe you didn't remove the fuel tank? If you did then you should be able to reach in there with a pair of needle nose pliers and fit the hose back on after installing the carbs.
 
Yep, left the tank in cuz it's full for the winter.. Can barely get there with the pliers but not well enough to get the hose on/fitting in.
 
When I loosen the set screw on the rod, eliminating No 2, things work fine.
Remove the snorkel and check if the flap, or the linkage is binding
how the heck does one hook that hose back up underneath the carbs?
Blind! ;-)
Seriously, I stand over the bike, rest the carb-bank on a rag thrown over the LHS frame/backbone/inner fairing, reach underneath with my right hand and connect the drain-hoses, etc... then I place it loosely onto the isolators to connect the throttle cables, after that (recheck if the clips are in place) I snap them into the boots...
And I rarely remove the gas tank...
 
Little hands there Martin?
Depends, glove size 11~12... is that small? ;-)
I even wear my mechanic gloves during the task... its not so hard, sense/locate the little stubs at the bottom, sort the hoses out, and plug them on...
 
Depends, glove size 11~12... is that small? ;-)
I even wear my mechanic gloves during the task... its not so hard, sense/locate the little stubs at the bottom, sort the hoses out, and plug them on...

Just kiddin'

hmm..I connected up the 4 little ones first, figuring it would then be easier to just get the one main hose connected up.
 
...figuring it would then be easier to just get the one main hose connected up.
Nah! That's even worse to access with the carb bank hovering above... unless you really pull the fuel tank, to reach in from the aft of the engine...
 
Yep, left the tank in cuz it's full for the winter.. Can barely get there with the pliers but not well enough to get the hose on/fitting in.

You may end up spending more time trying to finesse it than you would to just remove the tank.

Can't remember exactly how full mine was but I think it was better than half full and it wasn't too bad to lift out of the frame. Or you could also siphon some of it into a 5 gallon gas can if you have one around to lighten it up a bit.
 
Hi Dean. I'd pump the tank out with the fuel pump (jumper from the battery) and pull the tank. Then, with the carb assembly off the bike, I'd connect the drain tubes to their float bowls, with the manifold and large drain hose attached. Install the carbs and connect the large drain hose to the connector at the rear of the engine. BTDT If you look closely in my coolant hose R&R/carb pull album you'll see the drain tubes still attached to the pulled carbs. FWIW

Not sure what to say about the suspected enricher problem...

John
 
Could the binding issue be caused by the positioning of the boot clamps? I know I have heard of this in the past. The boot clamps, if installed the wrong way, can cause the enricher linkage to bind.
 
Enricher problem solved. Seems the rod was slightly bent, preventing it from sliding properly. Straightened it and now functioning as it should.

Now just gotta get that drain hose connected and hopefully the carbs will pop right back on the new boots/isolators. Speaking of which, when the no.4 boot is installed in the correct position, there is no way to orient the top clamp screw in the proper facing position and still have that little pin set in the slot like on the other three. Anyone else notice this?
 
...there is no way to orient the top clamp screw in the proper facing position and still have that little pin set in the slot...
This is as old as the ST1100... I've a way placing it with the pin on the opposite site of that rubber naze, this and a long carburettor adjustment Philips #2 screwdriver does help the procedure.
Others replace the bolts with allen types, utilising long, ball-head allen-wrenches...
 
The #4 carb (left rear) clamp shouldn't be a problem, Dean. It's the #1's that needs the special orientation. If pressed, I can probably find Jon R.'s pictures of it...

Edit: would just flipping the clamp over orient the screw head in the right direction...?

John
 
Last edited:
Last edited:
a little diagram of clamp positioning :

I noticed the same thing Dean, but mine was rotated a bit more counter clockwise than yours shows in the picture. With a little force I was able to access it, but my screw head was more in the 2:30-3:00 position, yours is more like 3:30-4:00, so it doesn't look quite the same as mine. But I can confirm it did not seem to fit the same way as the others.
 
Mine was not in the slot originally as well. I suspect Honda cheaped out and didn't want to create another clamp just for no.4
 
That's kinda curious Dean. I had just orienented the new carb boots same as originals, removing one at a time and replacing, clamping in place on head. This kept the upper clamp retaining slot same as originals leaving upper clamp orientated same as originally was........ least from aging memory that's what I recall from a year and a half ago:rolleyes:.
 
Back
Top Bottom