
kiltman
Site Supporter
- Joined
- Apr 27, 2013
- Messages
- 3,279
- Age
- 68
- Location
- Stratford, Ontario Canada
- Bike
- 2002,ST1100ABS
- STOC #
- 8826
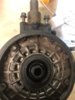
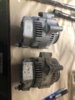
The back story.... I noticed that my alternator just wasn't putting out the voltage, when cold I would get 14.2 volts at the battery but when the engine warmed up it would drop down to 13.9 and 13.7 with no load and when I used my heated gear or PIAA lights it would drop down to 13.3... still charging yes but there is a problem. Brushes, voltage regulator, rectifier came to mind and preping myself for changing those out and the cost I decided I would just bite the bullet and put a new one in. I too have gone with the aftermarket unit.
I had no intention of doing an upgrade on my 1990 so I opted to buy a post 96 ST and gave the '90 to a buddy of mine and he did the upgrade.
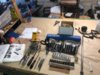
So... here I sit and now have to me a daunting project. I've gathered the tools and ordered some O-rings oil seals and rubber boot some of which are on back order here in Canada but hopefully they will arrive in January.
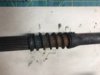
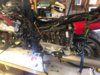
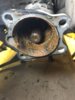
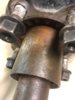
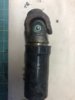
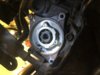
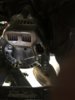
I built a lift for this project and I have to say I'm very pleased with it. I've screwed up my courage and have begun the task of taking off the swing arm. I started yesterday and this morning I have accomplished getting the swing arm out. Regardless it's a good thing I've gone and done this as I discovered that there is some surface rust on the shaft. The U-joint is OK it operates smoothly but the first impression was not good. I'm cleaning it up and everything seems to be servicable. My bike is a '97 with ABS and a California model, so lots of extra plumbing for brake lines as well as a disconnected Evaporation canister. (The PAIR system has been removed by a previous owner) I have a feeling the boot wasn't on properly and that's how moisture got in. The swing arm looks good and solid, I've done an initial clean but shall do a detailed inspection to make sure it hasn't been compromised. Over the weekend I will take out the alternator and install the new one.
It wasn't as bad as I thought, I'm one third of the way through the project and I'm getting confident that I can do this.")
I had no intention of doing an upgrade on my 1990 so I opted to buy a post 96 ST and gave the '90 to a buddy of mine and he did the upgrade.
So... here I sit and now have to me a daunting project. I've gathered the tools and ordered some O-rings oil seals and rubber boot some of which are on back order here in Canada but hopefully they will arrive in January.
I built a lift for this project and I have to say I'm very pleased with it. I've screwed up my courage and have begun the task of taking off the swing arm. I started yesterday and this morning I have accomplished getting the swing arm out. Regardless it's a good thing I've gone and done this as I discovered that there is some surface rust on the shaft. The U-joint is OK it operates smoothly but the first impression was not good. I'm cleaning it up and everything seems to be servicable. My bike is a '97 with ABS and a California model, so lots of extra plumbing for brake lines as well as a disconnected Evaporation canister. (The PAIR system has been removed by a previous owner) I have a feeling the boot wasn't on properly and that's how moisture got in. The swing arm looks good and solid, I've done an initial clean but shall do a detailed inspection to make sure it hasn't been compromised. Over the weekend I will take out the alternator and install the new one.
It wasn't as bad as I thought, I'm one third of the way through the project and I'm getting confident that I can do this.
Attachments
-
 F53ABA38-FB4D-417A-9785-D26A432D35DE.jpeg103.1 KB · Views: 76
 -
 7CE1A860-A2E2-4126-AF55-B74BE8F802FF.jpeg154.6 KB · Views: 79
 -
 0D2C336A-64D1-4361-AC67-D6BE59EB7DEF.jpeg162.4 KB · Views: 79
 -
 F1023614-D9CD-4A57-854A-6042B405765F.jpeg124.5 KB · Views: 78
 -
 9CEBE314-62DA-49FA-8399-08A7A10B6822.jpeg105 KB · Views: 77
 -
 1F7A8582-C032-4B1B-9501-956C109B3E83.jpeg119.3 KB · Views: 78
 -
 DCE4C7A6-A374-48C4-BC26-83FED9F3A323.jpeg87 KB · Views: 77

 I didn't need to remove the alternator cover on my '98 either. And like the Kiltman, I had to play around with the alternator a bit before it slipped in.