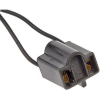
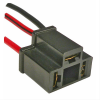
Melted Left Headlight Socket

Joined
Jan 17, 2020
Messages
196
Location
Woking, Surrey, UK
Hi Guys

Electrical burning smell experienced up front but could not determine the source. Bike ran ok so I didn't take any action till headlight bulb stopped working.

First I decided to replace the bulb without removing the fairing. Unfortunately, I discovered the female spade connector on the ground terminal of the socket was insulated by the plastic that had melted. None of the bulb terminals was loose and the bulb was tight in the socket, so I didn't discover the reason for the overheating.

So I had to remove the fairing to replace the headlight socket - similar to my GL1500. Although the bulb was now working ok, I decided to replace it for a whiter light. Now I have to replace the right hand bulb to match the light colour. While I'm at it I think I'll replace the side light bulbs..........

Paul
 
so I didn't discover the reason for the overheating.
If the terminals in the connector(s) are clean and corrosion free the problem might be a bad ground wire at the opposite end of the headlight connector. Generally overheating occurs when the resistance of the connection is sufficient to impede the current flow through any given connector.

My ST buddy was having headlight problems along with the highbeam indicator on when the highbeams were off. I told him to run an additional ground from the left headlight socket's ground to the frame and all was sorted.

Replacing the halogen headlight bulbs with LEDs will drop the current through the socket and wiring by a large margin. Maybe that's what you're doing with "whiter light" bulbs"
 
Last edited:
There are only two points of contact here: the crimp of the terminal on the wire, and the terminal's fit on the bulb prong.

The simplest fix is to crimp a new terminal onto the wire.
 
cut the pigtail off go to the auto parts store and match one up... most stores should stock them. not sure if this is the one1602106721909.png
 
The ground wire (green) at the headlights is a weak link. All the ground currents from the front end travel through one green wire through one 24 pin connector to get to chassis ground. If you are replacing the damaged headlight connector. I would strongly suggest that you add extra ground wire at the new splice and directly run it back to the battery ground or frame ground. The positive wires on both headlight are each on separate fuses and circuits so they should be OK.
 
Last edited:
Half measures. Check the ground wires of all circuits leading to the yellow buss above the right side headlight, the buss, and the ground connection in the 24 pin connector above the left hand valve cover. Corrosion and resistance in the buss and connector may continue to cause ground wire faults in other circuits in the front half off the bike that are tied to the common ground.
 
Thanks for your thoughts.

Yes I had installed a new headlight socket when I posted the message. Resistance between the ground terminal on the new socket and frame earth found to be zero, so perhaps the fault was in the old socket??

Replacing the halogen headlight bulbs with LEDs will drop the current through the socket and wiring by a large margin. Maybe that's what you're doing with "whiter light" bulbs"

No, I didn't use LEDs because my understanding of the UK Motoring Regs relating to the annual MOT test that has to be carried out is that LEDs can only be fitted if the bike was so fitted by the manufacturer. If I am wrong, I am sure my fellow Brits will put me straight. Even if am correct, no doubt 100s of riders do fit them.

The Bulbs I fitted were:-


1602182923353.png

1602182923353.png
 
The fault was the old socket.
However the hidden weak link is the 24 pin connector that has a single ground wire.
Since you are staying with the halogen bulbs I still recommend that improve that ground path with another wire to ground.
It will prevent you from having other problems later. This is a well known issue..
Otherwise just remember this and keep an eye on it...
Enjoy the ride......
 
Yes I had installed a new headlight socket when I posted the message. Resistance between the ground terminal on the new socket and frame earth found to be zero, so perhaps the fault was in the old socket??
An ohmmeter uses very little current, so a zero reading may appear across a poor connection, whereas placing an appreciable load on the circuit will make the poor connections show up.

The better troubleshooting method is to look for voltage between points where there should be little or no voltage, such as between the battery positive and the inoperative device's positive, or between the ground terminal of an inoperative device and the battery negative.

Also, you can look for bad switches, fuses, or questionable connections by again trying to read a voltage across them, i.e., between points that should be tied together by the switch, fuse, connection, wire, etc. I prefer a test light to a meter, unless I need to know the exact voltage.
 
Along with the additional ground wire you might consider changing the sockets to ceramic if they aren't already. I've melted a few of the plastic ones on other machines and use ceramic now exclusively.
 
Can some one please tell me where the front ground wire(s) are connected to the frame (left/right, anything else that may be useful)?, as the ground for the headlight bulb disappears into the wiring loom. Generally, does Honda publish details of the position of the frame grounding positions? Must admit I haven't looked into the 24 pin connector on left hand side - looks like a "rat's nest" of wires with all the other wires in that vicinity.

The better troubleshooting method is to look for voltage between points where there should be little or no voltage, such as between the battery positive and the inoperative device's positive, or between the ground terminal of an inoperative device and the battery negative.

I had already checked these with a circuit probe and all seemed fine when under load.

Thanks Paul
 
Can some one please tell me where the front ground wire(s) are connected to the frame (left/right, anything else that may be useful)?, as the ground for the headlight bulb disappears into the wiring loom.
I'd ignore the wiring loom unless you're a curious sort. Run an external ground wire from the headlight socket to any convenient bolt in the frame.

One member did that for multiple ground wires in the front end with ring connectors to that bolt. I don't recall who it was or what bolt was used. Maybe he'll advise.
 
Can some one please tell me where the front ground wire(s) are connected to the frame (left/right, anything else that may be useful)?, as the ground for the headlight bulb disappears into the wiring loom. Generally, does Honda publish details of the position of the frame grounding positions? Must admit I haven't looked into the 24 pin connector on left hand side - looks like a "rat's nest" of wires with all the other wires in that vicinity.


I had already checked these with a circuit probe and all seemed fine when under load.

Thanks Paul
Post #7 tells you where to look. Past experience of other ST1300 owners with electrical problems have posted many times about ground circuit issues. The first ones [threads] were out of the UK where corrosion seems to be harder on vehicles compared to other locations.

After the 24 pin white connector the ground circuit for devices in the front half of the bike goes to a bolt tapped into the frame under the rear of the upper gas tank.

Corrosion in the yellow buss and 24 pin connector and the green ground wires leading to and from are the first places to look when electrical issues arise with these bikes.
 
Back
Top Bottom