
Marshal_Mercer
Bumbleberry + Crumble = Yum!
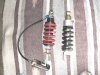
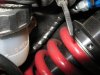
My Penske 8987 triple clicker shock with remote fluid reservoir and a 22" long hose, is in and works really well right out of the box. So well in fact, that it makes me think that my front fork seals must be shot! The spring is a hefty 1300 pounds. It just floats over bumps. No canyon or mountain time yet. Tomorrow, perhaps.
Update: I recently (09/20/2007) replaced both tires. I loosened the fork brace (MCL) and "bounced" the front forks to set them straight after the wheels were back in place, then re-tightened everything including the brace. The fork legs move again as they should. Apparently, the forks twisted slightly in the brace, causing some binding. I guess that I did not tightened the brace bolts as tightly as I had thought.
I just need to paint the bracket that I made from aluminum sheet stock to hold the shock's remote reservoir, then attach it to the bike where the former pre-load adjuster mounted, button up the side cover, snap on the seats and I'm done.
For anyone contemplating changing the rear shock, I believe that this Penske is a really good way to go - expensive, but good. Mine was over $1,100. Be advised that it is a time consuming, a dirty, and a real PIA job until you figure out what you need to do -- or are told (thanks again to the tellers). Also be aware that the stock shock top mount eyelet is slightly less than 1/4th inch wider than the Penske, so you'll need to shim that width. I used three, 1/16th inch washers with the stock spacer. The top eyelet floats, so there should not be a problem. Update 06/24/2008: I changed the number and location of the mounting washers as I found some evidence of the shock's spring rubbing on the right side-cover's mounting arm. This time I used two washers on the tire-side of the shock mount, and used one washer on the outboard side instead of the two used originally. That seems to have removed any chance of the spring coil rubbing against anything unintentionally.
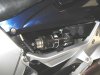
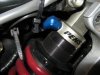
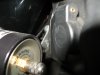
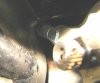
One week later: I have changed-out my home-made reservoir bracket for a friend's spare HyperPro unit. The inside diameter was slightly too large for the Penske reservoir so I shimmed the gap. A little aluminum stock and an angle bracket bolted together allowed me to attach the HyperPro bracket to the stock pre-load adjuster arm. The third and fourth images show the shock reservoir mounted. As can be seen, there is ample room for a two Powerlet attachment.
A local mountain trip is on for this afternoon. I expect nothing less than a great ride.
Later that night: Wow! In the mountains my cornering speeds were five to ten miles per hour faster everywhere -- this with much less lean angle and on nearly worn out tires. I was much more confident in the bike's track even though I have only ridden occasionally this summer; was out of town for seven weeks. Very impressive. Freeway ruts, pot holes, and bumps/dips almost disappear. The bikes' rear end no longer rises and stays up during and after braking. All of this in out-of-the-box condition.
Three weeks later: New Avon Storms and EBC brake pads allowed me to take my wife for a short (50 mile) mountain ride. The Penske did not even need its pre-load increased; optimally could have, but there was no need. It easily soaked-up the bumps and irregularities in the roadway, as well as ensuring confidence-inspiring cornering.
Impression over all: my bike was transformed into the quick, smooth, tractable, gracious performer that I was looking for. Oddly, the steering is somewhat "heavier", meaning that turn-in is slightly slower but straight-line stability is improved. Not sure why this is as the front end was left alone, and the rear was raised about one inch. I suppose it could be that the new Storms are just a tire with better grip than the Michelines and that I was sliding somewhat before. At any rate, I highly recommend this product.
12/09/2007 Update: the newness of the Avon Storms was what made the steering somewhat heavy. Now that they are scuffed in, the bike is back to its moderately quick handling ways.
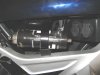
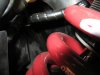
12/17/2007 Update: photos five through nine trace the shock damper hose from the blue anodized, right angle connector, down and behind the shock spring, then out to the remote reservoir with its high- and low-speed adjusters. The total length of the hose is slightly more than 22 inches. Two people have written to me, stating that the hose length they received was on the order of nine inches. That may be enough length for mounting on the right, but certainly not for mounting on the left. Be sure to let Penske know where you intend to mount the remote reservoir, if you buy one.
These are the settings that I have found to work best for me. High Speed compression = 5 clicks out from full in; Low Speed compression = 11 clicks out from full in for canyons or 12 clicks for highways when unloaded; Rebound = 7 clicks out from full in for canyons, 8 for streets and highways. Adjusting the shock when adding a pillion or luggage is easy: turn the High Speed Compression adjuster one click clockwise for every 100 pounds of added weight.
Here's how to tell if you have your shock damping is set right. Find a set of corners that you feel comfortable riding. Having bumps and dips in the corners is a "must".
High Speed compression damping controls the shock's spring when it is compressed very quickly. It has nothing to do with your bike's speed. If you have High Speed damping to adjust, find a sharp bump or square-edged irregularity in the pavement. Too soft and you'll get a "floating" feeling. Too hard and the sharp bump may lift you from your seat.
To adjust High Speed damping, look for the reservoir near the top of the shock, or one end of the remote reservoir. You will need a small crescent wrench to tun the larger of the two nuts. See your Penske manual for a picture of this. Set your High Speed damping half way through its range. Ride through the corners. Adjust the damper progressively harder until the bump jars you when you go over it. Back off one click and try the bump again. Continuing to back off damping one click at a time. Clockwise = more damping. Counterclockwise = less. Five or six clicks out from full in should be about right.
Low Speed compression damping controls the shock's spring when it is compressed normally. Too soft and you'll get a "sliding" feeling when moving through corners. This almost feels like your front tire pressure is too low. Too hard and the rear end feels "skittish" over slight bumps.
To adjust Low Speed damping, start half way through its adjustment range. Look for the reservoir near the top of the shock, or one end of the remote reservoir. You will be able to turn the smaller knob with your fingers. See your Penske manual for a picture of this. Ride through the corners. If the bike feels twitchy (bouncing on the roadway) in the side-to-side transitions, reduce the Low Speed compression damping. If it pitches up and down in a corner, increase Low Speed damping. Adjust up or down one click at a time. Go through the same corners and make adjustments until your bike feels right. Then take to the freeway. Make sure that when you hit bumps that you are not jarred. If you are, back off one click and try it again. Suspension setting are a compromise. You can always make adjustments again to suit your road.
Once you have the Low Speed and High Speed damping set, stiffen the High Speed only by one click for each 100 pounds (50 Kg) of extra passenger or storage weight. The High Speed setting controls the Low Speed setting too, so no other adjustment is needed. When carrying less, dial back to your normal High Speed damping value.
Rebound damping controls how quickly the shock's spring is able to return to its normal, compressed length. Too soft and you'll get a "wallowing" feeling when exiting corners. Too hard and the rear wheel may come off the ground in repetitive (stutter) bumps. Ride through the corners. If you feel the rear end getting shorter and shorter, the damping is too great; back off and try again. If the rear end feels like it wants to throw you into the air at the peak of the bump, add damping.
To adjust Rebound, start half way through its adjustment range. Look for the red-colored, toothed wheel near the bottom of the shock. Moving the wheel to the right (facing the bike from the right side) provides more damping; to the left, less. With some effort, one can turn the wheel with one finger. You may need a lever though. I use a flat bladed screwdriver wrapped in a rag. Take your bike off the stands. While you are mounted, sit down hard on the seat, compressing the shock spring. Look in your rear-view mirror and watch the bike's rear end. Stand on the ground to release the shock's load. Set the Rebound so that it takes about one second to return to the unladen height. Take your bike out for a test ride as before. Adjust as suggested above.
Marshal
Update: I recently (09/20/2007) replaced both tires. I loosened the fork brace (MCL) and "bounced" the front forks to set them straight after the wheels were back in place, then re-tightened everything including the brace. The fork legs move again as they should. Apparently, the forks twisted slightly in the brace, causing some binding. I guess that I did not tightened the brace bolts as tightly as I had thought.
I just need to paint the bracket that I made from aluminum sheet stock to hold the shock's remote reservoir, then attach it to the bike where the former pre-load adjuster mounted, button up the side cover, snap on the seats and I'm done.
For anyone contemplating changing the rear shock, I believe that this Penske is a really good way to go - expensive, but good. Mine was over $1,100. Be advised that it is a time consuming, a dirty, and a real PIA job until you figure out what you need to do -- or are told (thanks again to the tellers). Also be aware that the stock shock top mount eyelet is slightly less than 1/4th inch wider than the Penske, so you'll need to shim that width. I used three, 1/16th inch washers with the stock spacer. The top eyelet floats, so there should not be a problem. Update 06/24/2008: I changed the number and location of the mounting washers as I found some evidence of the shock's spring rubbing on the right side-cover's mounting arm. This time I used two washers on the tire-side of the shock mount, and used one washer on the outboard side instead of the two used originally. That seems to have removed any chance of the spring coil rubbing against anything unintentionally.
One week later: I have changed-out my home-made reservoir bracket for a friend's spare HyperPro unit. The inside diameter was slightly too large for the Penske reservoir so I shimmed the gap. A little aluminum stock and an angle bracket bolted together allowed me to attach the HyperPro bracket to the stock pre-load adjuster arm. The third and fourth images show the shock reservoir mounted. As can be seen, there is ample room for a two Powerlet attachment.
A local mountain trip is on for this afternoon. I expect nothing less than a great ride.
Later that night: Wow! In the mountains my cornering speeds were five to ten miles per hour faster everywhere -- this with much less lean angle and on nearly worn out tires. I was much more confident in the bike's track even though I have only ridden occasionally this summer; was out of town for seven weeks. Very impressive. Freeway ruts, pot holes, and bumps/dips almost disappear. The bikes' rear end no longer rises and stays up during and after braking. All of this in out-of-the-box condition.
Three weeks later: New Avon Storms and EBC brake pads allowed me to take my wife for a short (50 mile) mountain ride. The Penske did not even need its pre-load increased; optimally could have, but there was no need. It easily soaked-up the bumps and irregularities in the roadway, as well as ensuring confidence-inspiring cornering.
Impression over all: my bike was transformed into the quick, smooth, tractable, gracious performer that I was looking for. Oddly, the steering is somewhat "heavier", meaning that turn-in is slightly slower but straight-line stability is improved. Not sure why this is as the front end was left alone, and the rear was raised about one inch. I suppose it could be that the new Storms are just a tire with better grip than the Michelines and that I was sliding somewhat before. At any rate, I highly recommend this product.
12/09/2007 Update: the newness of the Avon Storms was what made the steering somewhat heavy. Now that they are scuffed in, the bike is back to its moderately quick handling ways.
12/17/2007 Update: photos five through nine trace the shock damper hose from the blue anodized, right angle connector, down and behind the shock spring, then out to the remote reservoir with its high- and low-speed adjusters. The total length of the hose is slightly more than 22 inches. Two people have written to me, stating that the hose length they received was on the order of nine inches. That may be enough length for mounting on the right, but certainly not for mounting on the left. Be sure to let Penske know where you intend to mount the remote reservoir, if you buy one.
These are the settings that I have found to work best for me. High Speed compression = 5 clicks out from full in; Low Speed compression = 11 clicks out from full in for canyons or 12 clicks for highways when unloaded; Rebound = 7 clicks out from full in for canyons, 8 for streets and highways. Adjusting the shock when adding a pillion or luggage is easy: turn the High Speed Compression adjuster one click clockwise for every 100 pounds of added weight.
Here's how to tell if you have your shock damping is set right. Find a set of corners that you feel comfortable riding. Having bumps and dips in the corners is a "must".
High Speed compression damping controls the shock's spring when it is compressed very quickly. It has nothing to do with your bike's speed. If you have High Speed damping to adjust, find a sharp bump or square-edged irregularity in the pavement. Too soft and you'll get a "floating" feeling. Too hard and the sharp bump may lift you from your seat.
To adjust High Speed damping, look for the reservoir near the top of the shock, or one end of the remote reservoir. You will need a small crescent wrench to tun the larger of the two nuts. See your Penske manual for a picture of this. Set your High Speed damping half way through its range. Ride through the corners. Adjust the damper progressively harder until the bump jars you when you go over it. Back off one click and try the bump again. Continuing to back off damping one click at a time. Clockwise = more damping. Counterclockwise = less. Five or six clicks out from full in should be about right.
Low Speed compression damping controls the shock's spring when it is compressed normally. Too soft and you'll get a "sliding" feeling when moving through corners. This almost feels like your front tire pressure is too low. Too hard and the rear end feels "skittish" over slight bumps.
To adjust Low Speed damping, start half way through its adjustment range. Look for the reservoir near the top of the shock, or one end of the remote reservoir. You will be able to turn the smaller knob with your fingers. See your Penske manual for a picture of this. Ride through the corners. If the bike feels twitchy (bouncing on the roadway) in the side-to-side transitions, reduce the Low Speed compression damping. If it pitches up and down in a corner, increase Low Speed damping. Adjust up or down one click at a time. Go through the same corners and make adjustments until your bike feels right. Then take to the freeway. Make sure that when you hit bumps that you are not jarred. If you are, back off one click and try it again. Suspension setting are a compromise. You can always make adjustments again to suit your road.
Once you have the Low Speed and High Speed damping set, stiffen the High Speed only by one click for each 100 pounds (50 Kg) of extra passenger or storage weight. The High Speed setting controls the Low Speed setting too, so no other adjustment is needed. When carrying less, dial back to your normal High Speed damping value.
Rebound damping controls how quickly the shock's spring is able to return to its normal, compressed length. Too soft and you'll get a "wallowing" feeling when exiting corners. Too hard and the rear wheel may come off the ground in repetitive (stutter) bumps. Ride through the corners. If you feel the rear end getting shorter and shorter, the damping is too great; back off and try again. If the rear end feels like it wants to throw you into the air at the peak of the bump, add damping.
To adjust Rebound, start half way through its adjustment range. Look for the red-colored, toothed wheel near the bottom of the shock. Moving the wheel to the right (facing the bike from the right side) provides more damping; to the left, less. With some effort, one can turn the wheel with one finger. You may need a lever though. I use a flat bladed screwdriver wrapped in a rag. Take your bike off the stands. While you are mounted, sit down hard on the seat, compressing the shock spring. Look in your rear-view mirror and watch the bike's rear end. Stand on the ground to release the shock's load. Set the Rebound so that it takes about one second to return to the unladen height. Take your bike out for a test ride as before. Adjust as suggested above.
Marshal
Attachments
-
 679.8 KB Views: 484
 -
 434.8 KB Views: 359
 -
 114.4 KB Views: 387
 -
 112.8 KB Views: 354
 -
 314.1 KB Views: 301
 -
 287 KB Views: 171
 -
 233.6 KB Views: 126
 -
 249.5 KB Views: 180
 -
 313.8 KB Views: 172
Last edited: