28A Charge Fail, Melty Surroundings re 1 Alt Input to VRR

Joined
Aug 30, 2008
Messages
84
Age
73
Location
Encino, California
Bike
'94 ST1100
Today I got the the 6P and 3P and 2P separated and tested the various circuits. All seemed fine, though I have not tested the VRR pins, partly because I don't have the requisite multimeter, but also because I discovered the melting described below.

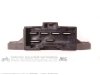
I saw black, melted plastic (of the 6-pin white connector that shoves into the bottom of the VRR) around the yellow (alternator) input line designated #5 on page 17-8 of the ST1100 manual. That connection, #5, is the alternator-to-VRR input line immediately next to the wall of the VRR and the bike frame.

My question now is, how do I fix this? So far, I can't seem to shove the female of this connection out of the melted white 6P connector.

Some preliminary web searches don't show me a replacement for the white 6P connector.

Should I dremel the melted area out of the white6P connector, and just run a separate line from alt (actually, closest 3P red connector) to VRR for that pin?

Or, what? Tired and sore, I'll leave it there...thx

p.s.: at this point, I don't want to be soldering the various yellow wires to eliminate the red connector...that stuff ain't my problem...my problem is a completely useless, but physically unassailable position within the white 6P connector...
 
Last edited:
Joined
Jun 3, 2006
Messages
3,521
Location
British Columbia
Bike
2021 RE Meteor 350
We share some of the same grief. There is no replacement for the 6P, unless you can find a used one that someone has left over from doing the 40 amp upgrade. The alternative for you would be to surgically remove that yellow wire spade connector and buy a new spade, solder it on the wire and reattach it, independent of the other connectors in the 6P. Bit of a delicate job, but I had intended to replace all 5 spades, can the 6P itself and just hook each spade up independently, until I discovered that the slightly larger spade on the red/white wire was a very elusive animal at my local auto parts stores.

Luckily my 6P is still in good shape, so my thought of eliminating it to prevent future problems, is on the back burner for now, unless I can locate that larger spade connector. My weak link was in the 3P, which I did remove and just soldered the wires together. I'd recommend that to you to prevent future issues there.

I have just determined that my 28 amp stator has one bad winding, but the alternator passed all the tests in the manual. Not sure what you have found so far, but the AC test from the stator proved that the alternator was, in fact, damaged.
 
Joined
Feb 24, 2010
Messages
511
Location
Central PA
Bike
1993 ST1100
STOC #
8180
Plenty of forum discussion on this issue. Eliminate the connectors altogether. If one connection overheated, it's a "time and corrosion" issue and the others may follow at any time. Even though the others may look good, the reliability comes into question. JMHO.
 
OP
OP
HelmetHead
Joined
Aug 30, 2008
Messages
84
Age
73
Location
Encino, California
Bike
'94 ST1100
There is no replacement for the 6P, unless you can find a used one that someone has left over from doing the 40 amp upgrade. The alternative for you would be to surgically remove that yellow wire spade connector and buy a new spade, solder it on the wire and reattach it, independent of the other connectors in the 6P.
Just what I was afraid of, kinda what I thought I was looking at...thanks for the confirmation...
 

John OoSTerhuis

Life Is Good!
Joined
May 10, 2005
Messages
5,230
Location
Bettendorf, Iowa
Bike
1991 SSMST1100
STOC #
1058
My guess is that lead probably has corrosion in the wire strands back from the female connector, under the plastic sheathing. If it's stiff/won't bend easily, strip back the sheathing until you get shiny copper strands and install a new connector. Good luck.

John [Keeper of the 40amp Alt Upgrade Kit]
 
OP
OP
HelmetHead
Joined
Aug 30, 2008
Messages
84
Age
73
Location
Encino, California
Bike
'94 ST1100
Yes, John, I reckon I'll be doing what you've suggested at some point, i.e., stripping some insulation on the pertinent yellow wire such that I can attach a new female connector to slip over the VRR pin.

However, my current problem is that the old connector seems melted into the white plastic, so no new connector can go back up that slot. So, I guess, unless I can find a salvage 6P, I've got to do something like dremel the whole slot out of the 6P plastic, so there's room to get the new connector (on the yellow wire) up onto the VRR pin.

Am I making sense? I need to physically eliminate the back center of the 6P, or get a replacment 6P, right?
 
Joined
Jun 3, 2006
Messages
3,521
Location
British Columbia
Bike
2021 RE Meteor 350
I just read your post on the recent 40 amp alternator thread, which sheds some light on your early thinking about your problem.


QUOTE:
"I've been slow on this issue (despite my daily ridership, now defunct for 5 days) because I not insignificantly hurt my (right/dominant) thumb-&-wrist recently.

Today I got the the 6P and 3P and 2P separated and tested the various circuits. All seemed fine, though I have not tested the VRR pins, partly because I don't have the requisite multimeter, and I did discover the melting described below.

Saw black, melted plastic (of the 6-pin white connector that shoves into the bottom of the VRR) around the yellow (alternator) input line designated #5 on page 17-6 of the ST1100 manual. That connection, #5, is the alternator-to-VRR input line immediately next to the wall of the VRR and the bike frame.

I have questions about how I get around this problem, which I will post in a new thread under the general ST1100 Tech forum, since this seems not to be an alternator problem." QUOTE


Even though your alternator tests showed all is well, mine did the same thing last week, it doesn't mean all IS well. You will need to conduct the AC voltage test from the stator windings. This is best done by disconnecting the 3P connector and, with the engine running about 3,000 rpm, measure the AC voltage being delivered between all three combinations of the yellow wires coming from the alternator. They should all be the same, or close to it, by one or two volts.

Pray that they are all the same, as that will indicate the VRR is kaput and it will spare you the need to actually come "face to face" with your alternator!

The only test you can do on the VRR is the diode test, if your meter has that function.
 
OP
OP
HelmetHead
Joined
Aug 30, 2008
Messages
84
Age
73
Location
Encino, California
Bike
'94 ST1100
I said that already.;) "independent of the other connectors in the 6P."
Indeed, you did; I think we're all on the same page. I was only re-phrasing to John that without a replacement 6P, I've got to create space for the replacement connector amidst the body of the 6P, which does make surgery sound like the only option.

I've got a line on a whole wiring harness, from which I could get a proper 6P. They want $175 for harness. But I will run the dynamic AC test before I buy a whole-machine wiring harness.

Are there any tricks to getting wires-cum-female spade out of the 6P? I can't get any out yet, and there's only melting around the one spade in question. Is there a little clip in each slot of the 6P that's holding the spade in place, and I have to depress that clip somehow (been trying that approach some, but no luck)?
 
OP
OP
HelmetHead
Joined
Aug 30, 2008
Messages
84
Age
73
Location
Encino, California
Bike
'94 ST1100
Dremel with cut-off wheel. BTDT However, there are special tools for removing lead ends from connectors, but a small screwdriver inserted into the connector can bend the little locking tab out of the way and release the spade connector as in this case you're not concerned with damaging it.
Just found the above in a John O. post to a DeanR thread from October, 2013. I think this gets me closing in on my next steps...a combination of some dremel action and bit of luck with the locking tabs...

I reckon I'll go all snip-snip and new spades for each wire plugging onto the VRR. I would like to get the wires and connectors out of the 6P where possible, just to preserve as much wire as I can.

Still, I acknowledge there may be an issue getting that non-standard female spade for the red/white wire...dunno about that yet, any advice appreciated, donation/sacrifice suggestions to appropriate gods/saints will be appreciated...
 
Joined
Jun 3, 2006
Messages
3,521
Location
British Columbia
Bike
2021 RE Meteor 350
If the other spades in the 6P are in good shape, you might be best to leave them alone, or just clean them up a bit if needed. Electrical contact cleaner (a spray) works well for this, or a little scraping with a tiny screwdriver, then spray. The spades you buy in an auto supply store may fit the 6P, or not, so be sure they do before cutting them off the wires, if going that route of individual connectors.
 

John OoSTerhuis

Life Is Good!
Joined
May 10, 2005
Messages
5,230
Location
Bettendorf, Iowa
Bike
1991 SSMST1100
STOC #
1058
I have a salvage 6P with ~5" or more on the 6 leads. The idea being to splice them into the existing wiring. But at this stage I'd eliminate your 6P, solder new wire onto the three yellow leads (eliminating the red 3P), and use individual spade connectors on the VRR. [edit (see next posts): [-]All the spades are the same size and take one size of connector... not sure what you mean about a different size for the red lead. [/-]]

John
 
Last edited:
Joined
Jun 3, 2006
Messages
3,521
Location
British Columbia
Bike
2021 RE Meteor 350
On my '95, the VRR definitely has two sizes of male connectors. The red/white wire spade is bigger, visibly quite noticeable, than the rest and the spade required for those will not fit the red/white.
 

John OoSTerhuis

Life Is Good!
Joined
May 10, 2005
Messages
5,230
Location
Bettendorf, Iowa
Bike
1991 SSMST1100
STOC #
1058
On my '95, the VRR definitely has two sizes of male connectors. The red/white wire spade is bigger, visibly quite noticeable, than the rest and the spade required for those will not fit the red/white.
Sorry. I defer to you and stand corrected. I no longer have a loaner VRR to look at, and on closer inspection of the 6P with leads that I do have, noticed that the red/white lead has apparently been replaced with a solid red wire. Also, its female connector is the same size as the others, but the curled edges that grip the spade have been opened/spread wider than 'normal.' This 6P had been in use so I know that it had worked.

Anyway, I regret having mislead anyone. Pictures from anyone would be welcome.

John
 
Last edited:
Joined
Jun 3, 2006
Messages
3,521
Location
British Columbia
Bike
2021 RE Meteor 350
Sorry. I defer to you and stand corrected. I no longer have a loaner VRR to look at, and on closer inspection of the 6P with leads that I do have, noticed that the red/white lead has apparently been replaced with a solid red wire. Also, its female connector is the same size as the others, but the curled edges that grip the spade have been opened/spread wider than 'normal.' This 6P had been in use so I know that it had worked.

Anyway, I regret having mislead anyone. Pictures from anyone would be welcome.

John
I use the excuse of "having a 60's moment", but no harm done. +1 on Dean's comment.

Here's the VRR. Hope it's not too small to see the difference.
 

Attachments

John OoSTerhuis

Life Is Good!
Joined
May 10, 2005
Messages
5,230
Location
Bettendorf, Iowa
Bike
1991 SSMST1100
STOC #
1058
Good picture. Interesting. I know of a number of melted VRR repairs using individual spade connectors, including some emergency field/on-the-road events, where this issue didn't come up...

In any case, less than a minute with my Dremel and I'd have that spade modified to accept common size female spade connectors. :)

John

via iPhone 4S
 
OP
OP
HelmetHead
Joined
Aug 30, 2008
Messages
84
Age
73
Location
Encino, California
Bike
'94 ST1100
So, the path seems clear: snip wires at base of 6P, solder on new female spades, opening one (red/white) as necessary, presuming I can't purchase the right size (I don't think I'll try to shave down the VRR-side male terminal for the red/white, since I don't have a Dremel anyway). Also, eliminate 3P.

This means come Monday I'll go purchase solder gun and solder (relying on public buses pretty much eliminates weekend shopping, because the schedules are so reduced). Also, purchase necess length of, I reckon, 14 gauge wire.

Any advice re solder to use, and/or solder gun wattage, tips, etc., since I haven't soldered since high school?...
 

John OoSTerhuis

Life Is Good!
Joined
May 10, 2005
Messages
5,230
Location
Bettendorf, Iowa
Bike
1991 SSMST1100
STOC #
1058
FWIW, I don't solder, never have in all my years of electrical farkling on the ST. Nor do I use insulated connectors, preferring to use uninsulated with a quality crimping tool and quality shrink wrap.

I'd cut the extant connectors out of the 6P and reuse them if serviceable.

John
 
Last edited:
OP
OP
HelmetHead
Joined
Aug 30, 2008
Messages
84
Age
73
Location
Encino, California
Bike
'94 ST1100
1) Thank you for pointing up the simple alternative to soldering. Any pointers re "quality" for crimping tool and/or heat shrink tubing vendors? My principal resources seem to be Harbor Freight and Home Depot. We have Fry's Electronics which used to be great, so I'll probably look there. I just don't know any brand names or characteristics to look for.

2) Also, since it may be time to get a dremel, I know the last few times I looked them over at Home Depot, there was quite a variety and range of prices. Some stuff was proper Dremel, but those seemed to be in the $100+ range, while the imitators had little kits as low as $15 - $18. Presuming I just need a small kit of cutting disks, are the cheap ones OK?

3) When eliminating the 3P, you just twist the wires together and heat shrink over them, no solder?

Once I get tools and parts, I think I'll be on a roll and will lighten up a bit with the very junior questions, but I sure appreciate the time you've so willing expended on this problem of mine ...thx, David
 
Top Bottom