This is best as you won't cut any insulation on existing wires and risk moisture getting in and causing green/black wire disease.
Motorsport electrical products: OEM and hard to find terminals and connector kits, wiring, harness supplies, tooling, and sensors for modern and vintage motorcycle, automotive applications. Easy online shopping, low cost shipping options, to expedited around the world. We accept Paypal and...

www.corsa-technic.com
Eastern Beaver products and kits main page
www.easternbeaver.com
Buy motorcycle and powersport industry connectors to repairing or modifying your vehicle, shipped fast, custom orders accepted!

motorcycleconnectors.com
Cycle Terminal - We have Your wiring Needs. OEM Style Japanese Motorcycle Wiring Terminals and Connectors for Yamaha, Kawasaki, Suzuki and Honda Motorcycles, from the 60’s to the 90’s. Motorcycle electric products and accessories, Motorcycle Fuse Box's, Bullet Terminals, Spade Terminals and...

cycleterminal.com
Stockists of a wide range of electrical and wiring products for the Automotive and Motorsport industries. Connector housings, terminals and accessories.
www.automotiveconnectors.com
Vintage Connections

www.vintageconnections.com

www.bmotorsports.com
Automotive and motorcycle 12v 24v electrical connector plugs, UK made thin wall harness cable and colour wiring diagrams

kojaycat.co.uk
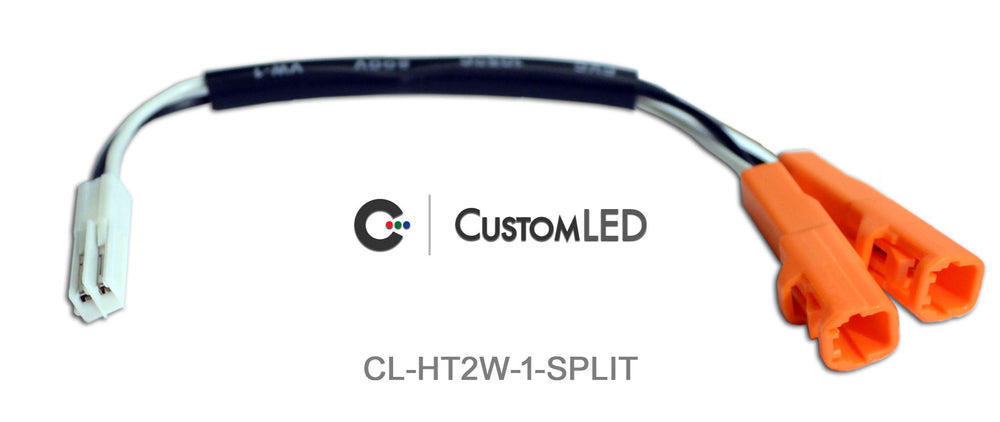
For newer models, you can get pre-made Y-splitters. Will have to make your own for older models. But results true plug-n-play installation and easy troubleshooting. If it doesn't work, unplug it and re-evaluate. No hacking of harness and causing shorts, endless blowing fuses and head-scratching.
To make your own splitter for brake-light, you'll need these connectors and some hook-up wire. Connects to harness-connector, about 6" from at brake-light. Run one Y-leg as far as you need to reach top-box light.
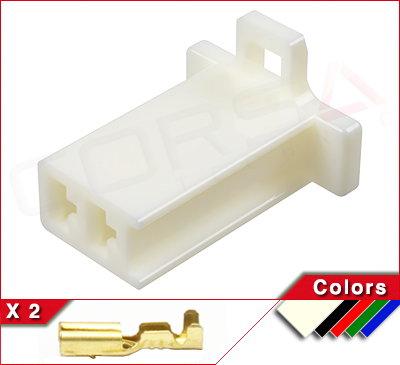
2x male connector (plugs into harness, add one to top-box light):
https://www.corsa-technic.com/item.php?item_id=220&page=2&category_id=49
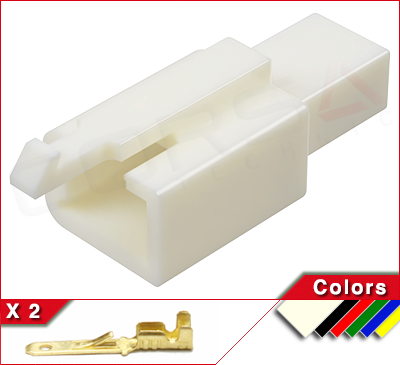
2x female connectors (for original brake and top-box brake light):
https://www.corsa-technic.com/item.php?item_id=217
If you're worried about shorts, add in-line fuse. Complicated relay circuits to isolate is just hedge against improper wiring and/or techniques. Some wiring-manuals I used in Army and later NASA's Ames Research Centre:
https://drive.google.com/file/d/1HaNVIxVWHuiCzJlg1WLV_2L7sAo-RJnA/view?usp=drivesdk
https://drive.google.com/file/d/1UVcnb91nGsjP-SfNmPhINBUfCWZt0-NG/view?usp=drivesdk
Thanks for your input on this
@DannoXYZ
Tapping into the brake light circuit has been covered rather well in some other threads, and other members and I have provided specifics on the connectors that will work with the OEM wiring harness without cutting wires.
There are only two places on the ST1300 that the brake light circuit can be accessed via connectors on the wiring harness:
The connector at the rear brake light switch can be seen in
msg #6 above in this thread. Its location on the wiring diagram is provided as well.
That one is a common
three terminal Hitachi connector that can be easily obtained from sources such as Amazon and ebay for far less than the specialty suppliers. They require a decent crimper to make a solid connection, but it's worth it to buy one because if you start diving into your bike or auto wiring you'll want one anyway. The kit is idea for connecting accessories to the Quartet Harness for instance.
This kit from Amazon includes 2, 3, 4, 6, and 9 pin connectors with terminals, as well as a number of in-line bullet connectors. I think it's a bargain at $18USD.
I asked for a set of crimpers with interchangeable anvils for Christmas and they've worked great for me. I can't locate my brand, but others like the one I reference look identical. I bet they all come from the same factory and it's only the logo laser etched into the tool that's different. The version without interchangeable anvils is cheaper, but less versatile.
Sourcing the connector at the taillight is a bit more challenging and I'd recommend the brake light switch connector first. The taillight connector is a much less common three terminal design. The female connector (which is on the wiring harness) is relatively easy to source. The male connector - which is actually what is molded into the sockets for the tail/brake and signal lights - is much harder to source as it isn't a standard connector. I was only able to find one domestic and one overseas source. From Cycle Terminal it's $11/each. The Japanese source was slightly cheaper per piece, but required a minimum $30USD order plus shipping around $20USD. I have a project which is more than simply tapping in to get the brake light signal, so I could justify the cost.
I cover that saga in this thread.
https://www.st-owners.com/forums/threads/help-locating-3p-honda-brake-tail-connector-mate.182589/
Good luck to you both
Tom


 I read too quickly and skipped over part in manual where to reach bulb harness one has to "remove rear fender A (page 2-8)".