Dont want to hijack anyone's thread so here is my own. Couple of questions about actually taking the carbs off... then putting them back on.
1- First, Ive removed everything EXCEPT the throttle cables. How do you do that?
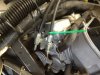
2- Loosening the carb boots I have noticed that the clamp screws were replaced with hex cap screws. Thats fine.. BUT... when I started to unscrew a couple I noticed that the bottom clamp actually spun when I put pressure on it... they were not tight. And then I noticed it did the same on all of the clamps. Hmmm.. now that cant be good.. right?
3- Im a little nervous about actually taking the carbs off... Taking anything apart is easy... putting them back on... could be trouble. Ive read posts... should I just go for it... and learn from doing it? I mean, are they that hard to put back on?
If you've read my other thread... my stumble is kinda still around but not as bad. Im thinking that there must be something in the carbs since I have run seafoam through a tank of gas. For peace of mind I think I just want to eliminate the carbs... clean them up. So many have posted how well their bike runs after a good cleaning.
Thanks
1- First, Ive removed everything EXCEPT the throttle cables. How do you do that?
2- Loosening the carb boots I have noticed that the clamp screws were replaced with hex cap screws. Thats fine.. BUT... when I started to unscrew a couple I noticed that the bottom clamp actually spun when I put pressure on it... they were not tight. And then I noticed it did the same on all of the clamps. Hmmm.. now that cant be good.. right?
3- Im a little nervous about actually taking the carbs off... Taking anything apart is easy... putting them back on... could be trouble. Ive read posts... should I just go for it... and learn from doing it? I mean, are they that hard to put back on?
If you've read my other thread... my stumble is kinda still around but not as bad. Im thinking that there must be something in the carbs since I have run seafoam through a tank of gas. For peace of mind I think I just want to eliminate the carbs... clean them up. So many have posted how well their bike runs after a good cleaning.
Thanks
")