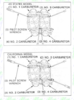
My 1100 ran well, but I have always made my bikes run better after adjusting the carb. pilot jet mixture screws. As many of you know, the ST1100 isn't easy to adjust - access is terrible - and much has been written already about what's needed to do the job. So, I've been reading about it and storing up courage to do this job for about 20 years and decided to give it a go! I have the UK/European spec. carbs with the 'X' slots in the screw, not the 'D' type, so the tool I made will only work with with the slotted screw.
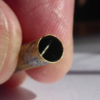
This is the business end - a brass tube with a pin soldered across - which I made sure would fit the screw on cylinder #3. It's as well to check that the tool will also fit elsewhere, the next easiest to reach is #4, the cylinder nearest the throttle cables - though you'll need a torch and can only look with one eye. .......It'll give you an idea of what to expect....
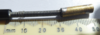
The brass tube was then soldered to a coiled spring - here in the UK, we use it to hang net curtains and it's covered with a plastic sheath that I cut off! And finally, the spring was superglued into a carbon fibre tube that I just happened to have. Overall, the tool was about 12" or 300mm long. The brass tube should have been a little shorter - it would have been easier to manoeuvre - maybe half as long?
Before I started I already knew what my settings were, so if I made a complete b*lls up, I could always go back.....
Access to #3 is easiest, then #4 and #2. .........#1 was a complete so-and-so because the rubber engine cover kept getting in the way.
It was a cold day, so I didn't have trouble with the fan coming on and off.
With my vacuum gauges connected and the engine running and warm, I did each carb. in turn.
The mixture screw was fully closed (gently) and opened slowly until the engine went from spitting and rough to smooth and strong. The transition between too lean and ok was subtle, but could be heard.
The vacuum also rose a tiny bit as the best setting was reached. I did not record the new pilot screw settings but they all finished up between 1 and 1.75 turns open.
After a re-balance, the vacuum gauges rose and fell in unison with a blip on the throttle and were in balance when held at higher revs. It sounded very healthy. I started the bike up the following day in the perishing cold and it fired up as sweet as you like. The engine is smoother than it was and a successful road test is anticipated once we are free of this virus thing (in 2020).
A note about Colourtune - I thought it might be useful, but it was just too awkward to mess with on my own. I've used it with great success elsewhere.
This is the business end - a brass tube with a pin soldered across - which I made sure would fit the screw on cylinder #3. It's as well to check that the tool will also fit elsewhere, the next easiest to reach is #4, the cylinder nearest the throttle cables - though you'll need a torch and can only look with one eye.
.......It'll give you an idea of what to expect....The brass tube was then soldered to a coiled spring - here in the UK, we use it to hang net curtains and it's covered with a plastic sheath that I cut off! And finally, the spring was superglued into a carbon fibre tube that I just happened to have. Overall, the tool was about 12" or 300mm long. The brass tube should have been a little shorter - it would have been easier to manoeuvre - maybe half as long?
Before I started I already knew what my settings were, so if I made a complete b*lls up, I could always go back.....
Access to #3 is easiest, then #4 and #2. .........#1 was a complete so-and-so because the rubber engine cover kept getting in the way.
It was a cold day, so I didn't have trouble with the fan coming on and off.
With my vacuum gauges connected and the engine running and warm, I did each carb. in turn.
The mixture screw was fully closed (gently) and opened slowly until the engine went from spitting and rough to smooth and strong. The transition between too lean and ok was subtle, but could be heard.
The vacuum also rose a tiny bit as the best setting was reached. I did not record the new pilot screw settings but they all finished up between 1 and 1.75 turns open.
After a re-balance, the vacuum gauges rose and fell in unison with a blip on the throttle and were in balance when held at higher revs. It sounded very healthy. I started the bike up the following day in the perishing cold and it fired up as sweet as you like. The engine is smoother than it was and a successful road test is anticipated once we are free of this virus thing (in 2020).
A note about Colourtune - I thought it might be useful, but it was just too awkward to mess with on my own. I've used it with great success elsewhere.