coolant leak under carbs advice ?

Joined
Aug 16, 2008
Messages
99
Location
goldendale wa.
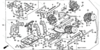
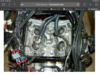
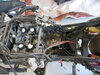
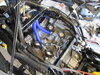
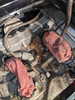
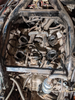
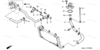
Hi my 2001 st1100 has coolant is leaking from under carbs and dripping down left side pass alternator and hitting exhaust header. Questions. How many coolant lines are under the carbs. Manual does not illustrate this. I see one hose connection on left side but unable to access nut on hose clamp to tighten. I have remove the complete air box. I want to remove the cleaner base #34 and all the bolts out but unable to remove it. I am doing this to hopefully access the coolant hose clamp nut to tighten it. Other than the 8 screws securing the base to the carbs are there any other screws to be removed? The partzilla photo show a hose connect in front of the base. Is there a hose connected there. Can I remove the cleaner base to access the coolant hose or hoses. I'd like to be able to tighten the hoses clamp w/o removing carbs. Anyone with experience removing the cleaner base and photos of the coolant hoses under carbs willing to help will be appreciated. Ride Safe, Greg

st1100 cleaner base.png
 

Slydynbye

Will ride for Pie
Joined
Sep 3, 2007
Messages
1,616
Location
Fremont, California
Bike
2000 ABSII
STOC #
7331
I want to remove the cleaner base #34 and all the bolts out but unable to remove it
I wouldn't separate the carbs or snorkels from that base unless absolutely neccessary.

You will need a JIS #3 Impact as they are REALLY hard to loosen.

The carb set is lifted out as a set if that is what you are trying to do.
 

Erdoc48

Site Supporter
Joined
Jan 25, 2009
Messages
1,441
Age
59
Location
Myrtle Beach, SC/ Sometimes Colorado
Bike
94/00/04 STs, FSC600
IMG_3515.png

^^ This is a pretty good representation of what you’ll see once taking off the carbs- the 2 black hoses that attach to what is called the ‘elbows’ need to be replaced and it’s usually good economy to replace the main radiator hoses and coolant overflow hoses as well (they get dry and brittle with age). When taking off the elbows, be careful as the bolts holding them on are small (I believe 8 mm) so not too much torque to put them back on with new O-rings, otherwise you risk snapping them. I’ve done this job 2x (on my 2 STs)- not hard at all, just time consuming. Many will say it’s wise to remove the fuel tank to pop the carbs off but I never did- just used a wooden broom handle under the posterior middle of the carb bank to lever it off- was pretty easy to do.

I also used a little silicone grease or even silicone spray to install the new hoses to the attachment points, otherwise they stick to the metal and then you’re cursing a blue streak trying to free them to then apply said grease (I have personal knowledge of this, and it wasn’t fun).
 
Joined
Aug 10, 2015
Messages
2,042
Location
Fort Worth, Texas
Bike
91 ST1100/06 ST1300
Here's what I found when I refurbished my 1991 going on three years back. Had some small drips and decided to replace every hose/tube/vent/clamp on the bike. Replace the four carb boots while your under there.
1711717695884.jpeg


Below is after, during reassembly. I replaced the two water fittings, right and left between carb pairs. I kept the PAIR tubes simply 'cause I liked the way they polished up, and sealed the open ends of the tubes. Removed PAIR valve as well.
New fuel hoses all 'round as well. A fuel leak from the two L shaped tubes aft of the carbs was the reason I took it down....both had split. I replaced most every thing I didn't like the looks of, and cleaned the %$&^ out of everything I could reach. Didn't want to revisit the job at some inconvenient moment. On my bike, these soft parts were 31 years old, and showing their age in one manner or another. It's easy to inspect your electrical connections for burns, cracked insulation and corrosion with all this other stuff out of the way as well.

Don't forget to check the long water hose that runs from the thermostat housing all the way back to the reservoir beside the suspension unit. Those have a propensity to split right at the thermostat housing.
Search on 'ST1100 refurbishment' where I think I documented my findings pretty well.

1711717950406.jpeg
 

PmodelinUS

Site Supporter
Joined
Jul 22, 2021
Messages
277
Age
56
Location
Gages Lakes, IL
Bike
1993 Honda ST1100
2024 Miles
000200
Not sure where you keep your ST but when I did this job on my 93 this is what it looked lIke. LOL. I will say think mine was in a barn for several years before I got it. It really isn't a bad job.


1711723054794.png

1711723111480.png
 
Joined
Mar 13, 2012
Messages
5,071
Location
soCal
Bike
'97 ST1100
STOC #
687
I suggest removing everything before ordering parts just in case something else gets damaged in the removal process.

In my case, that small hose at the front by the frame cross member didn't want to come off and I tore it a little while removing the carbs and needed a new one.
 
Joined
Jul 28, 2007
Messages
3,144
Location
finger lakes ny
Bike
1999 ST1100
STOC #
7959
You asked about removal of the air box. Once you get all the screws out, there is the breather hose you need to pull off the right underside of the airbox. I bet you already found this out.
 
Last edited:

Sunday Rider

Site Supporter
Joined
Apr 1, 2006
Messages
1,068
Age
68
Location
Aurora, Ontario
Bike
1997 ST1100
STOC #
6136
It could be more than a loose clamp causing the leak. I too tightened the hose clamp, and it still persisted not a lot but enough to always smell the burning coolant. When I took off the carbs , both hoses were stressed at the hose clamps and the aluminum elbows were leaking. What was supposed to be an O ring under them was just a greenish calcium like ring. It looks like it had been leaking for a long time.
You might as well get the carbs off and see what you can’t see from the sides.
 

ReSTored

Site Supporter
Joined
Nov 6, 2005
Messages
1,482
Location
Mississauga, Ontario
Bike
2019 Tracer GT
STOC #
4463
You'll probably find one of the elbows leaking. I'd take it apart, take lots of pictures and then order parts based on what you find. At a minimum, replaces all of the hoses and the elbows.

Time consuming job, but doable for most I think.

st-riders site has a tutorial on this. Just join to gain access.


ST1100Y

Site Supporter
Joined
Dec 4, 2012
Messages
5,037
Age
59
Location
Vienna, AuSTria
Bike
ST1100Y, ST1100R
STOC #
637
And winding on top of the pic, we see the mostly neglected, ignored, forgotten bypass line... (loc 13 in fiche...)

The rubber hardens due the heat (and lack of airflow behind the t/belt case) and will get brittle (sometimes shatters upon touch), hence essential to inspect/replace...
 
OP
OP
roadrider
Joined
Aug 16, 2008
Messages
99
Location
goldendale wa.
Thans to all responses. I am replacing every hose, o-ring, carb boots etc. What purpose does the rubber diaper under carbs serve. Needed? Any other suggestions? Ride Safe Greg
 

ST1100Y

Site Supporter
Joined
Dec 4, 2012
Messages
5,037
Age
59
Location
Vienna, AuSTria
Bike
ST1100Y, ST1100R
STOC #
637
Thans to all responses. I am replacing every hose, o-ring, carb boots etc. What purpose does the rubber diaper under carbs serve. Needed? Any other suggestions? Ride Safe Greg
As said, air guide, keeping engine heat away from the carbs...
 
Joined
Apr 15, 2022
Messages
53
Age
66
Location
Wisconsin
Bike
1994 Honda ST1100
Just did mine last year. Replace all o-rings, hoses, carb boots, thermostat and clamps. Some may want to re-use clamps but best to do this one and done approach. Do not re-use your coolant. Fill with fresh coolant - I went with Engine Ice coolant.
 
Joined
Jul 28, 2007
Messages
3,144
Location
finger lakes ny
Bike
1999 ST1100
STOC #
7959
When I did all the under carb stuff, I did replace that o-ring #9. Removing that water cover was the hardest part of the job as I remember, and I would likely not bother if I had to do this work again.
 
Top Bottom