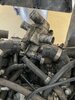
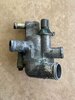
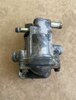
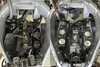
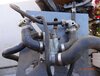
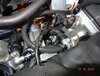
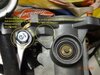
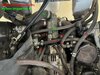
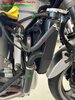
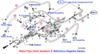
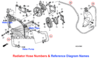
My 2007 ST1300 has 121,000 miles on it. While replacing the engine sub-harness, I removed the throttle body. Once removed I saw quite a mess in the engine bay, mostly from antifreeze weeps/leaks and probably a little oil from the cylinder head covers. After getting that cleaned up, I decided to replace the coolant system hoses and clamps. I took a lot of photos during the teardown and numbered the hoses along with notes on where each went. I ordered OEM parts from Ron Ayers. It was a bit of a challenge to make sense of the water pipe diagram. I thought I'd post a couple of photos with the hoses numbered with the part numbers from the water pipe and radiator parts diagrams along with a sheet listing the OEM part numbers for the hoses and associated clamps. On the photos, RED numbers refer to the water pipe diagram, and GREEN numbers to the radiator diagram. It might help anyone else who may be replacing cooling system hoses.
I previously posted cross-referenced coolant system diagrams here:
Article - How to Navigate Honda Parts Diagrams | Articles | ST-Owners.com
I previously posted cross-referenced coolant system diagrams here:
Article - How to Navigate Honda Parts Diagrams | Articles | ST-Owners.com
Attachments
-
 180.2 KB Views: 154
 -
 153.9 KB Views: 149
 -
39.3 KB Views: 52
-
 426.2 KB Views: 83
 -
 461.3 KB Views: 79