Cracked the fuel joint tube after lifting main tank to replace air filter

Cheddarhead

Smell the Dairy Air!
Joined
May 14, 2007
Messages
103
Location
Pewaukee
Bike
2003 ST1300...the "O
STOC #
6881
Well...as I said, I'm quite possibly the worlds' worst mechanic...but, bolstered with your guys support and recognizing that this is "HONDA" Engineering at its' finest, I plunged further into the recesses of my ST.

I removed the Seat Bracket.

I removed the hoses from under the Tank, including the largest / thickest of these...the dreaded "Drain" hose.

(Editorial comment #1: My efforts to drain the tank could have charitably been described as "modestly effective..." at best. I had to recruit my bride (Better Cheddar!) to hold a splash pan and transfer fuel from the aforementioned drain hose into the pan...and from there into a Gas Can. She was modestly amused.)

In the end, I was successful in removing the tank, exposing the air box pan to the light of day for the first time since 2009, when I acquired the ST and installed what few modest farkles required wiring (Heated Grips, a Stebel Horn, and Driving Lamps. But I digress....

I'm planning on replacing the various hoses...each is/was factory original, so they're approaching 20 years of service. Cheap Insurance, while I've gone this far in tearing into the guts of the bike, in my opinion...

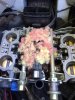
Removed the "Velocity Stacks" and their bases...(Failing to mark the specific positions of each...hope that doesn't haunt me during the reassembly cycle!


allowing me to remove the Air Box Pan. There I found...
This...
IMG_1128.JPG
And this...
IMG_1131.JPG

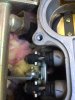
And even a bit of this.
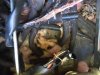
IMG_1133.JPG


...and this.
IMG_1136.JPG

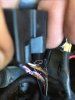
Looks like I'll be doing a Harness Swap, as well.

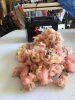
My wife noted that "...the only reason that the mice chewed on the wires is 'cause they (the harnesses) were (apparently) in the (mouses') way." Smart gal!

So...here's the pile of insulation that was stuffed into the space by said mouse. Note this is the stuff I picked out by hand...does not include the stuff that I removed via shop vac.
IMG_1134.JPG
 

Cheddarhead

Smell the Dairy Air!
Joined
May 14, 2007
Messages
103
Location
Pewaukee
Bike
2003 ST1300...the "O
STOC #
6881
I have to admit that I am approaching the point of being "...in over my head..."

Not that this is unfamiliar territory. I've a fair amount of practice in diving into a project with something less that full knowledge / awareness / comprehension or what lies ahead.

With frequently predictable results....me hauling X away (to the repair shop, so as to provide another Boat or Orthodontists' Payment to said proprietor(s), or to the recycling center), to be replaced by a new(er) / better version of whatever it was that I brazenly waged an assault upon.

So now I'm compiling a list of all of the things I'll need to order to effect the harness swap.

On the Harness Side, I have:
A. P/N 32103-MCS-770 Throttle Body Sub-Harness
B. P/N 17545-MCS-G00 Fuel Joint Tube
C. P/N 90661-SLO-A01 Fuel Joint Tube Clip
D. P/N 91405-MCS-G00 Fuel Joint Tube Clamp
E. P/N 90428-PD6-003 TB Fuel Inlet Banjo Bolt Seal (Qty 2)

(I stole this list from a different "How to" Article here on ST-Owners....figured I'd include it here just to save somebody else from having to seek it out. All Credits due to the brilliant individual who actually did the work necessary to compile this list!)

Still building up the list of tubes and hoses needed...feel free to chime in and / or tell me where to go......to find this info out, as well

I'm sure that I'll overlook / forget something...or damage it it the act of installation.

This should be "fun".
 

Gus1300

Site Supporter
Joined
Apr 5, 2007
Messages
563
Location
Haymarket VA
Bike
04 1300A
Have you actually removed any banjo bolts? They've never had to come off in the several times I've had my upper tank off (and had a similar mouse house incident resulting in the replacement of said injector harness...can be done w/o removing the throttle bodies, for when you get to that point). I still have yet to break loose any fuel injection lines so was wondering why you needed item E.

Keep the faith...there are people here to help you! You CAN do this, just take your time.
 

dduelin

Tune my heart to sing Thy grace
Site Supporter
Joined
Feb 11, 2006
Messages
9,685
Location
Jacksonville
Bike
GL1800 R1200RT NC700
2024 Miles
008131
STOC #
6651
I have to admit that I am approaching the point of being "...in over my head..."

Not that this is unfamiliar territory. I've a fair amount of practice in diving into a project with something less that full knowledge / awareness / comprehension or what lies ahead.

With frequently predictable results....me hauling X away (to the repair shop, so as to provide another Boat or Orthodontists' Payment to said proprietor(s), or to the recycling center), to be replaced by a new(er) / better version of whatever it was that I brazenly waged an assault upon.

So now I'm compiling a list of all of the things I'll need to order to effect the harness swap.

On the Harness Side, I have:
A. P/N 32103-MCS-770 Throttle Body Sub-Harness
B. P/N 17545-MCS-G00 Fuel Joint Tube
C. P/N 90661-SLO-A01 Fuel Joint Tube Clip
D. P/N 91405-MCS-G00 Fuel Joint Tube Clamp
E. P/N 90428-PD6-003 TB Fuel Inlet Banjo Bolt Seal (Qty 2)

(I stole this list from a different "How to" Article here on ST-Owners....figured I'd include it here just to save somebody else from having to seek it out. All Credits due to the brilliant individual who actually did the work necessary to compile this list!)

Still building up the list of tubes and hoses needed...feel free to chime in and / or tell me where to go......to find this info out, as well

I'm sure that I'll overlook / forget something...or damage it it the act of installation.

This should be "fun".
You can do this and you will have the confidence of trying something unknown! We all have made those types of mistakes and had to call in an expert but only if we had tried to do it first and it's in the trying we learn.
 

Cheddarhead

Smell the Dairy Air!
Joined
May 14, 2007
Messages
103
Location
Pewaukee
Bike
2003 ST1300...the "O
STOC #
6881
Have you actually removed any banjo bolts? They've never had to come off in the several times I've had my upper tank off (and had a similar mouse house incident resulting in the replacement of said injector harness...can be done w/o removing the throttle bodies, for when you get to that point). I still have yet to break loose any fuel injection lines so was wondering why you needed item E.

Keep the faith...there are people here to help you! You CAN do this, just take your time.
I wouldn't know a "Banjo bolt" from a Chevy Volt....yet. As I said, I copied the list so as to order what "might" be needed. I'd be delighted "not" to need some of the stuff....but I don't want to get any further into this until I have the harness etc in-hand.
 

Cheddarhead

Smell the Dairy Air!
Joined
May 14, 2007
Messages
103
Location
Pewaukee
Bike
2003 ST1300...the "O
STOC #
6881
You can do this and you will have the confidence of trying something unknown! We all have made those types of mistakes and had to call in an expert but only if we had tried to do it first and it's in the trying we learn.
Yep...you guys are my safety net.

I'm not burdened by knowledge....but I'm more than willing to try...and to put myself out there as an example of how really "good" this group (and this motorcycle) truly are.
 
Joined
Feb 11, 2006
Messages
1,102
Location
Bloomington, MN
STOC #
273
I guess I'm naive but can someone explain why of all places in and around the house/garage, mice seem to always be attracted to the carb area of motorcycles?
 

Gus1300

Site Supporter
Joined
Apr 5, 2007
Messages
563
Location
Haymarket VA
Bike
04 1300A
I wouldn't know a "Banjo bolt" from a Chevy Volt
Luckily the interweb is a great resource for things such as this. You'll find the banjo bolts on brake and fuel lines; BLUF, the bolts have a hole drilled through them up to a point where a hole is also drilled through the side, to allow fluid to pass through to a connected hose. Sealed by a washer on either side of the hose fitting and tightened into the structure supplying or receiving the fluid, such as a brake caliper or fuel injection rail.

Keep the learning curve going!

@STPaulK - my only guess is because the area under our airbox is warm and enclosed, perfect for setting up a nest to procreate and have breakfast, lunch, and dinner right at hand in the form of wire coverings, insulation, etc. Best defense, besides a cat, is to ride regularly!
 
OP
OP
SFAlan
Joined
Dec 5, 2007
Messages
63
Location
Dallas, TX
Bike
ST and K1600
As noted at the start of this thread, I managed to crack that large fuel hose when I tipped the tank back, even though I still had the wire connected that prevents tipping the tank beyond the height needed to insert the rod that holds the upper tank at the tilted-up position which allows removing the air box cover. I followed Igofar's instructions for removing the fuel hose: 1) with the upper tank tilted and supported by the support rod, 2) remove the through-bolt that secures the upper tank to the seat bracket, 3) remove the screws that secure the seat bracket to the frame and the one screw that secures the rear brake fluid fill to the seat bracket, 4) now you have access to the fuel hose connection to the lower tank (on top of the fuel pump).. spray some penetrating oil (or WD40) on the connection of the hose to the lower tank to help loosen it, carefully loosen the hose with a small screw driver to allow spraying the penetrating oil inside the hose, 5) I used channel locks and regular pliers to loosen the clip on the hose, while at the same time using a screw driver to push the clip back onto the hose, 6) now carefully push the hose off of the connection, 7) now that this hose is disconnected, remove the wire that prevents tipping the tank back, 8) lay some padding onto the frame to support the tank, 9) with the wire now removed, its possible to tip the tank all the way over backward onto the frame (carefully), 10) now you have easy access to examine the fuel hose to confirm you haven't put any cracks into it. My crack was on the inside of the elbow bend in the hose, as shown in the photos above.
 

Cheddarhead

Smell the Dairy Air!
Joined
May 14, 2007
Messages
103
Location
Pewaukee
Bike
2003 ST1300...the "O
STOC #
6881
As noted at the start of this thread, I managed to crack that large fuel hose when I tipped the tank back, even though I still had the wire connected that prevents tipping the tank beyond the height needed to insert the rod that holds the upper tank at the tilted-up position which allows removing the air box cover. I followed Igofar's instructions for removing the fuel hose: 1) with the upper tank tilted and supported by the support rod, 2) remove the through-bolt that secures the upper tank to the seat bracket, 3) remove the screws that secure the seat bracket to the frame and the one screw that secures the rear brake fluid fill to the seat bracket, 4) now you have access to the fuel hose connection to the lower tank (on top of the fuel pump).. spray some penetrating oil (or WD40) on the connection of the hose to the lower tank to help loosen it, carefully loosen the hose with a small screw driver to allow spraying the penetrating oil inside the hose, 5) I used channel locks and regular pliers to loosen the clip on the hose, while at the same time using a screw driver to push the clip back onto the hose, 6) now carefully push the hose off of the connection, 7) now that this hose is disconnected, remove the wire that prevents tipping the tank back, 8) lay some padding onto the frame to support the tank, 9) with the wire now removed, its possible to tip the tank all the way over backward onto the frame (carefully), 10) now you have easy access to examine the fuel hose to confirm you haven't put any cracks into it. My crack was on the inside of the elbow bend in the hose, as shown in the photos above.
Steps #1 - 9 make lots more sense when re-reading them "after" wrestling with (...and, ultimately, removing...) the upper tank.

Throughout the process, I kept reminding myself that "...somebody put this together....so there has to be a logical sequence where it will come apart."

In my career, I've worked in helping with the design, development, and commercialization of some pretty incredible devices...from CT and Magnetic Resonance scanners to large natural gas-fired engines to some of the largest Agricultural Equipment...so I've come to appreciate how things come together in three dimensions in very tight spaces...and to appreciate the creativity of those who figure out "how" to go about assembling things.
It can be brilliant...the staging of individual pieces and of sub-assemblies...and figuring out how and where to place them...to align the items...got make all of the necessary connections for electrical connectors, for fuel, for hydraulic fluid, for coolant, etc...there is a real "creative genius" involved with a well-developed plan for assembly....so...therefore...if it was able to be assembled...then there must be a way to disassemble it properly....especially for a product from a solid engineering company such as Honda.

There isn't much room to work there, especially "before" the upper tank is removed...so it can be intimidating...

Back to the task at hand: Do we have a preferred source for these replacement parts? Is there a retailer who actively support motorcycling, and perhaps ST-Owners.com? Where to buy the bits and bytes needed?
 

Cheddarhead

Smell the Dairy Air!
Joined
May 14, 2007
Messages
103
Location
Pewaukee
Bike
2003 ST1300...the "O
STOC #
6881
Bringing this to its' conclusion...

I purchased a replacement for the Injector Sub-Harness.

I took the time to remove both RH and LH Side panels...making it easier to locate all other various connection points between the main harness and the various items that are part of the Sub-Harness.

I tied bright yellow paracord to the various connectors / devices on the main harness....and to the connectors themselves on the Sub-Harness...making it easy to both see where the harness "lays" when installed...and also easier to thread the new harness connectors / pigtails back to where their mating connector is.

We (well, technically, my wife!) was able to manipulate / remove the damaged harness and install the replacement without having to remove the Fuel Injection system.

She fired right up as soon as I reinstalled the Battery and keyed the ignition.
 

Attachments

Joined
Sep 22, 2015
Messages
1,287
Location
Wasaga Beach, Ont. Canada
Bike
'04 ST1300 Blue STar
I guess I'm naive but can someone explain why of all places in and around the house/garage, mice seem to always be attracted to the carb area of motorcycles?
Food,,, in a nice secluded space. The food being the wiring insulation used in the 2000 era bikes,, being tasty to mice types. Compounds used in that insulation were somewhat less environmentally toxic,, but as it turns out were also attractive to rodents. Who knew ?? CAt'
 
Top Bottom