Did I (literally) Screw Up my Main Jets?

DaveWooster

'95 ST1100ALS and '98 Standard ST1100W
Joined
Oct 31, 2007
Messages
352
Location
Topeka, Kansas, USA
Bike
1995 ST1100A
STOC #
3480
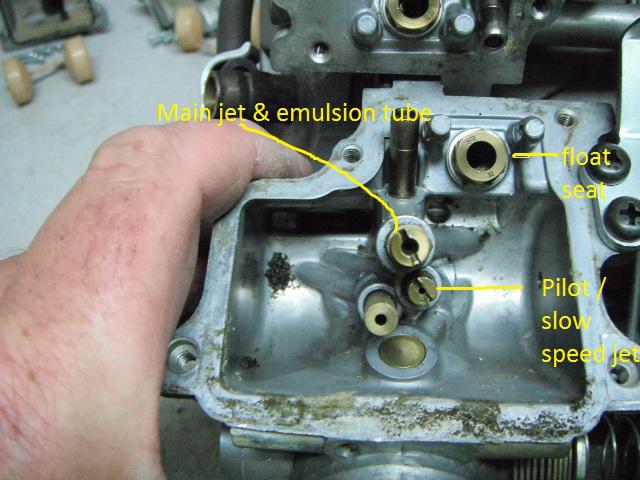
I bought an ST1100 "carb assembly" by mail order. Not having a mechanic available at this time, I went about getting the gasoline out of it myself.

I opened the float bowls; unscrewed the Slow Jets; and cleaned them with mineral spirits (not having any carb cleaner on hand).

The Main Jets looked similar, having a slot for a flat bladed screw driver. So I took two of them out and cleaned them. (Let me know if you need photos to follow this.)

Trying my luck on the third Main Jet, the two-piece nature of those Main Jets came to my attention. All that I removed was the small head portion, which is like an ordinary machine screw with a flat head. The Jet itself remained in the carb. (It has a hex portion on it so that it can be removed with a wrench or spanner. I repeated my "mistake" with the fourth and final Main Jet.)

Is that head portion there for adjusting that Main Jet? (If so, I have put that Jet out of adjustment.)

Or is it there just to make installation of the Main Jet easier?

What do you think?

(And down the road ahead: Has anyone written up a reasonably simple procedure for cleaning a carb assembly that is off the bike?)

Here are the details, for your reference:

American - California carb assembly number 16100-MY3-690. It came off of a 1994 ST1100ALR ABS model, but that assembly is also used on California non-ABS ST1100s starting with 1993, or maybe 1992.

Slow jet number 38S, and
Main Jet number 125.
 
Last edited:
The main jet screws into the needle jet. The larger tube with the hex is the needle jet and the small jet with the screwdriver slot is the main jet. The main jets are numbered to indicate the size hole in the jet. Adjustments are made by changing the size of the jet.
 
I am trying to understand where you are at with this. It appears 2 have the main jets with the hex head and 2 were a flat slot? As far as type goes, no biggie as long as the mainjets are the same size, 125 in this case. The pilot jets only meter by the size of orifice while at idle and fuel is drawn out into the venturi at idle. Might need pictures to ensure what you are asking.
 
Please read the link below. To answer what I think is the question, no. No, you have not screwed anything up yet. You do not adjust anything like that. That hex part needs to be removed for cleaning. In fact to properly clean those carbs you have more work ahead of you than you think.

http://www.st-riders.net/index.php?topic=10249.0


That is an excellent tutorial. You can't cut corners and obtain acceptable results. If you aren't already familiar with the ST carbs, spend some time studying an exploded view and this tutorial before you bother to begin. Otherwise you will find yourself unpleasantly surprised...usually after you have reassembled everything. While the carbs are out of the way, inspect your hoses and fittings.
Not trying to be preachy, certainly not criticizing.....I made all the usual mistakes of tearing into unfamiliar carbs and missing things. ST1100s are in the 20-30 year old range and must be treated nicely during maintenance if you wish to make the 100000-200000+ mile potential these bikes offer. They don't require major maintenance often, when they do, just do it well.
 
I don't see any photo yet of what I am calling the two piece Main Jet, number 125.

Maybe it is time for me to supply a photo.

(The number 125 is stamped on what I call the slotted head machine screw portion of the Main Jet. I did notice that that screw is hollow inside. And the hex portion of the Main Jet has a hole at both ends; that screw closes one of those holes when it is installed.))
 
I'm thinking you are referring to the main jet and emulsion tube. The e. tube is the hex part. Main jet is what you are calling machine screw.


Picture42.jpg
 
Hello Dave...

It is not uncommon for the main jet threads to get a little stuck in the emulsion tube and all them come out together. They can be easily separated by putting the hex nut of the emulsion tube in a vise and carefully turn out the main jet. They really should be separated to be cleaned properly.

Adam
 
Al st1100 provided a parts diagram.


Using it, what I am calling the two piece Main Jet is numbers:

20 HOLDER, NEEDLE JET (which has a place for a hex wrench or socket wrench) and
27 JET, MAIN (#125) which has a slot for a flat bladed screw driver and resembles a machine screw.

(The slow jet is number 28 in his diagram.)
 
Side note, I don't know that mineral spirits will clean those jets well enough. And be sure you don't tilt the carbs and get carb cleaner up into the diaphragms as the material on those can be destroyed. A small guitar string can be used to help verify all the ports are clear. I've had great success with an ultrasonic cleaner and water with either degreaser, or household cleaner. If you don't have access to one, clean the bowls and the fuel lines as well as you can with carb cleaner. Spend some time on the fuel valve aka needle and seat. Unless the needles for the fuel valves are damaged, chances are they are ok to reuse. I can recommend chucking a qtip into a drill and using that to polish the seat for the fuel valve - any debris that gets in there can cause carb flooding.

And there are no adjustments with those 2-piece jets - just secure them into place - keep in mind it's brass going into pot metal - don't overtighten.

And be sure to use a JIS screwdriver on those carb screws on the bowls - keeps them from getting chewed up.
 
Last edited:
Attached is a photo of (a finger pointing to) a needle jet holder, which is also known as a needle jet, or an emulsion tube.

I removed all four such, along with the four main jets that were screwed into those four needle jet holders.

When I re-install those eight items, is there a torque spec for each needle jet holder?

Then, do I just screw the main jets tightly into the needle jet holders, or do I somehow have to adjust them as I install them?

(Thanks for looking.)
 

Attachments

  • Needle Jet Holder.jpg
    Needle Jet Holder.jpg
    48.8 KB · Views: 17
Last edited:
As far as I can tell, the main thing on installation is in the following quote.
...
And there are no adjustments with those 2-piece jets - just secure them into place - keep in mind it's brass going into pot metal - don't overtighten.
...
 
I am trying to understand where you are at with this. It appears 2 have the main jets with the hex head, and 2 were a flat slot? ... Might need pictures to ensure what you are asking.
I have taken out all four of the main jets, using a flat bladed screw driver. Two of them came out still attached to their needle jet holders. Two of them came out without those needle jets, leaving the two needle jet holders installed. I then unscrewed those last two needle jet holders also, using an open end wrench or spanner, for cleaning.

As for reinstallation, it appears that one just screws in the four slow jets, the four needle jet holders, and the four main jets (which screw into those needle jets) ... until they are tight, but not so tight that threads get stripped.

... A small guitar string can be used to help verify all the ports are clear....
I have turned this carburetor assembly over to a friend who says he knows how to clean carbs. (By the way, he mentioned that his service manual says not to use metal wire to clear out passages inside carbs.)
 
Last edited:
Generally speaking if you are able to see daylight through those passages, and you've used an appropriate carb cleaner, there's no need for guitar string. I understand the concerns that steel strings can have with brass jets and such, but in practice, I have never seen one cause any kind of damage.

Basically with those brass bits you have off - if they are clean, reassemble and you are good to go.
 
Back
Top Bottom