
Yesterday I performed my annual fork fluid change and upgraded the valving at the same time to the Race Tech Gold Valves. During the change over I noted a couple of small changes from the Race Tech instructions.
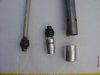
In step 2 "Remove the compression valve." is doesn't mention about removing the aluminum piece off the end of the cartridge, see first attachment. It's a snug fit and I used a slide hammer with expanding fingers to grab the inside lip. It came off with just a light tap. It would not come off by just pulling on it though. Once it was off access to the clip was easy.
In step 3:
"Remove the rebound rod from the cartridge. Being very careful not to damage the rod, hold the rod using the TFSH 01 Shaft Holding Tool. The bottom-out piston is held onto the rod with peening over a circlip on the rod (the circlip is not visible until the piston is removed). You must spread the peening over the circlip. Simply tap down on the piston using a hammer and a 12" (300 mm) length of 1/2 electrical conduit (or some other piece of pipe) as a driver (or you can use a small chisel). This will spread the peening. Save the circlip and piston, they will be reused. Slide the rod out of the cartridge tube."
The strange thing was once the compression valve was removed from cartridge the rod and rebound valve simply slide out without the need for any tools what so ever.
During the assembly of the rebound valve it showed only one check plate, item 3 in the drawing. The shim pack came with 2 per valve so I used both. They are very thin so I wasn't worried about the stack being too thick. Also, when I disassembled the factory rebound valve the nut simply unscrewed and pressed back the end of the shaft that was peened over. When I reassembled the stack I just reused the original nut and since I did do any clean up of the threads it was a good snug fit and I didn't use the Locktite as was instructed. The 30 in-lbs with the snug nut fit seemed tight enough to not worry about it falling off.
A test run up through Azusa Canyon and over to Mt. Baldy and back home on the freeway was very pleasant but I think I'll go out today and test it some more.
Attachments
-
 93.5 KB Views: 242
 -
 109.4 KB Views: 236