Frame bolt holes out of alignment

Joined
Oct 28, 2020
Messages
15
Age
63
Location
Chester, NJ 07930
Bike
2016 ST1300PA
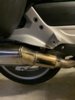
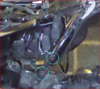
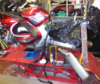
I'm not the most mechanically inclined guy, and I managed to goof up what I think should have been a simple installation of some crash guards for the luggage on my ST. I removed two bolts as shown in the pic below. Now the corresponding holes behind this part are slightly out of alignment. I'm not sure what the right terms/names are for the parts involved. I think the solution may involve jacking up (very slightly) the part behind, but figure I'd reach out for assistance before making a small problem big.

TIA,

Chastened in Chester


Two holes.jpg
 
Joined
Sep 22, 2015
Messages
1,287
Location
Wasaga Beach, Ont. Canada
Bike
'04 ST1300 Blue STar
The aluminum part with the counterbores (for the cap screws),,, is called "side step". First time I removed both bolts,,, I lost the alignment,,, as you have. After that,,, I always only removed one bolt at a time. I was eventually able to get one bolt back in,,, being very cautious to not cross thread it. I will soon be doing the same task again,, as I remove BlueSTar's damaged tip over bars. Just work carefully,,, with levers or jacks,,, and you will figure it out,,, cheers,,, CAt'
 

Igofar

Site Supporter
Joined
Jan 8, 2011
Messages
7,120
Location
Arizona
Bike
2023 Honda CT125A
You need to take the weight off the rear wheel as it is attached to shock etc.
Try board under wheel while on center stand, or carefully using bottle jack under shaft drive pumpkin.
 

jfheath

John Heath
Site Supporter
Joined
Mar 18, 2006
Messages
2,832
Age
70
Location
Ilkley, W Yorkshire, UK
Bike
2013 ST1300 A9
2024 Miles
000679
STOC #
2570
Without those two bolts on both sides, there is nothing holding up the black tubed frame that loops around under the pillion seat. It doesn't drop so much as slowly lowers itself while you are not looking, being clamped by the bolts at the front.

The two bolt holes concerned are on this angled down tube just behind the battery on the right hand side, and just behind the fuses on the left (shown).
Sorry it is a blurred image - its a detail of the picture below.

1629757621405.png

Here is my bike a couple of years ago, getting a good clean up and the hydraulic pre-load adjuster being sorted out. The entire bike is balanced quite nicely on the blue platform scissor jack under the sump and the centre stand (which takes most of the weight). The bottle jack is supporting the collector of the exhaust, because the silencers are just held by the collector pipes and the edge of the ramp. The green circle is the bolt that supports the front end of the frame, and the piece of wood that was once part of the pallet on which the bike ramp was delivered, is exactly the right size to stop the rear end from dropping (ahem, 'add any further' to the end of that last sentence). It is relatively easy to lift the rear end up to make the holes align with the large alloy footres bracket. Put the front bolts in loosely to start off with, and have a narrow screwdriver handy to put through one of the holes as you lift the rear a tad. Then put the bolt into the other one. Again loosely. Then the other bolt.

The swing arm will not drop any further than it is.

1629756905124.png

In your case, remove the seat, saddlebag and top box if there is one. Find some way of lifting the rear frame up. (eg using the grab rails). The whole assembly is not particularly heavy and use a bar / screwdriver to slot through as soon as the holes line up. Slacken the front bolts to give a bit of freedom of movement.
The swing arm, suspension unit and wheel are all independant of this assembly so they don't add any weight to what you have to lift.
 
Last edited:

Andrew Shadow

Site Supporter
Joined
Jan 28, 2012
Messages
5,127
Location
Montreal
Bike
2009 ST1300A9
Lift up or push down on the platform behind the passenger seat as required to line them up. The platform gives you leverage. It takes very little force. A second person doing so while you thread the screws is a lot easier.
 

STRider

Site Supporter
Joined
Mar 17, 2020
Messages
1,114
Age
64
Location
Oregon
Bike
2012 ST1300A
STOC #
50
Sorry you didn't get the same instructions as I did which clearly admonished, "Only remove one bolt at a time, install tip-over bar with one bolt, remove second bolt and rotate tip-over bar's mounting plate into alignment and then insert second bolt" or something like that. :)
 

dduelin

Tune my heart to sing Thy grace
Site Supporter
Joined
Feb 11, 2006
Messages
9,685
Location
Jacksonville
Bike
GL1800 R1200RT NC700
2024 Miles
008131
STOC #
6651
I did this on one side when I installed the Goldwing crash guards. I happened to have a tapered bronze drift or punch that I used in one bolt hole to lever the subframe back in alignment to start one of the bolts. I would be hesitant to use a steel screwdriver for fear of buggering up the threads in the subframe. Harbor Freight has a set of bronze drifts or punches cheap enough for a one-use tool.
 
Joined
Nov 16, 2007
Messages
1,372
Location
MURFREESBORO, TN
Bike
18 Gold Wing
STOC #
7285
I made the same mistake. You could have a neighbor come over and left the rear up from the grab rails while you thread one of the bolts in. I used a ratcheting tie down hooked to the garage door rail and the grab bar and was able to ratchet the rear up enough to thread the bolt in.
 

Sadlsor

Site Supporter
Joined
Jan 15, 2020
Messages
4,285
Age
66
Location
Birmingham, Alabama
Bike
2008 ST1300A
STOC #
9065
Sorry you didn't get the same instructions as I did which clearly admonished, "Only remove one bolt at a time, install tip-over bar with one bolt, remove second bolt and rotate tip-over bar's mounting plate into alignment and then insert second bolt" or something like that. :)
Not that it helps the OP, but I got the same detailed instructions when I ordered the adapter plates (which many here do NOT use in mounting the GW crash bars) from @red dirt cowboy, which are sadly no longer available from him. @bygdawg stopped selling them before that.
Without the written admonition to NOT take both bolts out at once, I most certainly would have done exactly that, with the exact results of the OP.
 
Joined
Feb 19, 2012
Messages
83
Location
Patchogue, NY
Bike
ST1300 - Black
Been there too.
I used one C-clamp and made a jack out if a bolt and nut. That fits on the inside of the cast aluminium frame on a ledge just below the black tube frame. To jack up the black tube frame and used the C- clamp move the holes sideways.
Retaped the Holes and replace bolts.

My problem side was where the fuses and relays are.

Note: You can use longer bolts too. just check they don't interfere with anything behind the black tube frame.
 
Top Bottom