Front wheel bearings questions..

Odie1

Site Supporter
Joined
Apr 24, 2011
Messages
112
Location
Claremore, Ok
Bike
1996 ST1100
STOC #
3876
Installing a new front tire and felt my wheel bearings. Felt very slightly 'gritty', not perfectly smooth, so I decided now would be a good time to replace them. Okay, since I have 93K on the bike, it's probably way past time, but lets not go there.

I have not started yet, but have been reading several posts from the past on replacement, and can't seem to answer a couple of questions I have.

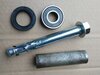
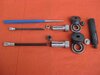
Seeing as how there is a spacer between the bearings, and it LOOKS from the manual it is sized just large enough for the axle to pass through, is there room enough to drive the left hand bearing out from the right hand side while the spacer and right hand bearing are still in there? Again - apologies for not investigating more before asking, but would like to know BEFORE I start blindly hammering on stuff! I've learned over the years to use the big hammer as a LAST resort, not on the first attempt.

Secondly, should I replace the dust seals while I am there... which leads me to my third question...

Lastly - was looking at Partszilla and they show 3 different part numbers for dust seals, and 2 different numbers for the same bearings? Is there any difference, or is that just different generations of part codes, manufacturing, whatever?

Thanks for any input before I start disassembly...of the bearings anyway ... tire and disks already off.

Odie1
 

Uncle Phil

Site Supporter
Joined
Feb 26, 2007
Messages
11,313
Age
71
Location
In The Holler West Of Nashville, Tennessee
Bike
4 ST1100(s)
2024 Miles
005185
STOC #
698
Odie - I used to get the entire 'setup' - bearings and seals - from CBR with a lifetime warranty but I think they stopped that service.
IIRC, ALLBALLS has the same deal now if someone else wants to jump in and confirm.
 
OP
OP

Odie1

Site Supporter
Joined
Apr 24, 2011
Messages
112
Location
Claremore, Ok
Bike
1996 ST1100
STOC #
3876
Partszilla had listed a "kit" - seals and bearings... but was not available.

I have not spent much time "shopping around"

Odie1
 

jfheath

John Heath
Site Supporter
Joined
Mar 18, 2006
Messages
2,836
Age
70
Location
Ilkley, W Yorkshire, UK
Bike
2013 ST1300 A9
2024 Miles
000679
STOC #
2570
The spacer is designed to keep the inner race of the two bearings the correct distance apart. ie the spacer is slightly longer than the distance between the two ledges which appear to be where the bearing sit. But the don't both sit on a 'ledge'. The inner race of the bearings and the spacer should meet and there is no gap between them. So finding being able to drive out the inner race from the opposite side is extremely difficult. You may be able to knock the spacer across a little bit to provide a tiny ledge of the inner race - then knock it back to get a ledge on the other side. Repeat. I did it once. It is tedious.

Some people cut two notches into the end of the spacer to make this job easier.

But the correct tool is the way to go. The bearings knock out quite easily. It doesn't have to be Honda. It just has to fit the bearing.

Note that when you put them back in, it matters which bearing is put in first. For the front wheel, you drive in the RIGHT hand bearing (brake lever side) first until the outer shell sits on the ledge inside the hub. (It is a different order for the back wheel). If you get this wrong, then the wheels will be slightly off centre, the brake disc and the gap through which the brake disc passes on the caliper bracket will be slightly out of alignment.

Then put in the spacer. Don't forget the Spacer. Then drive in the LEFT bearing until the inner race meets the distance tube. Drive only on the outer race - or use a tool that drives outer and inner together. Although there is a ledge in the hub, the inner race meets the distance collar before the outer race meets the ledge in the hub. So as soon as the inner race meets the distance collar, you stop driving. For a few years, I used the outer race of an old bearing as a tool to drive a new bearing in on the outer shell. I ground a slot in so that it was 'C' shaped so I could get it out again - it was free to spring away from the hub sides. And I used the axle to make sure that it was driven in perfectly square. You have to keep feeling for when the inner race meets that collar - check if there is still a gap. tap in a bit more. Stop as soon as the gap between the bearing and collar has gone.

Download my pdf in Post #1 here Article [13] - ST1300 - Maintenance - Fitting Wheel Bearings - What the manuals don't tell. | ST1300 Articles | ST-Owners.com

And theres a video of me removing and replacing a front wheel bearing here Article [13] - ST1300 - Front wheel bearing replacement [VIDEO] | ST1300 Articles | ST-Owners.com

Dealers do not necessarily take the same care to the detail. I know. When I thought that they knew best, I watch them do it. I thought that what they did was correct, until I found out for myself. Those bearing lasted 5,000 miles. They were shot by the next tyre change. They had been 'side loaded'
 
Last edited:
OP
OP

Odie1

Site Supporter
Joined
Apr 24, 2011
Messages
112
Location
Claremore, Ok
Bike
1996 ST1100
STOC #
3876
John - thank you sir. Always nice to be able to follow a GOOD example.

I think I will source a removal tool. Seeing as how we are not supposed to be above freezing for about a week, I'm in no hurry..

Odie1
 

Uncle Phil

Site Supporter
Joined
Feb 26, 2007
Messages
11,313
Age
71
Location
In The Holler West Of Nashville, Tennessee
Bike
4 ST1100(s)
2024 Miles
005185
STOC #
698
The spacer is designed to keep the inner race of the two bearings the correct distance apart. ie the spacer is slightly longer than the distance between the two ledges which appear to be where the bearing sit. But the don't. The bearings and the spacer should meet and there is no gap between them. So finding being able to drive out the inner race from the opposite side is extremely difficult. You may be able to knock the spacer across a little bit to provide a tiny ledge of the inner race - then knock it back to get a ledge on the other side. I did it once. It is tedious.

Some people cut two notches into the end of the spacer to make this job easier.

But the correct tool is the way to go. The bearings knock out quite easily.

Note that when you put them back in, it matters which bearing is put in first. For the front wheel, you drive in the RIGHT hand bearing (brake lever side) first until the outer shell sits on the ledge inside the hub. It is different fro the back wheel. If you get this wrong, then the wheels will be slightly off centre, the brake disc on the wheel and the gap through which the brake disc passes on the caliper bracket will be slightly out of alignment.

Then put in the spacer. Then drive in the LEFT bearing until the inner race meets the distance tube. Drive only on the outer race - or use a tool that drives outer and inner together. Although there is a ledge in the hub, the inner race meets the distance collar before the outer race meets the ledge in the hub. So as soon as the inner race meets the distance collar, you stop driving.

Download my pdf in Post #1 here Article [13] - ST1300 - Maintenance - Fitting Wheel Bearings - What the manuals don't tell. | ST1300 Articles | ST-Owners.com

And theres a video of me removing and replacing a front wheel bearing here Article [13] - ST1300 - Front wheel bearing replacement [VIDEO] | ST1300 Articles | ST-Owners.com

For a few years, I used an old bearing as a tool to drive a new bearing in on the outer sheel. Ground a slot in so that I could get it out again. And used the axle to make sure that it was driven in perfectly square. You have to keep feeling for when the inner race meets that collar.
John - Does Odie have a ST1300 or a ST1100? ;)
Are the procedures the same?
 

jfheath

John Heath
Site Supporter
Joined
Mar 18, 2006
Messages
2,836
Age
70
Location
Ilkley, W Yorkshire, UK
Bike
2013 ST1300 A9
2024 Miles
000679
STOC #
2570
I don't know - but I did check - yes they are. I'll find the relavant bits.

ST1100 from service manual 1991-2002 St110 and ST110A P13-10

1100 Front Wheel

1704991176293.png

1300 Front Wheel

ST1300 Copied from the 2003 manual illegally available on-line - but it saves me scanning in the same part from my legally purchased 2004 manual.
P15-17 in the 2003 online verison. P16-11 in mine

1704991548561.png

Rear Wheels

The rear wheel bearings are done in the opposite order - right first.

The confusion isn't helped by my 1300 manual which states:
"Drive in a new left bearing", "Install the distance collar", "Drive in a new left bearing" ! Oops !! Fortunately the diagram identifies that the left side bearing should touch bottom first and the text labels the double race bearing correctly.

The 1100 manual backs this up for the rear wheel - Drive in a new left bearing first, then the spacer, then a new right bearing. P14-5

I cannot find anything relating to this in the Common Service Manual - but it does say that bearings should always be inserted with the manufacturers name facing out. It doesn't say why. Advertising perhaps ? Maybe to do with bearings with a seal on just one side. I don't know.

I remember being very confused the first time I put new bearings into my first 1300. No one could tell me why the spacer was longer than the distance between the shoulders in the hub. Some suggested bits of grit on the shoulder; burrs on the distance collar; someone had replaced the distance collar with the wrong one.

So I went hunting and found that the order of installation mattered. That can only be because one seats on the shoulder in the hub and the other doesn't. I had to go and buy another new bearing ! So I got the 1300 manual where the diagram shows the rear left bearing has to be driven in to touch bottom. The front wheel bearing diagram shows the same for the right hand bearing - but this time it shows the gap between the shoulder and the bearing on the left side. But you have to look for it !!

I have no evidence that the 1100 spacer is longer than the distance between the shoulders. When I had the 1100s I had only the Haynes manuals. Just that for the 1300 it is and that both manuals state which bearing should be driven in first.
I guess that when I changed the bearings on my 1100, I didn't know and I didn't notice. When I discovered this for the 1300, I went back to the 1100 manual to check - and noted that it had the same requirement. My second 1100 was slightly more difficult to lean one way than the other. I fitted new radial BT020s and fitted bearings at the same time. That cured it. I assumed it was the tyres. I might have got lucky and put the bearings in correctly !!

See - I'm not an 'expert'. I just thought I was. Problem is - that statement is probably still true ! I just don't know what I don't know.
 
Last edited:
OP
OP

Odie1

Site Supporter
Joined
Apr 24, 2011
Messages
112
Location
Claremore, Ok
Bike
1996 ST1100
STOC #
3876
Correct - I have an 1100...and had read in the manual to install the RH bearing first. But thanks for making sure.

Doing a little on-line shopping and have not run across that removal tool as yet... but still looking.

Odie1
 
Joined
Jul 28, 2007
Messages
3,147
Location
finger lakes ny
Bike
1999 ST1100
STOC #
7959
bearings and seals - from CBR with a lifetime warranty but I think they stopped that service.
That is unfortunately correct.

I think I will source a removal tool.
After struggling with the same thing, I bought one of these. A little hard to find. Wound up at Runnings hardware
dept. I think it was called an anchor bolt. About 3 bucks. Worked great. The picture is of the rear wheel parts, but same idea:

wheel bearing tool sleeve anchor .jpg


.
 
Last edited:

John OoSTerhuis

Life Is Good!
Joined
May 10, 2005
Messages
5,222
Location
Bettendorf, Iowa
Bike
1991 SSMST1100
STOC #
1058
You’ve gotten good advice, above. To borrow the free (postage only) STOC bearing tool kit (register):

HONDA ST1100/ST1300 WHEEL BEARING R&R TOOLS
http://www.st-riders.net/index.php?topic=1343.0

The tools (very custom removers by Dave Graham):
IMG_1653.jpeg

After you get them out, modify your distance collar/spacer so you can just use a drift next time:
IMG_1387.jpeg

Mike Turley’s video:

EDIT: BTW, USA 1991s [early models] have 42mm front wheel bearings, all others [later years’] are 47mm. [the USA 1991s have beautiful, sleek, OEM front wheels: no ugly bosses cast in for ABS rings]

Regards, John
 
Last edited:

Ron

Joined
Feb 5, 2005
Messages
1,679
Location
Orlando
Bike
ST1100s
STOC #
2432
Post #7 above shows:

'91-'96---6004UU

after '96--6204UU The UU is the bearing seal. But a seal on each side of the wheel is still needed, #18 & #19.


see #17,18,19

I've replaced a few wheel bearings and never done them in a left/right or right/left order. The bearings were seated firmly and the spacer was snug. No problems.
 
Joined
Sep 4, 2013
Messages
8,198
Location
Cleveland
Bike
2010 ST1300
Harbor fright sells an expansion type bearing puller kit. It costs more than the loaner set available here, but it also pulls more bearings than just the ST's wheel bearings.

@DeanR is using a concrete expansion bolt, also called a Rawl bolt. A very large hardware store (industrial hardware) might sell these individually, the shorter ones almost always come in a box of 25 or 50.
 

ST1100Y

Site Supporter
Joined
Dec 4, 2012
Messages
5,036
Age
59
Location
Vienna, AuSTria
Bike
ST1100Y, ST1100R
STOC #
637
I've replaced a few wheel bearings and never done them in a left/right or right/left order. The bearings were seated firmly and the spacer was snug.
Well, the first might cause a slight misalignment of the track/wheels, the second should be avoided as ball-bearings don't like axial/side loads -> excessive wear/premature retirement... the inner race of the bearings should barely touch the ends of the space tube and still move freely when rotated by fingers...
 

jdmccright

Vendor
Joined
May 21, 2013
Messages
90
Location
La Plata, MD
Bike
2000 ST1100
Very good info! Glad I read this. I'm fixing to replace my front tire and am thinking I should replace the wheel bearings too. Pretty sure I didn't do them this way the last time. I got the All Balls kit back then.
 
OP
OP

Odie1

Site Supporter
Joined
Apr 24, 2011
Messages
112
Location
Claremore, Ok
Bike
1996 ST1100
STOC #
3876
Well- everyone - thanks for all the good info as always. John H - excellent article

John O - thank you for the link to the tool. Looks handy, but won't be needing it.... because....

(NOTE! - I went back and read AFTER I typed this and John H had already explained I could do this - DOH!) oh well. :)

I went out to the shop to really look at things (I already have the disks and tire off) and noticed that there was already just a slight bit of play in the spacer between bearings....hmmm?..... there was just enough that if I pushed the spacer to one side (not to the end towards the bearings) the was a little lip on the inner bearing a screw driver would just "grab" on to. So, starting from the right hand side, removing the left hand bearing, I made a few taps on the screwdriver with a hammer (light taps, not pounding), moved the spacer over to the other side, made a few taps, and repeated several times. Flipped to wheel over and thought maybe I was moving the bearing?.. Repeated the process again for a few minutes. Flipped the wheel and sure enough, the bearing had come out maybe .125 inches? So kept at it...slowly... The more the bearing moved out, the more play there was to move the spacer. After a bit I was able to move the space enough that a punch could grab the bearing lip so continued, again - as John H pointed out light to moderate taps - no banging.

After a few minutes, bearing popped out. Once that bearing was out, as well as the spacer, the right hand bearing was a piece of cake. Used a punch, lightly striking with a hammer.

I do believe I will make some nothces in the spacer in case there is a next time.

Now - to get some bearings ordered.

Odie1
 
Joined
Jul 15, 2023
Messages
523
Location
Mesa, AZ
Bike
VFR750F, ST1300
I don’t like hammering in new bearings. Too much chance on driving them in crooked or too far. I noticed many people on their 4-5th bearing replacement saying that bearing just drops into hub without interference fit and is loose.

I prefer gentler approach with large threaded rod and thick washers. Then pull bearing in slowly verifying square alignment and depth along way. Can get bearing installation kit from AutoZone with their free tools rental programme.

IMG_0576.jpeg
 
OP
OP

Odie1

Site Supporter
Joined
Apr 24, 2011
Messages
112
Location
Claremore, Ok
Bike
1996 ST1100
STOC #
3876
Follow up - or - Should I have known that?

Got my bearings yesterday - All Balls kit... and they were the wrong size! I looked at the package and it said "97-02 ST1100". I have a 96.

Went online and checked a parts fiche and sure enough - different part numbers for a 96 vs a 97..

Now - maybe my only saving grace - I checked my order and it says "96 ST1100 front wheel bearings kit".. So shot them an email this morning and we'll see how it comes out.

I did not know wheel sizes changed from 96 to 97.. I just figured it it did, would have been from 95 to 96, when other major changes were made.

Odie1
 

jdmccright

Vendor
Joined
May 21, 2013
Messages
90
Location
La Plata, MD
Bike
2000 ST1100
When I got the All-Balls kit last time for my 2000, I recall the bearings slid in by hand too. I've put 13k miles on them since. I plan on replacing them again when I replace the front tire for no other reason than the wheel will already be dismounted. No other perceptible issues. I like the idea of the notches in the spacer!
 
Top Bottom