Back when it was warm (108 f) I was having an issue where if I parked my 1300 and, say ran in the store, when I took off the bike would loose power and almost stall. This happened when the fuel level was low (2 bars or less). Would only happen for a second, and then be ok. I got in the habit of keeping my tank topped off. From what I've read it's probably my fuel pump, so I went ahead and ordered a new pump, and will install it this weekend. My question is should I change the filter at the same time, my top tank is VERY clean, and if my bottom tank is as clean, do I really need to spend $60 more on the filter. are there any replacement filters I can use? feels like a lot of money for a filter. My bike has 38000 miles on it

Fuel pump
- Thread starter RichKat
- Start date
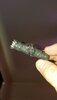
With all the crap in our fuel nowadays, it may be a good idea to replace the fuel filter, as well as the packing (gasket) and fuel hoses.
DO NOT use ANY aftermarket fuel bits (such as the ones supplied with aftermarket pumps) as they are NOT designed to be submerged in fuel etc.
Use ONLY Honda OEM fuel line hoses etc.
These have commonly been known to fail after a few months, or a couple thousand miles.
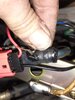
And just because you hear the fuel pump wind up, does not mean that its still holding pressure etc.
The lines inside that you don't see, can fail and bleed off pressure.
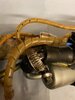
Be sure to follow the service manual's torque sequence as well, as they are different between years (read the small print)
Do NOT over torque the cover nuts, or you'll be removing the entire swingarm and ass end of the bike to remove the lower fuel tank.
*These are another members pictures*
DO NOT use ANY aftermarket fuel bits (such as the ones supplied with aftermarket pumps) as they are NOT designed to be submerged in fuel etc.
Use ONLY Honda OEM fuel line hoses etc.
These have commonly been known to fail after a few months, or a couple thousand miles.
And just because you hear the fuel pump wind up, does not mean that its still holding pressure etc.
The lines inside that you don't see, can fail and bleed off pressure.
Be sure to follow the service manual's torque sequence as well, as they are different between years (read the small print)
Do NOT over torque the cover nuts, or you'll be removing the entire swingarm and ass end of the bike to remove the lower fuel tank.
*These are another members pictures*
OP
OP
Larry, are those the 2 small hoses shown on the parts diagram as hose A and B?
With all the crap in our fuel nowadays, it may be a good idea to replace the fuel filter, as well as the packing (gasket) and fuel hoses.
DO NOT use ANY aftermarket fuel bits (such as the ones supplied with aftermarket pumps) as they are NOT designed to be submerged in fuel etc.
Use ONLY Honda OEM fuel line hoses etc.
These have commonly been known to fail after a few months, or a couple thousand miles.
And just because you hear the fuel pump wind up, does not mean that its still holding pressure etc.
The lines inside that you don't see, can fail and bleed off pressure.
Be sure to follow the service manual's torque sequence as well, as they are different between years (read the small print)
Do NOT over torque the cover nuts, or you'll be removing the entire swingarm and ass end of the bike to remove the lower fuel tank.
*These are another members pictures*
You mention not to over torque fuel pump cover bolts. Changed out fuel filter with new fuel pump cover gasket. Filled main tank fuel started weeping out from under new gasket. Made a mistake by tightening bolts very stug, to try to stop the leak. Leak just got worst. Must have deformed the rubber gasket. If the over torqued bolts are not stripped. Is the tank still good. Why is there different torque pattern on 2004 + on? Have 03 + think tank may have been replaced. How to identify year of secondary fuel tankWith all the crap in our fuel nowadays, it may be a good idea to replace the fuel filter, as well as the packing (gasket) and fuel hoses.
DO NOT use ANY aftermarket fuel bits (such as the ones supplied with aftermarket pumps) as they are NOT designed to be submerged in fuel etc.
Use ONLY Honda OEM fuel line hoses etc.
These have commonly been known to fail after a few months, or a couple thousand miles.
And just because you hear the fuel pump wind up, does not mean that its still holding pressure etc.
The lines inside that you don't see, can fail and bleed off pressure.
Be sure to follow the service manual's torque sequence as well, as they are different between years (read the small print)
Do NOT over torque the cover nuts, or you'll be removing the entire swingarm and ass end of the bike to remove the lower fuel tank.
*These are another members pictures*
You mentioned not to over torque fuel pump cover nuts. Changed out fuel filter with new fuel pump gasket. Filled main tank. Fuel started weeping from under new rubber gasket. Made a mistake by tightening very snug, to try to stop the leak. Leak got worse. Must have deformed the rubber gasket. If the over torqued bolts are not stripped, is the tank still good. Why is there a different torque sequence in 2004 + on fuel tank nuts? Have 03 + think tank may have been replaced. How can you identify year of secondary fuel tank?
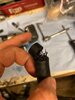
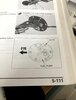
Here is the sequence. Did mine twice with no leaks. Check to make sure there is nothing between the gasket and tank. Go easy . Use torque wrench. I done mine in 2 steps. Make sure the inside wire goes inside not on the gasket, mine stuck there for a bit.
It says not to use old gasket but I'd retry it
For a task with such onerous consequences if you damage the threads, and such a low torque setting on the wrench, I'd test the wrench on a bolt held in a vise. First of all, torque wrenches are most accurate in the middle of their range, so don't use a 1/2" drive wrench with adapters down to 1/4" drive sockets. Select the appropriate torque wrench, put a scrap bolt in the vise and put the wrench on it. Nine ft-lbs means you are pulling with a force of 9 lbs on the end of a 12" long wrench (distance from center of socket to center of your hand on the handle). You should be able to estimate this easily.
Not sure how to ID a replacement tank, but hopefully the appropriate tank was installed for the year of the bike. My manual shows both torque sequences but makes no mention of the visual differences of the tank's cover. The only difference is for early tanks, you begin tightening the bolts with what is shown above (post #7) as bolt #3, then follow the same pattern. Here is the '03 sequence:
Not sure how to ID a replacement tank, but hopefully the appropriate tank was installed for the year of the bike. My manual shows both torque sequences but makes no mention of the visual differences of the tank's cover. The only difference is for early tanks, you begin tightening the bolts with what is shown above (post #7) as bolt #3, then follow the same pattern. Here is the '03 sequence:
Appreciate your advice.
Here is the sequence. Did mine twice with no leaks. Check to make sure there is nothing between the gasket and tank. Go easy . Use torque wrench. I done mine in 2 steps. Make sure the inside wire goes inside not on the gasket, mine stuck there for a bit.
It says not to use old gasket but I'd retry it