Here we go! Fork seals at 40k

ToddC

Site Supporter
Joined
Feb 2, 2015
Messages
4,165
Age
60
Location
Seven Bays Wa
Bike
2006 ST1300A
John, why is it not on the lift...?
Inquiring minds need to know.
T
 
OP
OP
JohnK

JohnK

Site Supporter
Joined
Oct 15, 2014
Messages
538
Location
Bonney Lake WA
Bike
2012 ST1300a
STOC #
8814
John, why is it not on the lift...?
Inquiring minds need to know.
T
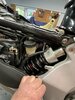
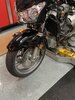
Well a 700 pound plus bike is a little scary for me to be elevated on a block or center stand on the lift whilst pulling and pushing bits and parts around. And I kinda like sprawling on the floor on rugs. Shop is heated and relatively clean. Albeit I will put it up once the front wheel is back on for further inspection and other service.
 

Terminator2

Site Supporter
Joined
Jun 27, 2016
Messages
191
Age
68
Location
Auburn California
Bike
2006 ST1300
Hope it all goes well. Let's see.......former owner replaced seals (5weight oil) on my bike @ 31k miles. I bought bike @32k. Leaked at 58.6k miles, so I did full replacement of seals, dust covers, bushings, (SS8-10weight oil), washers, etc. Currently @86k all appears well. Wondering if I should just change fluid now. Just returned a few days ago from a ride to Bodega Bay-Ca.

1681756421004.png1681756421004.png
 
OP
OP
JohnK

JohnK

Site Supporter
Joined
Oct 15, 2014
Messages
538
Location
Bonney Lake WA
Bike
2012 ST1300a
STOC #
8814
Hope it all goes well. Let's see.......former owner replaced seals (5weight oil) on my bike @ 31k miles. I bought bike @32k. Leaked at 58.6k miles, so I did full replacement of seals, dust covers, bushings, (SS8-10weight oil), washers, etc. Currently @86k all appears well. Wondering if I should just change fluid now. Just returned a few days ago from a ride to Bodega Bay-Ca.

1681756421004.png1681756421004.png
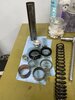
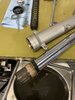
Nice spot. I would change it around 20 k intervals at least. After inspecting the residue, seals and bushings - was apparent wear caused by degrading materials trapped in the fork. Although some is expected - dependent on your riding conditions, temp and rider input it - the damper and other parts might appreciate a fresh oil periodically
 
OP
OP
JohnK

JohnK

Site Supporter
Joined
Oct 15, 2014
Messages
538
Location
Bonney Lake WA
Bike
2012 ST1300a
STOC #
8814
So lefty leaky is rebuilt and ready for install. The right side showed some wear so all bushings replaced along with seals and stop cap. Update on my race techs. The front spring is longer so had to make a collar out of pvc and I used the provided spacers to brace the contact between spring and parts. It’s best not to try any preload on the cap by making the assembly longer than oem. The race techs are rated for weight and progressive. So to get the right clearance for sag I made sure it was as long as oem put back together.
 

Attachments

OP
OP
JohnK

JohnK

Site Supporter
Joined
Oct 15, 2014
Messages
538
Location
Bonney Lake WA
Bike
2012 ST1300a
STOC #
8814
Also the SMC and brakes checked out - bled and made sure the SMC charged up - so important to follow bled procedure and really let it run clean. I did it twice and could see a difference in color that drained out and function. Really worth the extra effort and for folks in the PNW we should do this annually. A lot of moisture in the rubber well caps.
 
Last edited:
Joined
Nov 10, 2007
Messages
1,611
Age
61
Location
Vancouver, British Columbia, Canada
Bike
1&2&3-2005 ST1300ABS
2024 Miles
001862
STOC #
8562
Also the SMC and brakes checked out - bled and made sure the SMC charged up Really worth the extra effort and for folks in the PNW we should do this annually. A lot of moisture in the rubber well caps.
Yes, those rubber well caps are soaked evertime I remove them.
While I had the throttle bodies off for the thermostat last week, I bled the clutch. Nice clear fluid in the sight glass now. :thumb:
 

dduelin

Tune my heart to sing Thy grace
Site Supporter
Joined
Feb 11, 2006
Messages
9,682
Location
Jacksonville
Bike
GL1800 R1200RT NC700
2024 Miles
008131
STOC #
6651
Left fork the leaker gonna need new bushings too. All the Teflon was worn off. Springs are good though - measured 9 7/8” may sell them for those who need stock springs -
IMG_4601.jpegIMG_4599.jpeg
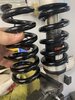
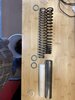
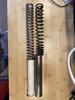
It makes sense to replace all wear items since you had it all apart but the bushings in these pictures are perfectly serviceable.

The teflon coating is on the inside of the slider bushing and the outside of the fork tube bushing. The opposite side from the coated side will show no teflon even on a brand new one. Replacement is indicated when copper is showing on 3/4 of the original coated surface meaning all but 25% is worn off. Those pictured have many miles left in them. This might help a future reader in determining if the bushings are worn to the point of replacement.

It will be interesting to see how rider sag comes out using the OEM spring stack length. Stock ST1300s have way too much sag. Hopefully the stiffer RT spring will account for it.
 
OP
OP
JohnK

JohnK

Site Supporter
Joined
Oct 15, 2014
Messages
538
Location
Bonney Lake WA
Bike
2012 ST1300a
STOC #
8814
Front back together - while in there the brakes, pads, calipers and cylinders were cleaned and checked out - all lines clean and flexible The forks feel firmer and I think I will be happy with improved sag and dive. Going to the rear end now..sag reports to come
IMG_4616.jpeg
 

ATA

Joined
Sep 12, 2018
Messages
291
Location
Atlanta, GA
Bike
2007 ST1300
I just had my forks rebuilt at 41k on my '07. First time. Went back with all balls racing inner/outer kits, etc. Very happy with the results.
 
Joined
May 23, 2012
Messages
837
Age
64
Location
London, Ontario, Canada
Bike
2004 ST1300
Nice seeing your bike hovering on 2 stands.

My seals leaked at 43,000 miles also, May 2022 , got another 7,000 miles out of them by cleaning them with a thin plastic sheet wrapped around the chrome slider.
I'm hovering around 50,000 miles April 2023, just started leaking again.
My new OEM seals just arrived today in Blaine WA today.
Picked them up from partzilla, free shipping. :thumb:
That seal cleaner has been a God send. I had a couple of instances where my seals stopped leaking after cleaning. Little bits get between the seal and fork. I've fashioned a cleaning tool out of a clear salad container. Using a clean cloth found that the dust seals were cracked and replaced those first.
I performed a spring and shock replacement on my '04 with 90,000 klms with Traxxion Dynamics. What a difference.
Not sure I sold the bike last year.
Dave
 

SupraSabre

48 Years of SoCal Lane Splitting/Commuting-Retired
Site Supporter
Joined
Nov 20, 2005
Messages
9,520
Location
Cedar City, Utah
Bike
12/04 ST 1300s
2024 Miles
000420
STOC #
5901
Last year, I did a January ride from Cedar City to Elk Grove, Kaliforniastan, just over 1,300 miles. Most of the temperatures were below 40F and it was two lane desert roads, and I blew out my leftside fork seal. My 2012 only had about 33,000 miles on it. But I figured, it wasn't the miles as much as the age of the seals!
 
OP
OP
JohnK

JohnK

Site Supporter
Joined
Oct 15, 2014
Messages
538
Location
Bonney Lake WA
Bike
2012 ST1300a
STOC #
8814
Last year, I did a January ride from Cedar City to Elk Grove, Kaliforniastan, just over 1,300 miles. Most of the temperatures were below 40F and it was two lane desert roads, and I blew out my leftside fork seal. My 2012 only had about 33,000 miles on it. But I figured, it wasn't the miles as much as the age of the seals!
I agree age can be a factor, (same year bike) ride conditions for the life of the fork with hot/cold season, temps between 20-108 degrees, terrain and rider fubars don’t help Me I hit a road gator and bottomed out once and been on many a rough dusty road. Along with two up etc etc - I was lucky to get 40k
 

Happy Rob

Rob
Joined
Jun 17, 2015
Messages
197
Age
55
Location
CBS, Newfoundland, Canada
Bike
2004 ST 1300
STOC #
8931
I just replaced my front fork seals with 10W as well. First time on this 2004 with 96,000 kms. Second time doing this and it was easier, ( other time was on my less fast red ST!!). I have the shop manual this time as well!! Now I just want it to STOP SNOWING in Newfoundland so I can begin my riding season.
 
OP
OP
JohnK

JohnK

Site Supporter
Joined
Oct 15, 2014
Messages
538
Location
Bonney Lake WA
Bike
2012 ST1300a
STOC #
8814
@JohnK how about a picture of your 2x4 jig for holding the fork.
Believe it or not I was surprised at the ease of disassembly and assembly of the stack. After installing the seals I put the damper in and and just held the fork up a little off the bench and used a long allen to start the screw below and made sure stop cap was aligned. Hand tight and checked for proper set. I torque spec it after assembly

At this point is where a jig or spare triple tree would come in handy. I put a five gallon bucket between my legs and it assisted in the upright effort here on.

Then I used a copper wire wrapped around end with nut to hold the damper tube up and and fill the fluid. (No leaks so far and oem spec amount.) Of course you pump the damper. Once I started the assembly used another long wire to slide the brace/stop rings, spring and collar - that hooked onto the copper wire holding the damper tube. Once stacked I lift up the upper fork tube and used the copper wire on the edge of the upper tube to hold the damper tube up. But carefully holding the stack I braced the nut on the collar and then attach the fork cap to the damper tube. Snug that down against the nut. Then with a little lift off the stack and slide up the tube with one hand and push down effort with other started the cap thread till snug with tube. there was only about 23cm clearance, had I attempted to keep the original collar there would have been 45cm or more and a jig would almost be necessary to close the cap.

If I had an extra set of hands would have taken pictures
 
Joined
May 23, 2012
Messages
837
Age
64
Location
London, Ontario, Canada
Bike
2004 ST1300
I just replaced my front fork seals with 10W as well. First time on this 2004 with 96,000 kms. Second time doing this and it was easier, ( other time was on my less fast red ST!!). I have the shop manual this time as well!! Now I just want it to STOP SNOWING in Newfoundland so I can begin my riding season.
Hi Rob. After meeting you I wanted to ride your ST. Same as the one I had. I think miss that bike or something. It certainly seemed simple to me at the time.
Anyway, I wish I could've stayed longer on the island. Not enough time to hang out with you. Will be back soon.
DaveIMG_20210603_122722.jpg
 

Happy Rob

Rob
Joined
Jun 17, 2015
Messages
197
Age
55
Location
CBS, Newfoundland, Canada
Bike
2004 ST 1300
STOC #
8931
Hi Rob. After meeting you I wanted to ride your ST. Same as the one I had. I think miss that bike or something. It certainly seemed simple to me at the time.
Anyway, I wish I could've stayed longer on the island. Not enough time to hang out with you. Will be back soon.
DaveIMG_20210603_122722.jpg
Great to meet you as well. Come back anytime, and I will give you a proper tour of the East coast of our province! You blue one had the nice big middle tank pad!!!
 
OP
OP
JohnK

JohnK

Site Supporter
Joined
Oct 15, 2014
Messages
538
Location
Bonney Lake WA
Bike
2012 ST1300a
STOC #
8814
Rear spring swapped and installed.
IMG_4623.jpegIMG_4626.jpeg
some observations
Oem spring coil diameter varied 12.9 to 13.1 mm at different points. The RT 13.6 to 13.7 more uniform. Length oem 7” RT 6” with a 3/4 in spacer
So now in theory I’ve upgraded both front and rears matched for my weight - as soon as I get another free moment - will see what the sag rates are
 
Last edited:
OP
OP
JohnK

JohnK

Site Supporter
Joined
Oct 15, 2014
Messages
538
Location
Bonney Lake WA
Bike
2012 ST1300a
STOC #
8814
Oh my goodness. I have always liked a high and tight suspension - the sag in the fronts is just under an inch when off center stand and under 2 when I bounce on it - the rear seems to go a little more but on standard tension setting it feels correct amount of sag is achieved. I will see if my wife can assist me for more correct measures - first ride with plastic off and I am really pleased with its position and steering response. It feels like a different bike - a road trip is in order after I button up the plastic - also noticed it goes on the center stand much easier. It’s going to ride much better with two up and loaded for sure
 
Top Bottom