Finally got around to installing the hitch on STella today.
It's a Denray model, but I don't know which one. Denray makes 2 ST1300 models, one for the 2003 and one for 2004 onward. I have no idea what the difference is between the two, nor am I aware of any difference in the 2003 year rear end design vs 2004 onward.
I got it used from a nice gentleman 400km's away, bought online - sight unseen, for a very very decent price as it was missing 2 key parts - the upper hangers. New, a Deray hitch will set you back about $310 Cdn plus taxes and shipping.
The upper hangers are the parts that go over the rear frame tube to take the downward weight of the trailer's tongue.
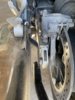
This is what it's supposed to look like (photo from Denray's website.) You can see the hangers over the frame on each side, going down to a hex bolt. Those hex bolts go thru the rear fender and connect to the lower side hangers that connect to the hitch body assembly.
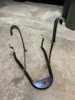
So, I made a few dummy mock ups of the part from 1/2 copper tubing and some other easy to use materials before I cut some galvanized angle into flat stock and then bent it to form. Flat bar (cold or hot rolled) is a ridiculous price here right now and I only needed two 1' pieces, and I had the galvanized angle on hand - so we'll see how it works out. The final shape has a shepherd's hook on the top and an L at the bottom, with a hole drilled for the connecting bolt.
I then covered the galvanized flat bar with some expandable wire loom and then wrapped it in electrical tape for abrasion resistance. OEM would have been powered coated like the lowers.
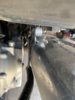
Here's how it looked before installation. As the upper hangers are hidden, I wasn't worried about looks (as you can tell! lol)

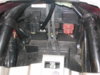
The next step is to remove the rear lower fender by removing the 2 JIS screws into clip nuts and the 2 hex bolts in the rear by the license plate. That allows you to remove the lower fender. In my case it just let me lower it as I have it wired up with an additional brake light. It's easiest to remove the side cases when you do this so you have room and can easily see.
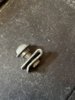
I then took a slotted screwdriver and slid the clip nuts off, as they (and the bolts that went into them) won't be needed. Here's one set after removal.
The homemade upper hanger brackets were put in place and the connector bolts and washers slid down through the hanger and the plastic holes in the fender tail liner. I did run a drill bit through the plastic tail holes to allow for the larger bolt to slide through easier. There's not much room down in there for fingers! If you drill the holes out, do it from underneath. Just don't put the bit in too far as you don't want to hit the wiring loom on the passenger side!!!!!!
I didn't like having the wiring loom on the inside (as per my photo above) as it made getting the tool kit almost impossible to get in, plus it was difficult to hold the bolt head to tighten - so I moved the loom to the outside as per the first photo from Denray. Problem solved.
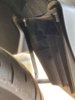
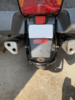
The next step was to remove the exhaust hanger bolts and fit the hitch body in place. Slightly longer bolts were required due to the added thickness of the hitch mounting points. Nuts were added and things hand tightened. Without the hangers the hitch body pivoted like a skeleton's jaw")
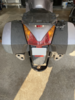
The lower hanger brackets were slid up over the protruding bolts from the upper hangers and a lock washer and nut added to attach them. You want to do that first as it's easier to attach the lower hanger parts to the upper hangers before you attach them to the hitch body. I then attached the lower part of the hangers to the hitch body and started to tighten things up. I found I couldn't get a socket down onto the head of my bolts, likely due to my DIY hangers so I just put an open ended wrench down into the "hole" and onto the bolt head 90* straight down. Not ideal, but it kept the bolt from spinning as I tightened the nut from under the tail.
I then went to put the rear lower fender back in place and realized you have to put it IN BETWEEN the upper part and lower hanger parts. Argh. (but only a little argh as it's an easy fix.)
So I removed the nuts and lower hangers and slid the lower fender into place with the upper hanger bolts now sticking though it as I should have the first time.

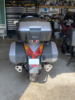
The lower hanger arms were reinstalled, connected to the hitch body and everything tightened. I did an easy stand test on the hitch to ensure the hangers were seated and things seemed OK.
Took me about 3 hours (I wasn't in a hurry and had no instructions) but if I'd had the OEM parts I'd think you could do it in an hour.
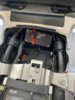
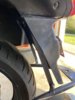
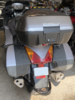
So here is the finished product of this part of the project. I still need to wire up a harness with relays for a trailer lighting, get a ball for the hitch and then the final piece will be to get a trailer.
The hitch will be the justification with Mrs. Obo to buy a trailer. A luggage trailer will likely be first, maybe followed by a camper model.
I did some touch-up painting on the rusted spots after the photos.
Thanks for reading!
It's a Denray model, but I don't know which one. Denray makes 2 ST1300 models, one for the 2003 and one for 2004 onward. I have no idea what the difference is between the two, nor am I aware of any difference in the 2003 year rear end design vs 2004 onward.
I got it used from a nice gentleman 400km's away, bought online - sight unseen, for a very very decent price as it was missing 2 key parts - the upper hangers. New, a Deray hitch will set you back about $310 Cdn plus taxes and shipping.
The upper hangers are the parts that go over the rear frame tube to take the downward weight of the trailer's tongue.
This is what it's supposed to look like (photo from Denray's website.) You can see the hangers over the frame on each side, going down to a hex bolt. Those hex bolts go thru the rear fender and connect to the lower side hangers that connect to the hitch body assembly.
So, I made a few dummy mock ups of the part from 1/2 copper tubing and some other easy to use materials before I cut some galvanized angle into flat stock and then bent it to form. Flat bar (cold or hot rolled) is a ridiculous price here right now and I only needed two 1' pieces, and I had the galvanized angle on hand - so we'll see how it works out. The final shape has a shepherd's hook on the top and an L at the bottom, with a hole drilled for the connecting bolt.
I then covered the galvanized flat bar with some expandable wire loom and then wrapped it in electrical tape for abrasion resistance. OEM would have been powered coated like the lowers.
Here's how it looked before installation. As the upper hangers are hidden, I wasn't worried about looks (as you can tell! lol)
The next step is to remove the rear lower fender by removing the 2 JIS screws into clip nuts and the 2 hex bolts in the rear by the license plate. That allows you to remove the lower fender. In my case it just let me lower it as I have it wired up with an additional brake light. It's easiest to remove the side cases when you do this so you have room and can easily see.
I then took a slotted screwdriver and slid the clip nuts off, as they (and the bolts that went into them) won't be needed. Here's one set after removal.
The homemade upper hanger brackets were put in place and the connector bolts and washers slid down through the hanger and the plastic holes in the fender tail liner. I did run a drill bit through the plastic tail holes to allow for the larger bolt to slide through easier. There's not much room down in there for fingers! If you drill the holes out, do it from underneath. Just don't put the bit in too far as you don't want to hit the wiring loom on the passenger side!!!!!!
I didn't like having the wiring loom on the inside (as per my photo above) as it made getting the tool kit almost impossible to get in, plus it was difficult to hold the bolt head to tighten - so I moved the loom to the outside as per the first photo from Denray. Problem solved.
The next step was to remove the exhaust hanger bolts and fit the hitch body in place. Slightly longer bolts were required due to the added thickness of the hitch mounting points. Nuts were added and things hand tightened. Without the hangers the hitch body pivoted like a skeleton's jaw
The lower hanger brackets were slid up over the protruding bolts from the upper hangers and a lock washer and nut added to attach them. You want to do that first as it's easier to attach the lower hanger parts to the upper hangers before you attach them to the hitch body. I then attached the lower part of the hangers to the hitch body and started to tighten things up. I found I couldn't get a socket down onto the head of my bolts, likely due to my DIY hangers so I just put an open ended wrench down into the "hole" and onto the bolt head 90* straight down. Not ideal, but it kept the bolt from spinning as I tightened the nut from under the tail.
I then went to put the rear lower fender back in place and realized you have to put it IN BETWEEN the upper part and lower hanger parts. Argh. (but only a little argh as it's an easy fix.)
So I removed the nuts and lower hangers and slid the lower fender into place with the upper hanger bolts now sticking though it as I should have the first time.
The lower hanger arms were reinstalled, connected to the hitch body and everything tightened. I did an easy stand test on the hitch to ensure the hangers were seated and things seemed OK.
Took me about 3 hours (I wasn't in a hurry and had no instructions) but if I'd had the OEM parts I'd think you could do it in an hour.
So here is the finished product of this part of the project. I still need to wire up a harness with relays for a trailer lighting, get a ball for the hitch and then the final piece will be to get a trailer.
The hitch will be the justification with Mrs. Obo to buy a trailer. A luggage trailer will likely be first, maybe followed by a camper model.
I did some touch-up painting on the rusted spots after the photos.
Thanks for reading!
Last edited: