Installing LED Headlights On A ST1100

Uncle Phil

Site Supporter
Joined
Feb 26, 2007
Messages
11,331
Age
71
Location
In The Holler West Of Nashville, Tennessee
Bike
4 ST1100(s)
2024 Miles
005383
STOC #
698
On one of my ST1100s, my G6 (Evitek) LEDs finally had a bulb die.
So I bought the F2s (what Spiderman recommended) and installed them.
On the G6s, you could use the rubber boot because the bulb twisted and came out of the base.
On the new F2s, that does not appear to be possible.
My question - if you installed LEDs on your ST1100, did you try to install the rubber 'boots' (the round rubber cover that goes over the opening)?
If you didn't, have you had any unintended consequences from it over time?
 

Obo

Joined
Oct 22, 2019
Messages
4,296
Location
East Coast Canada
Bike
'03 ST1300A
The outer ring should snap off the F2 bulbs. Just takes a bit of force.

Mine had detent holes and a ball to lock it in place. (see arrow) The circled part is all one piece and the rest of the bulb twists in it.

The body will come out of the positioning ring.

1645837590667.png

I can't speak to how they fit on an st1100 housing boot though, only on my st1300. No cutting was required as I recall.

1645837746979.png1645837791970.png
 

GGely

Site Supporter
Joined
Oct 28, 2018
Messages
709
Location
Oshawa, Ontario, Canada
Bike
2001 ST1100 Non ABS
STOC #
8997
Where are the moderators? What is this forum becoming, a venue for burlesque images and who knows what else? Mellow is slacking these days! :)

On a serious note, I used Obo’s technique on my 1100 and have had no issues, rain or shine, Phil.

Now, where did I put my righteous indignation?
 
  • Like
Reactions: Obo
Joined
Aug 21, 2018
Messages
6,785
Location
Richmond, VA
Bike
'01 & '96 ST1100s
STOC #
9007
Those are exactly what I got, but now I am confused.
Does it come apart at the red ring?
Do you twist them apart or just pull them apart?
Or do you press the ball in and pull?
Yes, they separate at the red ring. See the body that holds the LEDs above the mounting flange? That's the same part you can see through the holes in the tube below the flange.

The flange and the tube with the holes is one piece, the body from the top of the LEDs to the bottom of the heat sink is the other piece. The spring-loaded ball pops into any hole.

Pulling while twisting should separate the parts. It will be scary at first, because you might feel like you're going to break something, but you should be okay as long as you're careful.

Most users separate the flange from the body, mount just the flange in the headlight shell, put on the rubber boot, then install the body. That places the fan and heatsink outside the boot.
 
Last edited:
Joined
Apr 8, 2017
Messages
174
Location
Utah
Bike
1994 ST1100
STOC #
9042
Thanks so much for posting this. I've been wanting to change out my halogens for LED's and have done all the searches, but it's very confusing as many posts are for the 13's and I don't know if they are different than the 11's.

So if I've got this straight, I'll need S2 LEDs with the S4 adapter rings as the ears are different on the ST11?
 

Andrew Shadow

Site Supporter
Joined
Jan 28, 2012
Messages
5,122
Location
Montreal
Bike
2009 ST1300A9
So if I've got this straight, I'll need S2 LEDs with the S4 adapter rings as the ears are different on the ST11?
F2 LED H4/9003 bulbs like what is in the first picture in post # 7 above.

Headlight adapter rings to allow the use of automotive bulbs in the ST1100. See below for an example. These are available from many places.
1645891095813.png

H4 Adapter Rings Compatible with Honda ST1100
Disregard the mention of ST1300. The ST1300 does not need the adapter rings.
 
Joined
Aug 21, 2018
Messages
6,785
Location
Richmond, VA
Bike
'01 & '96 ST1100s
STOC #
9007
@Andrew Shadow do you still snap off 2 of the lower locator tabs on the bulbs when using the rings for the st1100?
Yes, because the bulb tabs are at 5 and 7 o'clock, and the socket slots are at 4 and 8 o'clock.

The top tab maintains flange orientation, while the ring provides spacing of mounting depth.
 

Andrew Shadow

Site Supporter
Joined
Jan 28, 2012
Messages
5,122
Location
Montreal
Bike
2009 ST1300A9
@Andrew Shadow do you still snap off 2 of the lower locator tabs on the bulbs when using the rings for the st1100?
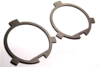
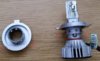
Yes, as Larry wrote, a standard H4/9003 automotive bulb has lower tabs that are in different locations than the OEM bulb. Their removal leaves the bulb with improper lower support against the headlamp housing. The adapter rings are to re-establish this support.

Note 1:
Since there are many people on this forum who are not riding North American standard ST1100's, it is important to point out that this only applies to ST1100's equipped with the North American headlamp housing. I do not believe that any other market used this housing, and that it is a result of the lighting regulations that exist in North America.

The adapter ring is not designed to position the bulb at the correct depth however. The addition of the adapter ring actually causes the bulb to be at an incorrect depth by the the thickness of the adapter ring. The correct bulb depth is having the bulb base sitting directly against the headlamp housing where the adapter ring has to go, and where the OEM bulb sits. I have seen some of these adapter rings that are thicker than others. The thinner that adapter ring is, the closer to the correct focal point will be the H4/9003 bulb.

Note 2:
If using the adapter rings, and if the new bulb has curved tabs as most Halogen bulbs do, the remaining tab of the new H4/9003 bulb that was not cut off, as well as the area adjoining where the two lower tabs were cut off, should be flattened so that they do not protrude beyond the surface of the rest of the bulb base. If this is not done, the bulb will be positioned even further away from the correct focal point in the housing.

If the standard automotive H4/9003 bulbs are going to be used, there are only four ways to achieve this as far as I know.

1- Remove, or bend out of the way, the two lower tabs of the H4/9003 bulb so that it will fit in to the North American ST1100 headlamp housing with the use of adapter rings. (See post # 14)
Doing so means that the lower portion of the bulb will now go to far in to the housing and will not sit correctly at the bottom. This is because its lower tabs are no longer supporting it by resting against the headlamp housing. These adapter rings re-establish a place for the lower portion of the bulb to rest against.
See note: 2 above.

2- Replace the base of the new H4/9003 bulb with a base that properly fits the ST1100 headlamp housing.
This is possible with many of the regular Halogen bulbs. This is probably not possible with most of the LED bulbs however, so whether or not this can be done is dependent on what replacement bulb is being installed. If it is possible, remove the base from the new bulb. Then remove the base from a Honda OEM bulb and assemble it to the new H4/9003 bulb being installed. This allows installation of the new bulb without having to use an adapter ring because an OEM bulb base with the correctly orientated lower tabs is being used.

3- Modify the headlamp housing to accept the standard H4/9003 bulb base.
This involves removing the housing and machining, by whatever means one chooses, notches in the headlamp housing at the correct location and the correct depth to accept the standard H4/9003 bulb lower tabs. Once done, this allows the use of any H4/9003 automotive bulb without any modification to the bulb and without the need for the adapter ring.

4- Purchase a European standard ST1100 headlamp housing.
This odd ball lower tab configuration is to comply with North American lighting regulations. They do not have this requirement as part of the lighting regulations in Europe. The standard H4/9003 automotive headlamp bulb fits directly in to a European standard headlamp housing with no muss, no fuss. It is a direct fit. Despite the expense, several North American ST1100 owners on this forum have gone this route.

Note: 3
Anyone considering this European headlamp housing option would be well advised to do a little research before purchasing one. I do not know if the headlamp housing from all European countries are designed for the standard H4/9003 automotive bulb, or if it is only certain countries. Maybe @John OoSTerhuis might know, as he has installed a European headlamp housing on his ST1100.
 
Last edited:

kiltman

Site Supporter
Joined
Apr 27, 2013
Messages
3,284
Age
68
Location
Stratford, Ontario Canada
Bike
2002,ST1100ABS
STOC #
8826
I have the European housing on my 1100. Mine was NOS and is designed for driving on the right, the beam pattern is slightly different than the North American unit. I’ve had no issues at night seeing the road properly with standard halogen bulbs. With the LED’s in the rain at night it reflects back too much, like riding in a snowstorm with high beams on.
 
OP
OP
Uncle Phil

Uncle Phil

Site Supporter
Joined
Feb 26, 2007
Messages
11,331
Age
71
Location
In The Holler West Of Nashville, Tennessee
Bike
4 ST1100(s)
2024 Miles
005383
STOC #
698
I went with the 'cut' method.
If you just remove the dead center with a razor knife, the dust cover will stretch easy enough over the fan assembly.
Then you mash it down past the fan assembly as it normally goes.
With only one shoulder fully functional, it was too much sugar for a nickel to try to separate the pieces and remove/install the headlight assembly again.
Thanks!
 
Joined
Apr 22, 2011
Messages
1,151
Age
68
Location
Camarillo, Ca
Bike
2006 ST1300A
2024 Miles
002552
f2_ring2.jpg

the other trick is to use a paper clip wire put across the bottom two slots to support the bottom of the flange if you do not have the adapter plate.
this will cause a slight down tilt of the bulb which I found actually improves the beam pattern a bit. Shown is an H4 back and not the ST back. So the wire will be a little higher.

20220226_130156.jpg
 
Last edited:
Top Bottom