New Springs Spring

Willsmotorcycle

Ride more...
Site Supporter
Joined
Oct 26, 2020
Messages
1,764
Location
Makefield Highlands PA
Bike
2016 ST1300P
2024 Miles
003726
Broke down and ordered a pair of Racetech front springs(rear too but another time). Changing them now, was wondering about the distance of spacer. The kit comes with a bunch of washers, they are clearly(?) not the replacement for a spacer. Do I just compress it more? I know a bunch of you have been here before, would love a little guidance.

OEM with spacer
IMG_3401.jpeg
 

dduelin

Tune my heart to sing Thy grace
Site Supporter
Joined
Feb 11, 2006
Messages
9,682
Location
Jacksonville
Bike
GL1800 R1200RT NC700
2024 Miles
008131
STOC #
6651
Broke down and ordered a pair of Racetech front springs(rear too but another time). Changing them now, was wondering about the distance of spacer. The kit comes with a bunch of washers, they are clearly(?) not the replacement for a spacer. Do I just compress it more? I know a bunch of you have been here before, would love a little guidance.

OEM with spacer
IMG_3401.jpeg
Depending on the RT spring rate you might not be able to compress the spring stack enough to thread the fork cap onto the fork tube reusing the OEM collar (spacer) but if you can reassemble it with RT spring, OEM washer, and OEM collar measure the free sag and rider sag. It seems 36 mm of rider sag is a sweet spot for the ST1300. Whatever rider sag is then plan on adding or subtracting length of the spring stack of spring, OEM washer, and collar to achieve 36 mm. Didn't RT give some guidance as to length of spacer to install? Mheck had some helpful posts in the past about spacers IIRC and he installed the RT package of cartridges and springs.
 
OP
OP
Willsmotorcycle

Willsmotorcycle

Ride more...
Site Supporter
Joined
Oct 26, 2020
Messages
1,764
Location
Makefield Highlands PA
Bike
2016 ST1300P
2024 Miles
003726
Depending on the RT spring rate you might not be able to compress the spring stack enough to thread the fork cap onto the fork tube reusing the OEM collar (spacer) but if you can reassemble it with RT spring, OEM washer, and OEM collar measure the free sag and rider sag. It seems 36 mm of rider sag is a sweet spot for the ST1300. Whatever rider sag is then plan on adding or subtracting length of the spring stack of spring, OEM washer, and collar to achieve 36 mm. Didn't RT give some guidance as to length of spacer to install? Mheck had some helpful posts in the past about spacers IIRC and he installed the RT package of cartridges and springs.
Yes they did, if it was stock I would not question, custom makes me nervous and you lost me at {measure the free sag and rider sag}

They are calling for 25mm preload.


dduelin

Tune my heart to sing Thy grace
Site Supporter
Joined
Feb 11, 2006
Messages
9,682
Location
Jacksonville
Bike
GL1800 R1200RT NC700
2024 Miles
008131
STOC #
6651
Yes they did, if it was stock I would not question, custom makes me nervous and you lost me at {measure the free sag and rider sag}

They are calling for 25mm preload.


Since you are just changing springs I would assemble the spring stack in the order it came apart which should be spring, OEM washer, collar, fork cap. Don't screw the damping rod into the fork cap yet. Then pull up the tube all the way up out of the slider and measure the distance from the top of the tube to the underside of the fork cap. This is pictured in Step 9 of Method 1 on the instruction pdf. You might need to fab up some way to hold the fork leg vertical.

That figure should be 25 mm according to RT. If more than 25 mm you will have to cut down the OEM collar (spacer) or fabricate a new one out of PVC pipe that is 1.5" OD. If the figure is less than 25 mm a longer spacer is needed or use a stack of washers on top of the collar. Then reassemble with correct oil level recommended by RT and with the correct spacer and the fork cap screwed onto the damping rod. Assemble both sides in the triple clamp and measure how much the forks sag under your weight. You'll dress in your normal riding gear. Shoot for 33 to 36 mm of sag.

There are a couple of ways to measure sag that is easy to do. We can talk on the phone or I'll find a post where it's been discussed in ST-O.
 
OP
OP
Willsmotorcycle

Willsmotorcycle

Ride more...
Site Supporter
Joined
Oct 26, 2020
Messages
1,764
Location
Makefield Highlands PA
Bike
2016 ST1300P
2024 Miles
003726
Since you are just changing springs I would assemble the spring stack in the order it came apart which should be spring, OEM washer, collar, fork cap. Don't screw the damping rod into the fork cap yet. Then pull up the tube all the way up out of the slider and measure the distance from the top of the tube to the underside of the fork cap. This is pictured in Step 9 of Method 1 on the instruction pdf. You might need to fab up some way to hold the fork leg vertical.

That figure should be 25 mm according to RT. If more than 25 mm you will have to cut down the OEM collar (spacer) or fabricate a new one out of PVC pipe that is 1.5" OD. If the figure is less than 25 mm a longer spacer is needed or use a stack of washers on top of the collar. Then reassemble with correct oil level recommended by RT and with the correct spacer and the fork cap screwed onto the damping rod. Assemble both sides in the triple clamp and measure how much the forks sag under your weight. You'll dress in your normal riding gear. Shoot for 33 to 36 mm of sag.

There are a couple of ways to measure sag that is easy to do. We can talk on the phone or I'll find a post where it's been discussed in ST-O.
We are coming in @ 24 mm stock, so 1 more washer should bring me up to 25mm.
5F47AC8D-6904-4E3E-B8E3-2A6CB1CFECF2.jpegI
 
OP
OP
Willsmotorcycle

Willsmotorcycle

Ride more...
Site Supporter
Joined
Oct 26, 2020
Messages
1,764
Location
Makefield Highlands PA
Bike
2016 ST1300P
2024 Miles
003726
Right side reinstalled, left side pulled, cleaned and drying. Oddly, the refitted fork is 2 mm taller in the tree. Also noted the cleanliness of the left fork oil compared to the right. It was as if the left fork was new, the right was dark and smelly.
 

dduelin

Tune my heart to sing Thy grace
Site Supporter
Joined
Feb 11, 2006
Messages
9,682
Location
Jacksonville
Bike
GL1800 R1200RT NC700
2024 Miles
008131
STOC #
6651
Right side reinstalled, left side pulled, cleaned and drying. Oddly, the refitted fork is 2 mm taller in the tree. Also noted the cleanliness of the left fork oil compared to the right. It was as if the left fork was new, the right was dark and smelly.
Doing fork work I generally have both legs out at the same time. If the new springs and new preload raises the ride height from stock you will have to slide the fork assembly up in the clamps in order to try and retain the same steering geometry. I removed 11 mm of sag with fork preload to get to 36 mm sag and the forks can slide up about 10 mm IIRC in the clamps before contacting the riser block under each handlebar. Results were just 1 mm of ride height difference in the forks. Then additional preload on the stock shock to level the bike. It's good that you are not far from the ideal Japanese rider because heavier riders can't get proper ride height with the stock rear spring. Will be interesting the results after you install the RT rear spring.
 
Joined
Aug 21, 2018
Messages
6,776
Location
Richmond, VA
Bike
'01 & '96 ST1100s
STOC #
9007
Wouldn't you want the tops of the fork tubes to be in the normal flush position to take advantage of the new springs, and only then adjust the rear for best geometry?
 
OP
OP
Willsmotorcycle

Willsmotorcycle

Ride more...
Site Supporter
Joined
Oct 26, 2020
Messages
1,764
Location
Makefield Highlands PA
Bike
2016 ST1300P
2024 Miles
003726
I left the one in so I could slide the axel back in for “correct” height. Axel spins freely, new spring has fork 2mm above flush. When I put the other back in we will see. Of course I can put them where I want but staying as it was for a jumping off point.
Will be interesting the results after you install the RT rear spring.
I’m going to put a few miles on before I do that. I want to see the new difference and the new new difference too.
 
Joined
Sep 4, 2013
Messages
8,197
Location
Cleveland
Bike
2010 ST1300
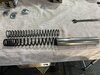
I too did both at the same time. Some months after putting Gold Valves up front (stock springs), I sent my rear shock to RT for a new spring, rebuilding and a new preload hose.

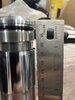
Before starting work, I measured the front sag - this is what I did: With the bike on the center stand, and no weight on the front* measure from the top of the fork's dust cap to the bottom of the triple clamp. Record this number. Take the bike off the center stand, bounce the forks a couple of times, pull up on the handle bars and let the bike settle. Measure the new distance from the dust cap to t-clamp. Record this number. Note that it is a lot easier to have a helper holding the bike upright while you measure. Now, with full riding gear, climb aboard and pull up on the handle bars, let it settle as you put your feet on the pegs. Measure again and record the third number. It is probably best to have one person doing all the measuring - a helper - since it is difficult to sit on your bike and measure the sag. Note that I did three measurements at each step of the process - compress, release, measure, etc. x 3 and averaged the results. Then I did a second complete series, called Trial 2. Stiction accounts for the differences.

I posted a few questions and 
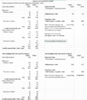
@dwalby sent me a multiplier that was used to determine the preload. I will try to post my excel worksheet below - it shows every step I took and that magic multplier - 1.2 for stock springs is included. I don't know how you would set the length of the preload spacer without the information learned from what the bike was doing with the original suspension, nor do I know how to do it if you change the spring to one with a different strength. Theoretically, if you know the weight the bike puts on the front end, and the spring's characteristics - the weight to compress it 1 mm (kg/mm) - you could calculate what length the preload spacer should be. How we, without oodles** of experience setting up bike's suspensions do this correctly the first time is beyond me. I think you will have to take RT's advice and then test the sag per above. Then you can adjust it to get the proper sag.

Ideally you want the bike's total sag with rider and all tools/gear in top and side cases to be about 1/3 of the total length available (the first number you found for the unweighted fork).

i could not figure out how to attach an excel file, so here is a picture of the spreadsheet. I can em it to you if you want - PM me.

Screen Shot 2023-03-04 at 10.02.19 AM.png

* Someone has to push down on the rear of the bike to lift the front off the ground
** Oodle - measure of experience - units are oodes, centioodes, millioodes, etc. Discussions are underway at institutions of higher learning (hard knocks, etc.) to arrive at a consensus of how many oodes are necessary to be called a guroode.
 

dduelin

Tune my heart to sing Thy grace
Site Supporter
Joined
Feb 11, 2006
Messages
9,682
Location
Jacksonville
Bike
GL1800 R1200RT NC700
2024 Miles
008131
STOC #
6651
I left the one in so I could slide the axel back in for “correct” height. Axel spins freely, new spring has fork 2mm above flush. When I put the other back in we will see. Of course I can put them where I want but staying as it was for a jumping off point.

I’m going to put a few miles on before I do that. I want to see the new difference and the new new difference too.
Hmmn, I also don't understand how the first one could be 2 mm longer than before.

I never saw the need to "correct" height between fork tubes as a practical matter. If the parts are straight it's going to line up and the axle slides in without effort on all the many bikes I have owned. But since I fiddle around with sag changes on some of them I need to be able to slide the aligned fork assembly up in the clamps evenly. After bouncing the forks to align the tubes then tightening the axle pinch bolt(s) up I set a jack under the engine and loosen the clamp bolts. I raise the fork in the clamps as a solid assembly by use of the jack. Both tubes will have the same height in reference to the top bridge because the fine tolerances machined into the sliders and axle.
 
OP
OP
Willsmotorcycle

Willsmotorcycle

Ride more...
Site Supporter
Joined
Oct 26, 2020
Messages
1,764
Location
Makefield Highlands PA
Bike
2016 ST1300P
2024 Miles
003726
Hmmn, I also don't understand how the first one could be 2 mm longer than before.

I never saw the need to "correct" height between fork tubes as a practical matter. If the parts are straight it's going to line up and the axle slides in without effort on all the many bikes I have owned. But since I fiddle around with sag changes on some of them I need to be able to slide the aligned fork assembly up in the clamps evenly. After bouncing the forks to align the tubes then tightening the axle pinch bolt(s) up I set a jack under the engine and loosen the clamp bolts. I raise the fork in the clamps as a solid assembly by use of the jack. Both tubes will have the same height in reference to the top bridge because the fine tolerances machined into the sliders and axle.
I don't have the experience with suspension to anything for granted. I put in the left fork, fitted a new tire and left everything loose. Once everything was in the right spot, I jostled it all around and sat on it to bounce the forks. When it was all settled both forks are about 1/2mm above where it was before the work. Have to run out can't shake it out until tomorrow morning. I'm sure there will be some revisiting of the process.
 
Joined
Sep 4, 2013
Messages
8,197
Location
Cleveland
Bike
2010 ST1300
Something sounds wrong to me. If one fork leg was longer than the other after you put the new spring in, then the fork was not assembled correctly. I could be misunderstanding. If you put the bike's weight on one old fork and one new fork (I mean springs), then the side with the weaker spring will collapse more than the strong spring. Regardless, 1/2 a mm is not enough to get excited about. That shakes out to about 1/50" - and if both are the same it makes no difference.

What I don't understand is why you left the forks that 1/2 mm high? if you loosen the clamps, you can slide both forks up or down from flush (down) w/ the top of the clamp to proud maybe 1/2" (oops figure 12-13 mm). When I was measuring the sag w/ a steel rule, I could barely see the difference of 1 mm, let alone 1/2.
 
OP
OP
Willsmotorcycle

Willsmotorcycle

Ride more...
Site Supporter
Joined
Oct 26, 2020
Messages
1,764
Location
Makefield Highlands PA
Bike
2016 ST1300P
2024 Miles
003726
What I don't understand is why you left the forks that 1/2 mm high?
Regardless, 1/2 a mm is not enough to get excited about.
What I don't understand is why didn't I leave the old tire on at least for a 100 miles or so, then I could have a better comparison.

I think some set up is still required to gain optimization, though I don't know what that entails yet. With that being said the new tire had me cautious in the turns. The bike stock was in unison hitting imperfections in pavement. Now the rear is lagging. The brake dive is still there, but comes back up quick. I don't think I have enough skill, time, perception, all of the above, to say this is way better than stock at this point. We will scrub in the new tire and set up sag and then ride it like I stole it. Then maybe the difference will be obvious to me.
 
Joined
Oct 27, 2022
Messages
28
Location
Nashua, NH
Bike
2010 ST1300
I am late to this discussion, but I'm interested because I too have some racetech springs ready to go into my ST1300. To those concerned about the unloaded static height... Not a deal breaker for me because I have bought springs for my substantially greater than stock rider weight. (225 lb setup).
When I do mine I EXPECT it to sit higher at rest. The OE sag is 13 years old on my 2010 37k bike, which was supposedly optimized for a 160 lb rider. The last time I was 160 lbs I was 12 years old. I'm not looking to copy the factory setup.

On the Racetech lookup for the ST1300 they specify a 25mm preload for their front springs. https://racetech.com/ProductSearch/12/Honda/ST1300/2010It also goes into nice detail on how to accomplish that preload by cutting our own spacers. https://racetech.com/page/title/IP FK SPR PRELOAD DAMPING ROD I am planning to use that unless you all convince me otherwise.
 
Last edited:
Joined
Sep 4, 2013
Messages
8,197
Location
Cleveland
Bike
2010 ST1300
I don't think I have enough skill, time, perception, all of the above, to say this is way better than stock at this point.
Racetech Gold Valves made a big diff for me. From your original post, I think you are simply replacing the springs. If you go to a stronger spring because you weigh more than the 160-170 lb rider for whom the bike was set up, then you should improve the damping to maintain the same response to bumps and road imperfections. Replacing stock springs with new ones of the same strength AND overhauling the damping valve that Honda provided should restore handling to stock.

I've said before that the GV stretched out the bumps. I was unhappy with the bike's response on our local Interstate that has asphalt heaves every 100' or so (estimated). The impact was sudden and sharp. After installing the GV, those bumps seemed gentler - as if there was a ramp on both sides of the asphalt ridge. That's how I describe it. The rear suspention still kicked my butt, but after RT rebuilt and resprung my shock, the kick was somewhat less. The front change was more dramatic than the rear. Doing curves and twisties, the bike simply seemed more planted, more stable. I'm not skilled enough to really push the bike nor can I adequately explain the difference.

https://racetech.com/ProductSearch/12/Honda/ST1300/2010It also goes into nice detail on how to accomplish that preload by cutting our own spacers. https://racetech.com/page/title/IP FK SPR PRELOAD DAMPING ROD I am planning to use that unless you all convince me otherwise.
@dwalby told me he used the pvc tailpiece from a 1 1/4" lavatory drain. This is a standard plumbing item at any hardware store. I went upscale and used a brass 1 1/4" tailpiece. Just make your choice and cut off as much as you need. The PVC one will cost you a few bucks, the brass maybe $10 (I had the latter - left overs from a bathroom repair).
 
Joined
Mar 13, 2012
Messages
5,071
Location
soCal
Bike
'97 ST1100
STOC #
687
I used regular schedule 40 1" PVC pipe to make my own preload spacers though, not the lavatory drain pipe.

However, I have the non-ABS ST1100, which I think has slightly smaller fork tubes than the ABSII 1100 and all 1300s, so 1.25" might make more sense in a 1300, IDK.
 

dduelin

Tune my heart to sing Thy grace
Site Supporter
Joined
Feb 11, 2006
Messages
9,682
Location
Jacksonville
Bike
GL1800 R1200RT NC700
2024 Miles
008131
STOC #
6651
@dwalby told me he used the pvc tailpiece from a 1 1/4" lavatory drain. This is a standard plumbing item at any hardware store. I went upscale and used a brass 1 1/4" tailpiece. Just make your choice and cut off as much as you need. The PVC one will cost you a few bucks, the brass maybe $10 (I had the latter - left overs from a bathroom repair).

Post#2:
 
Top Bottom