Pics of switches (kill, headlight, turn signal, horn, start). Cleaned them today.

bplandis

2006 ST1300
Joined
May 6, 2018
Messages
55
Location
Nashua, NH
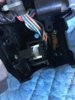
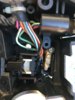
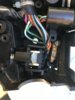
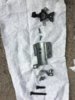
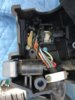
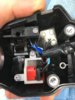
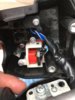
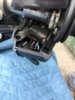
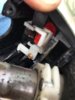
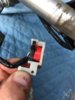
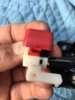
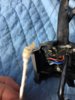
Had sticky starter button switch (2006) and the kill switch was inop the other day. Had to toggle it twice to get it to start. Pulled them apart today and cleaned them up a bit. Snapped a few pics for reference for those who want to pull the assemblies apart for the first time they can have a look. Basic tools are all that are required. I used paper towels, qtips and Caig Deoxit and Fader lube. Caig Gold may have been a better choice.... time will tell.

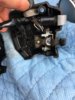
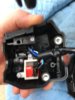
I pulled the kill switch from the mount, pay attention to how the tab slides under the housing before pulling it out. I noticed that going back in the toggle has to be in the off (maybe on) position or it will not slide back in. On the throttle side I pulled the brake lever off and the bar end weight off to allow me to move the housing around more to gain better access. Guessing it took me less than an hour start to finish even with pics.

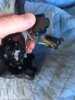
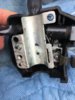
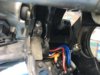
Clutch side is easier. Grease was pretty thick and tacky. Used qtips and some deoxit to try and clean contacts and internals. I tinker with vintage audio gear and use this on switches and pots. Is plastic friendly. Followed up with fader lube.... will ride it a while and see and pull back apart if they start sticking again.

Hope the pictures help.
 
OP
OP

bplandis

2006 ST1300
Joined
May 6, 2018
Messages
55
Location
Nashua, NH
Clutch side pics. The turn signal assembly once out just slides apart. Can see before when dirty, then apart, and back after cleaned on the paper towel pic. Sorry about the order, not sure how to switch them around and put them in order.
 

Attachments

OP
OP

bplandis

2006 ST1300
Joined
May 6, 2018
Messages
55
Location
Nashua, NH
Throttle front brake side. Kill switch had quite a bit of grease in it. Again, I pulled the brake lever.... could be done without doing so probably but only took a few more minutes and gave me much better access. If you pull the retainer from where the wires enter the housing note how the plastic "spacer" is oriented. I assumed it was rubber and when I removed the retainer the plastic piece fell on the floor.

Only semi complicated step is getting the kill switch back into the housing. Took me a few tries. Try it in the off and on position if it is being a bit of a pain.
 

Attachments

dduelin

Tune my heart to sing Thy grace
Site Supporter
Joined
Feb 11, 2006
Messages
9,685
Location
Jacksonville
Bike
GL1800 R1200RT NC700
2024 Miles
008131
STOC #
6651
Nice write up. Toward the end of the 12 years I owned my ST I was having to clean the turn signal switch about every 10,000 miles or annually. I finally replaced it around 175,000 miles.

I think it’s important to note for people thinking about doing this maintenance item that no small parts fly across the garage when the switches are opened. Hard to mess it up in other words. It’s a step by step dismantling to get to the contact surfaces.
 
OP
OP

bplandis

2006 ST1300
Joined
May 6, 2018
Messages
55
Location
Nashua, NH
Dave is correct. Not all that difficult, used a dozen or so q-tips and a few papertowls. Throttle side was very dirty. Housing are not sealed.

Have been a long time lurker here and have not found many instances where I could add much value or insight. Just hope a few pics may help that DIY'er who is a bit hesitant to dig into this relax a bit and have an idea of what lies under the housings.

Appreciate others who do the same here. This forum has saved my rear more than once and my wallet on numerous occasions.
 

Moto-Charlie

Vendor
Joined
Oct 7, 2012
Messages
319
Location
New Hampshire
Nice write up. Toward the end of the 12 years I owned my ST I was having to clean the turn signal switch about every 10,000 miles or annually. I finally replaced it around 175,000 miles.

I think it’s important to note for people thinking about doing this maintenance item that no small parts fly across the garage when the switches are opened. Hard to mess it up in other words. It’s a step by step dismantling to get to the contact surfaces.
I've got a ST1100 with 140,000 on it - still running great. The turn signal switch has started to act up a bit in that I have to be deliberate in firmly pushing it to the right or left in order to get it to work. It also feels a little "squishy" as opposed to a nice click off and on.

Any suggestions as to whether those symptoms would suggest a need to clean versus a need to replace? Thanks
 
Joined
Feb 7, 2009
Messages
1,691
Location
Lost in the sticks
Bike
2007 ST1300
Good write up. Mine lasted 9 years before I had to add grease.
I did my turn signal last year- the contacts needed dielectric grease then all worked just fine. The symptom was the turn signals only worked intermittently when using the switch.
 

ST1100Y

Site Supporter
Joined
Dec 4, 2012
Messages
5,039
Age
59
Location
Vienna, AuSTria
Bike
ST1100Y, ST1100R
STOC #
637
...clean the turn signal switch about every 10,000 miles or annually.
Unfortunately neglected by way too many...
When hauling through heavy weather and/or parking outside (yet even washing is a factor) those items must be serviced frequently to provide trouble free operation.
Simply flooding them with WD-40 is contraproductive, yet even damaging...
It's a bit like owning a boat... ;)
 
OP
OP

bplandis

2006 ST1300
Joined
May 6, 2018
Messages
55
Location
Nashua, NH
Moto I would assume the 1100 is not much different? Pics are of 06 1300. My right signal would not "lock" into place about 80 percent of the time. On occasion it would not even work.

If it is similar you could pull it apart and clean and lube it in about 15 minutes or so if it is similar to mine. Others may chime in as to if the 1100 is different.

After a cleaning and lube mine works as it should. Can feel and hear the click.... could not before.
 

ST1100Y

Site Supporter
Joined
Dec 4, 2012
Messages
5,039
Age
59
Location
Vienna, AuSTria
Bike
ST1100Y, ST1100R
STOC #
637
The turn signal switch has started to act up a bit in that I have to be deliberate in firmly pushing it to the right or left in order to get it to work.
Any suggestions as to whether those symptoms would suggest a need to clean versus a need to replace?
Well, defenitely overdue for some maintenance there...
Ideal would be removing them from the bike to work on the bench, with proper light, etc... but it can be done on the motorcycle:
- I'd suggest throwing a blanket or larger towel over the false tank and infills, to prevent scratches and contamination with solvents/lubricants
- both switchpods are helt together and in place by 2 black philips (actually JIS) bolts inserted from the bottom
- remove those, note that they have different legth, memorize their proper positions and carefully pry the casing open (but not too far to prevent damage to cables or soldering spots)
- use only plastic approved/friendly cleaners and grease, an air nozzle is also hepfull, so are Q-tips, dental picks and toothpicks...
- you'll find that there is a small, spring loaded steel ball underneath the t/signal lever, this should "click" upon moving the lever, but when clogged with crud and oxidation the thing stucks
- when reattaching the switch casings to the handlebar, beware that the pin in the bottom half slides into its bore in the steel tube (that prevents the switch pods from sliding/rotating)

Don't forget the RHS switch assy, KILL and starter contacts in particular (a common "bike won't start" cause...)

I use waterpoof marine grease on moving metal parts, silicon grease where plastic rubbs on plastic and a dab of AFC-50 on any electrical contact plates...
Done properly you're good for 2 years riding in harsh weather ;)
In fact will the cases fade and crack due UV radiation/weathering down long before any of the switch mechanisms wear off...
 
Joined
Aug 21, 2018
Messages
6,775
Location
Richmond, VA
Bike
'01 & '96 ST1100s
STOC #
9007
I've got a ST1100 with 140,000 on it - still running great. The turn signal switch has started to act up a bit in that I have to be deliberate in firmly pushing it to the right or left in order to get it to work. It also feels a little "squishy" as opposed to a nice click off and on.

Any suggestions as to whether those symptoms would suggest a need to clean versus a need to replace? Thanks
I would try a contact-cleaner spritz before any disassembly.
 

ST Gui

240Robert
Site Supporter
Joined
Sep 12, 2011
Messages
9,284
Location
SF-Oakland CA
Bike
ST1300, 2010
My ST buddy was having trouble with his turn signal switch being very stiff and not locking in one direction and being capricious in the other and often failing to cancel with a normal push.

I mentioned cleaning it with some spray as a temporary fix. He had some plastic-safe electrical contact cleaner from my rec for cleaning his starter/kill pod.

The turn signal switch had a lot of hardened grease inside and didn't respond to spritzes. He opened it up and it was stubborn to clean but he persevered and the switch is like new.

My switch is giving a little resistance so a spritzing is in order until the weather gets a little warmer.
 
Joined
Nov 10, 2007
Messages
1,610
Age
61
Location
Vancouver, British Columbia, Canada
Bike
1&2&3-2005 ST1300ABS
2024 Miles
001862
STOC #
8562
My turn signal switch has been hit and miss for the past few months, so I pulled it apart today and gave it a good clean and Lube job.
Used Q-tips (10) along with WD-40, then used contact cleaner on the more stubborn dried up grease.
Removed the spring and ball and degreased the bore and ball. Spring was found with no grease residue on it.
Then flooded the switch contacts with contact cleaner and mopped it up with Q-tips.
I used marine grade grease on the switch pivot point and used diaelctric grease for the switch contacts.
Also used marine grade grease to hold the ball and spring in place.
Don't wait 10 years to do this like I did. Betting it hasn't been done since it left the factory.
There was no evidence that the previous owner ever opened up this area before.
Works like brand new now.
 

ST Gui

240Robert
Site Supporter
Joined
Sep 12, 2011
Messages
9,284
Location
SF-Oakland CA
Bike
ST1300, 2010
Removed the spring and ball and degreased the bore and ball. Spring was found with no grease residue on it.
Where does that ball live? I didn't see it in the OP's pics. Is the same switch mechanism used on all the more recent 1300s? 2005 on?
 

Moto-Charlie

Vendor
Joined
Oct 7, 2012
Messages
319
Location
New Hampshire
Lots of good info and how-to instructions - Thanks to all. I will go collect a few supplies and give the switches a good cleaning and lube in the next few weeks.
 
Joined
Nov 10, 2007
Messages
1,610
Age
61
Location
Vancouver, British Columbia, Canada
Bike
1&2&3-2005 ST1300ABS
2024 Miles
001862
STOC #
8562
Where does that ball live? I didn't see it in the OP's pics. Is the same switch mechanism used on all the more recent 1300s? 2005 on?
You will see in the picture of Brads photo attached, the ball resides at the opposite side of where you place your thumb to activate the switch. The ball and spring helps to hold the lever arm in the neutral position when you cancel the turn signal. You will see the notch on the arm where the ball and spring resides. The spring is inside the square black plastic part pushing against the ball.
2002-2014 ST1300's should have this same type of switch.
It's sure nice to hear the ball clicking into the de-dent on the lever arm again when you cancel your signal.
image.jpeg
 
OP
OP

bplandis

2006 ST1300
Joined
May 6, 2018
Messages
55
Location
Nashua, NH
A few more of the turn assembly. I pulled all the switches from the housing. The horn button is a PITA to get back in, could not hold my mouth right to get it in on its own and I believe the shield up/down switch wires are to short if it did go in on its own. Again... assumption on my end. There is a groove in the bottom of the housing that the brass button side has to snap into.

Once I slid the shield switch into the groove about 2/3 the way horn switch slid right in. Screw tab for horn goes under the screw tab for the shield switch. Make note when you pull it apart if you dig this far.

Only other advice is to start with the switch deepest in the housing when you are putting everything back together. Top of the clutch side I believe I did hi/lo first then emergency flashers. Tried it in reverse order first and was a bit complicated. Outside horn rest of the switches, mounts and brackets should slide right in. Wires are already formed as they have been held in the same place for years.

The spring and ball bearing only come out the back of the housing. I had to use a small screw driver to push them out. Clean and grease and should be good to go. On re-assembly spring has to be decompressed prior to sliding it all the way back in. The housing is beveled so compressing with small screw driver may not be necessary... just wanted to be safe.

Glad I could finally help a few.
 

Attachments

Last edited:
Joined
Oct 17, 2015
Messages
1,962
Location
near Harrow, Ontario, Canada
Bike
'83 BMW R100RS
STOC #
8870
This is extremely timely information!
My last few rides before winter storage were quite challenging because the switches on both sides had become very sticky and felt “gummed-up” to a remarkable degree.
Thanks for doing such a fine job of documenting this important task!
Pete
 
Joined
Apr 22, 2011
Messages
1,151
Age
68
Location
Camarillo, Ca
Bike
2006 ST1300A
2024 Miles
002552
My starter switch was becoming intermittent. It would only start if I pushed the switch half way in. Used the info here and cleaned all my switches. I used a cleaner called Awesome to dissolve the dirt and grease. Used a tooth brush and a small stiff artist paint brush. Then I washed it out with rubbing alcohol to remove the soap residue. Then sprayed it with electrical contact lube. Amazing how much black gunk was in there. Now it works just like new. This should be a sticky. Thanks for the Photos and tips.
 
Top Bottom