Pre-Load Fluid Replacement Follow Up

dduelin

Tune my heart to sing Thy grace
Site Supporter
Joined
Feb 11, 2006
Messages
9,662
Location
Jacksonville
Bike
GL1800 R1200RT NC700
2024 Miles
010688
STOC #
6651
Most riders over here are much heavier than the Japanese ideal the default setting starts at. If you are north of 150 lbs the default setting is the bottom end of the range - that's why there is 36 clicks available. If your riding tends to the fast or sportier side low preload settings give too much sag because the stock 900 lb spring is far too soft for heavier riders and all two up riding. The suspension forum is full of threads where folks upgrade to 1200 or 1300 lb springs to get the sag correct for their riding weight. I once measured the amount of sag the stock spring gives and for my weight of just under 150 lbs 9 clicks gave 34 mm of sag and 16 clicks gives 29 mm. Most suspension tuning guides tell us to set sag at 30-36 mm. Heavier riders need lots more clicks or a heavier spring.
 
Joined
Jun 2, 2011
Messages
101
Location
Dublin, Ireland
Bike
ST1300
Sooo....I did this today and the fluid came out clear (77,000 km). I topped it up with fork oil...I'll see if it makes any difference.
 
OP
OP
Igofar

Igofar

Site Supporter
Joined
Jan 8, 2011
Messages
7,115
Location
Arizona
Bike
2023 Honda CT125A
Sooo....I did this today and the fluid came out clear (77,000 km). I topped it up with fork oil...I'll see if it makes any difference.
When you say you topped it off....you did unscrew the knob all the way, then push the piston back down, so you'd completely fill the housing right? :think1:
 
Joined
Jun 2, 2011
Messages
101
Location
Dublin, Ireland
Bike
ST1300
Yep, good job I had a basin to hand too, because I think I spilt about 200ml pouring it into the little hole....no issues coming to work this morning, but I'll take a spin up the mountains later this evening and see how I get on.
 
Joined
Jun 2, 2011
Messages
101
Location
Dublin, Ireland
Bike
ST1300
Well, I went out training on the twisties tonight...I have an advanced riding assessment coming up and need to brush up on 30 odd years of bad habits...and the rear end performed perfectly.

I started out in the Dublin mountains on the especially twisty road that the testers love because it's so challenging and very sweet when you get it right.....after a couple of runs it began to get busy with cyclists, walkers and people out for romantic drives overlooking the city.....so I headed across the Sally Gap into the Wicklow mountains...It's a crappy, bumpy road with wandering sheep, the occasional couple of deer and a good few potholes. In all the times I've been over this road, I've never had such a beautiful view...The sun was low, the air was clear, there was a beautiful golden glow from the bogland and I had a clear view to the Sugar Loaf that glistened and sparkled in the setting sun. It was so nice that I turned round after I crossed the gap and came back to be rewarded with beautiful views of the Blessington Lakes...Normally, I'd stop and take a few snaps but was enjoying it so much I just kept riding.

On the way home through the city a guy on a vtec VFR tagged along. Whilst admiring his bike at a set of lights I remembered the FI I had before the Pan and compared the two in my mind....After the service I gave it yesterday, it's running sweet as a nut. Just got home a short while ago and no.3 was watching Jools Holland on the telly....Happy out.
 
Joined
Mar 10, 2019
Messages
162
Age
76
Location
Atlanta
Bike
2006 ST1300 basic bl
For anyone interested in what the inside of the adjuster looks like and how it works I took a bunch of pics. I used the excellent on-bike procedure Igofar described in post #7 here.

https://photos.app.goo.gl/srubXzDrrFMFkJzM8
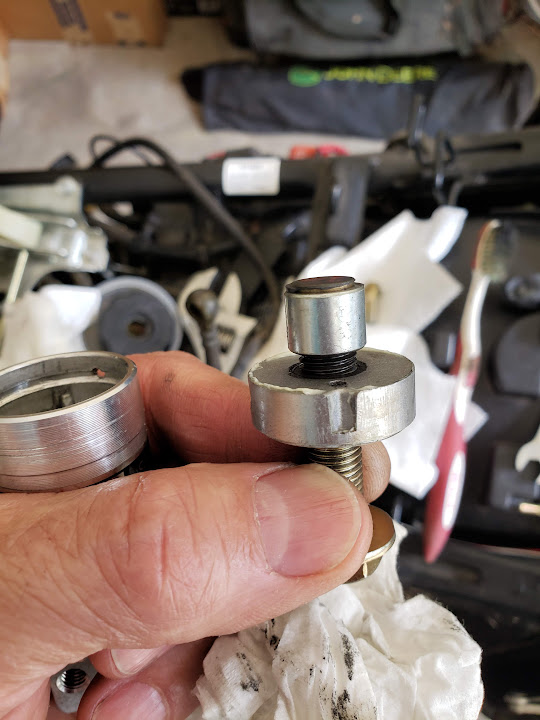

It was necessary to drill a small hole - just visible above - to remove the steel retainer ring, but I understand that '07 and later year models already had the hole.

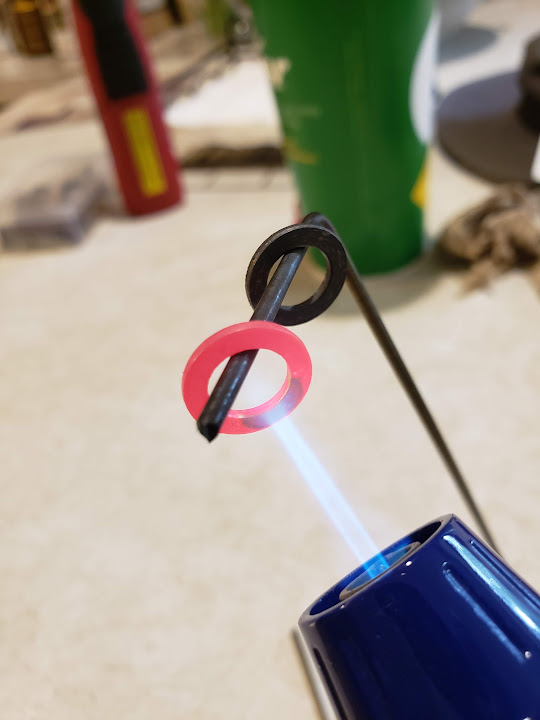
The copper banjo seals were annealed with a butane lighter and reused, it's easy and quick. Copper gets hard and brittle with work and age, annealing restores the flexibility and ductile character necessary. The same can be done to aluminum seals, too, a slightly different process, the same tools.


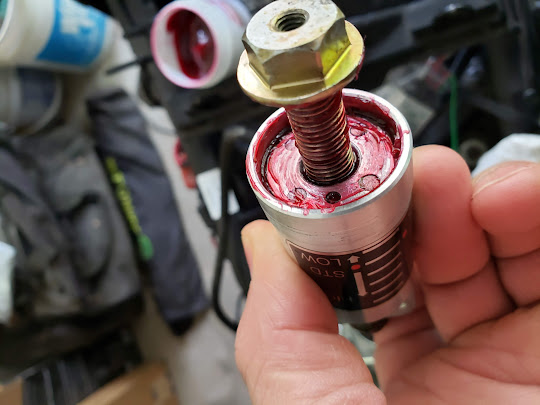
Also, the inside walls of the cylinder (exterior to the oil) are subject to water from the breather holes in the threaded plug. I was concerned that the moisture would cause corrosion on the cyl wall and the steel piston and the threaded adjuster. All of these were wiped with Red Rubber Grease for moisture protection. An alternative without disassembling would be to shoot some spray-can white lithium grease in thru a vent hole. Hold the cyl wrapped in a rag because stuff comes out of the other hole promptly.
 

fnmag

R.I.P. - 2020
Rest In Peace
Joined
Mar 21, 2009
Messages
1,416
Location
Desert Southwest
Bike
'06 ST1300/Burgmn400
For anyone interested in what the inside of the adjuster looks like and how it works I took a bunch of pics. I used the excellent on-bike procedure Igofar described in post #7 here.

https://photos.app.goo.gl/srubXzDrrFMFkJzM8


It was necessary to drill a small hole - just visible above - to remove the steel retainer ring, but I understand that '07 and later year models already had the hole.

The copper banjo seals were annealed with a butane lighter and reused, it's easy and quick. Copper gets hard and brittle with work and age, annealing restores the flexibility and ductile character necessary. The same can be done to aluminum seals, too, a slightly different process, the same tools.


Also, the inside walls of the cylinder (exterior to the oil) are subject to water from the breather holes in the threaded plug. I was concerned that the moisture would cause corrosion on the cyl wall and the steel piston and the threaded adjuster. All of these were wiped with Red Rubber Grease for moisture protection. An alternative without disassembling would be to shoot some spray-can white lithium grease in thru a vent hole. Hold the cyl wrapped in a rag because stuff comes out of the other hole promptly.

Thanks for posting the pics.
 

mlheck

Site Supporter
Joined
Feb 12, 2006
Messages
1,004
Location
Ft. Wayne, IN
Bike
'18 BMW K1600GTL
STOC #
664
I went one step further and used some very light emery cloth to polish the inside of the cylinder. Mine was rougher than I liked for a hydraulic unit.
 
Joined
Jul 14, 2006
Messages
969
Location
Nova Scotia
Bike
'07STA
STOC #
7235
I went one step further and used some very light emery cloth to polish the inside of the cylinder. Mine was rougher than I liked for a hydraulic unit.
How did you get the Emery cloth out? The bolt hole is small, and would be extremely hard to remove
 
Joined
Mar 10, 2019
Messages
162
Age
76
Location
Atlanta
Bike
2006 ST1300 basic bl
How did you get the Emery cloth out? The bolt hole is small, and would be extremely hard to remove
Tdinova,

Go to my post #68 above and look at the first pic. That's the cylinder on the left and the adjuster that came out of it on the right. Once the adjuster comes out you can push the piston out from the banjo bolt hole. Then you have enough room to get fingers or thumbs all the way in. There are pics of the empty cylinder in the link. Cleaning is EZPZ.
 
Joined
Jul 14, 2006
Messages
969
Location
Nova Scotia
Bike
'07STA
STOC #
7235
Tdinova,

Go to my post #68 above and look at the first pic. That's the cylinder on the left and the adjuster that came out of it on the right. Once the adjuster comes out you can push the piston out from the banjo bolt hole. Then you have enough room to get fingers or thumbs all the way in. There are pics of the empty cylinder in the link. Cleaning is EZPZ.

Thanks for the reply. I done mine over the winter, it only took 1 hr . Now I may take it back off and redo it...
 
Joined
Dec 19, 2020
Messages
16
Age
48
Location
Phoenix
This will be my project for this week, I hope, time is a always a struggle for me with working nights, often 6 days a week and often 12 hour shifts.
I only get resistance with about 5 clicks left to the knob being at max preload, I am sure this thread will be of great help, thanks to you all for the contributions in here, it really helps a noob like me with this type of bike.
 
OP
OP
Igofar

Igofar

Site Supporter
Joined
Jan 8, 2011
Messages
7,115
Location
Arizona
Bike
2023 Honda CT125A
This will be my project for this week, I hope, time is a always a struggle for me with working nights, often 6 days a week and often 12 hour shifts.
I only get resistance with about 5 clicks left to the knob being at max preload, I am sure this thread will be of great help, thanks to you all for the contributions in here, it really helps a noob like me with this type of bike.
Or.....you could ride your bike over to Tucson and visit the ST-Whisperer, and I could do your pre-load adjuster for you, as well as inspecting several other things you may need that you didn't know about :rofl1:
:WCP1:
 
Joined
Dec 19, 2020
Messages
16
Age
48
Location
Phoenix
Or.....you could ride your bike over to Tucson and visit the ST-Whisperer, and I could do your pre-load adjuster for you, as well as inspecting several other things you may need that you didn't know about :rofl1:
:WCP1:
yes it’s on my todo list for sure, one of these weekends in the near future, work is supposed to slow down in the next week or so.
Did the fella from Catalina find you?
 
OP
OP
Igofar

Igofar

Site Supporter
Joined
Jan 8, 2011
Messages
7,115
Location
Arizona
Bike
2023 Honda CT125A
Catalina? I didn't know someone from there was looking for me :rofl1:
I had a very nice man from Tucson come down this weekend, and we sorted out several issues on his bike.
Seems like there are several ST Riders up in your area, Mesa, Phoenix, Scottsdale, Surprise, etc. that have been reaching out and asking questions, but so far none of them have made the trip yet.
 

David Fyffe

Site Supporter
Joined
Aug 12, 2017
Messages
84
Age
77
Location
Spokane Valley, WA.
Bike
2010 ST1300/1978 GL
A source for preload adjuster sealing washers.
Grainger part number: 5ZLU0 $2.59 plus sales tax. Sealing Washer, Copper, 12mm Od. X 8mm Id. X 1mm thick
 
Top Bottom