Quick Question (yeah right) about the float seat screen/filter

Joined
Oct 10, 2021
Messages
26
Age
56
Location
Ipswich GB
STOC #
9083
Hello everybody peeps,

So I have an 1996 ABS/TCS with 36,000 mile on the clock.

I bought it a coupla weeks ago with a "misfire" sight unseen so I knew I was taking a risk.

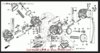
It looks like the carbs have seen a less than competent visitor. The fuel feed from the filter to where it splits to each bank was leaking fuel. One of the diaphram covers was actually loose and leaking. And the last thing (well I hope it's the last thing!) to leak fuel was a nipped O ring seal on float bowl # 4.

O ring nipped.jpg Grrrrrrr :mad:


I've whipped out the carbs and to be fair, there was not a lot of debris inside them. The PO said that the jets had been changed to accomodate the new delkavic headers. Whoever done the jets was a neanderthal, but no matter, the world is full of them (myself included sometimes o_O)

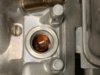
So my quick question is: Should the screen/filter actually be firmly attached to the float seat? Mine seems to be quite a loose fit. Or is that the case to aid fitting only, as it stays attached whilst upside down (i.e. going back into situ)? I'll see if I can make a little vid of what I mean....The video is a bit big @ 13.5MB So I've taken a couple of photos...

fss02.jpg fss01.jpg

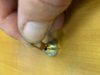
It seems to me to be inefficient if they are not firmly attached as fuel (and thus debris) can bypass the filter entirely. One of screens/filters was actually upside down (piccie attached, oh and I did get the debris out of there in one piece too). And none of them came out attached to the float seat.

upsidedown screen-filter.jpg Double Grrrrr :mad::mad:

Or am I being a plum? Does the fuel pressure keep the screen/filter pushed against the float seat?

Billy (2% Neanderthal, honestly, I can't help it it's actually in my DNA profile) London.
 
Joined
Aug 10, 2015
Messages
2,042
Location
Fort Worth, Texas
Bike
91 ST1100/06 ST1300
I just retrieved my old ones from my garage. I rebuilt the carbs on my 1991 about 12 months ago. The screens on those are tight fitting. When I twisted the screens the screens distorted but didn't turn on the boss.
 
OP
OP
Billy von Bimble
Joined
Oct 10, 2021
Messages
26
Age
56
Location
Ipswich GB
STOC #
9083
Make sure the inner passages are clean, choke passage, idle jet passage, air passages.
Also check this site for insights on rebuild
Thank you Slydynbye,

I have read that excellent guide and keep referring to it and it got me to asking the question about the screen being attached as the picture there shows it being on the seat.

I will indeed check all the passages are clear.

Billy.
 
Joined
Mar 12, 2006
Messages
226
Location
Brewerton, NY
Bike
ST1100/ST1300
STOC #
949
The float needle seat screens are an interference fit and are very snug. You'll need a pick to remove them from the seat assy. Many times they get ruined by taking them out.

The screens you have pictured are Honda/Keihin OEM factory. They are very dark in color and fuel stained from time and usage. New OEM screens are white plastic.
Judging from the very shiny needle seat, those are newer aftermarket float needle/seat kits, hence the fitment issues your having. Someone before you cut corners and cost by using aftermarket crap. I recommend that you replace with Honda factory parts. Yes, they are a little pricey in the beginning, but they'll go 400,000 miles in the end, if you take care of them. Do the math...

When fitting the new float bowl seals, spray them with 3M spray tack. Then fit them into the float bowls quickly before the spray tack dries. This will hold them in place as you install the float bowls. Your fingers will be a mess for two days. LOL
 
OP
OP
Billy von Bimble
Joined
Oct 10, 2021
Messages
26
Age
56
Location
Ipswich GB
STOC #
9083
The float needle seat screens are an interference fit and are very snug. You'll need a pick to remove them from the seat assy. Many times they get ruined by taking them out.

The screens you have pictured are Honda/Keihin OEM factory. They are very dark in color and fuel stained from time and usage. New OEM screens are white plastic.
Judging from the very shiny needle seat, those are newer aftermarket float needle/seat kits, hence the fitment issues your having. Someone before you cut corners and cost by using aftermarket crap. I recommend that you replace with Honda factory parts. Yes, they are a little pricey in the beginning, but they'll go 400,000 miles in the end, if you take care of them. Do the math...

When fitting the new float bowl seals, spray them with 3M spray tack. Then fit them into the float bowls quickly before the spray tack dries. This will hold them in place as you install the float bowls. Your fingers will be a mess for two days. LOL
Hi afrymoyer,

Thank you for the insights,

So I'm going to tack the filters I have at the moment on, this being my first priority, stopping the petrol from leaking out. I've done the fuel stop bypass.

As I suspect other issues will need attention (only running on one bank (coils?), ABS & TCS lights on to name but two).

I've checked the numbers on the main jets (128), Pilot (42) and float seat (2.6) and they all match. I have noticed though that the main jets do not have what I think is the emulsion tube, spring, O ring and washer. I'm hoping that is because it's a UK spec bike. Which also doesn't have the PAIR system or charcoal canister either.

I'll keep the thread updated. I'm re-fitting the carbs today but I can't take the bike outside to fill up and test as it's pissing down for most of the day today.

Here's a video of the leak.

Billy.
 

ST1100Y

Site Supporter
Joined
Dec 4, 2012
Messages
5,039
Age
59
Location
Vienna, AuSTria
Bike
ST1100Y, ST1100R
STOC #
637

Smudgemo

Intermodal Man of Mystery
Joined
May 17, 2019
Messages
558
Location
Berkeley, CA
Bike
'08 GS / '78 CB550
I don't have any first-hand experience with aftermarket jets, but in my SOHC4 projects, the guys who are really into it constantly warn not to use the aftermarket product - they're generally garbage. So, if you need to buy new jets or have aftermarket jets in place, you may want to replace them with the OEM parts.
 
OP
OP
Billy von Bimble
Joined
Oct 10, 2021
Messages
26
Age
56
Location
Ipswich GB
STOC #
9083
Thank you Ryan,

I am seeing if I can get the bike to run on a budget at the moment. If I can fix it up with what I have, then I will start to service it with OEM parts.

I could end up chasing my own arse around the bike. As we know, Honda parts don't come cheap, I know that's because they are the best for the bike. I just can't afford to chuck money (well that's not true, I can afford it, but I don't want to waste money where it's not needed).

I've managed to stop the dangerous petrol leak (see above youtube link). There is now an oily petroly fluid (see this youtube link) dripping from where the silencer (ya'll call them mufflers I think) joins the mid section of the exhaust pipe. I suspect this is from the left two cylinders not firing, so I'll run through the diagnostics of the coils and HT leads this weekend.

Billy.
 
Joined
Mar 12, 2006
Messages
226
Location
Brewerton, NY
Bike
ST1100/ST1300
STOC #
949
With your ‘96 ABS, again someone did you a disservice by installing giant #42 pilot jet’s with a #128 mains. WAY too much fuel for an ABS bike.

I agree with you that you’ll be chasing your own tail with this one and setting yourself up in numerous “return repairs” and fixing what you fixed… Reconsider being patient, doing it right the first time with all the gains of having a reliable bike.
 

ST1100Y

Site Supporter
Joined
Dec 4, 2012
Messages
5,039
Age
59
Location
Vienna, AuSTria
Bike
ST1100Y, ST1100R
STOC #
637
When fitting the new float bowl seals, spray them with 3M spray tack. Then fit them into the float bowls quickly before the spray tack dries. This will hold them in place as you install the float bowls.
Interestingly I came to a similar solution using PATTEX contact adhesive... ;)
(also helps on those valve cover gaskets...)
 
OP
OP
Billy von Bimble
Joined
Oct 10, 2021
Messages
26
Age
56
Location
Ipswich GB
STOC #
9083
With your ‘96 ABS, again someone did you a disservice by installing giant #42 pilot jet’s with a #128 mains. WAY too much fuel for an ABS bike.

I agree with you that you’ll be chasing your own tail with this one and setting yourself up in numerous “return repairs” and fixing what you fixed… Reconsider being patient, doing it right the first time with all the gains of having a reliable bike.
Hi afrymoyer,

You could be right on both counts there fella. I was told the jets were upped because of the new delkavic headers. I will research that a bit further now, what would you think the jets should be then?

To justify (I don't have to, but this is a Forum after all!) my method, I just would like to get the bike running on all four cylinders and not leaking fuel. Once I've achieved that, I will start to prepare the bike for the NC500 (which is 671 miles away from me, making a total journey of 1842 miles:eek:), so I'd be foolish not to service with OEM parts.

I can whip the carbs off now in under 3 minutes and be inside them within 5. The hardest thing I've found so far is getting the tupperware off! :D And I'm pleased to see that 98% of the fixings are present and in good condish, which for a 25 year old bike bodes well :thumb:

Billy.
 
Joined
Mar 12, 2006
Messages
226
Location
Brewerton, NY
Bike
ST1100/ST1300
STOC #
949
Ok... I've been through my notes and have found 2 others like yours. Both were UK bikes with a bazaar factory tune that I hadn't previously seen before. Yours is one of those bikes.

Your European '96 ABS has the hotter standard spec International non-emission camshafts. However, the jets were originally #40 pilot and a #125 main from the factory. You may also have the Phillips head idle mixture screws. One of them did, the other one had the "D" shape. Weird....

In the end, when you have EVERYTHING up to snuff, I recommend the following jetting and settings. Because you have the aftermarket fart can exhaust system, be sure that you have the silencers installed, or some sort of "quiet tip". The ST needs exhaust back pressure. Leave in the #128 mains, but make sure that they are genuine Keihin. Check that the diaphragm slide needles have a .020" shim installed under the needles. Measure them to be certain.

Remove the #42 pilots and throw them away. Install genuine Keihin #40 pilot jets and set your idle mixture screws to 2 turns out from lightly seated. This should get you really close to a spot-on mixture. Replace all the filter's. Use only the Honda OEM air filter, as this is what everything is jetted to. After synchronization, set idle speed to 1000 rpm. This tune will also yield the best of both worlds in power delivery and reasonable fuel economy. She'll pull hard down low!

Again, I realize that it's a little spendy getting the OEM carburator parts, but they will always fit and go the distance. Your posted pictures of aftermarket float needles and seats is a prime example. Good luck getting the bike sorted out and best wishes with your rebuild endeavors.
 
OP
OP
Billy von Bimble
Joined
Oct 10, 2021
Messages
26
Age
56
Location
Ipswich GB
STOC #
9083
Ok... I've been through my notes and have found 2 others like yours. Both were UK bikes with a bazaar factory tune that I hadn't previously seen before. Yours is one of those bikes.

Your European '96 ABS has the hotter standard spec International non-emission camshafts. However, the jets were originally #40 pilot and a #125 main from the factory. You may also have the Phillips head idle mixture screws. One of them did, the other one had the "D" shape. Weird....

In the end, when you have EVERYTHING up to snuff, I recommend the following jetting and settings. Because you have the aftermarket fart can exhaust system, be sure that you have the silencers installed, or some sort of "quiet tip". The ST needs exhaust back pressure. Leave in the #128 mains, but make sure that they are genuine Keihin. Check that the diaphragm slide needles have a .020" shim installed under the needles. Measure them to be certain.

Remove the #42 pilots and throw them away. Install genuine Keihin #40 pilot jets and set your idle mixture screws to 2 turns out from lightly seated. This should get you really close to a spot-on mixture. Replace all the filter's. Use only the Honda OEM air filter, as this is what everything is jetted to. After synchronization, set idle speed to 1000 rpm. This tune will also yield the best of both worlds in power delivery and reasonable fuel economy. She'll pull hard down low!

Again, I realize that it's a little spendy getting the OEM carburator parts, but they will always fit and go the distance. Your posted pictures of aftermarket float needles and seats is a prime example. Good luck getting the bike sorted out and best wishes with your rebuild endeavors.
Adam,

Thank you very much Sir, you are a gentleman.

I will do exactly as you suggest. The bike only has the delkavic headers, with stock silencers.

I’ve not had the time this weekend to have a go at diagnosing the coils. The resistance on the HT leads is within spec.

Luckily I have other bikes I can go out for a bimble on :thumb: so I’m not harried by the situation.

Billy.
 
Top Bottom