
Uncle Phil
Site Supporter
Having just done this with one of my older jacket liners, I thought that it might be of help to someone along the way.
Repairing A Gerbing Jacket Liner Glove Connections
1. You will need -
a. Seam Ripper
b. Sewing Needle And Black Thread
c. Soldering Iron
d. Solder
e. Glove Harness
f. Patience
2. There is a seam in the inside of the jacket line on the left side near the bottom where the tag is stitched in.
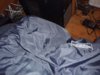
3. Open this seam with a seam ripper to gain access to the wiring inside.
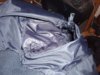
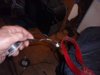
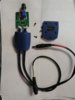
4. If one glove connector fails like this -
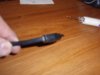
the other one will not be far behind it. So I always replace both connectors while I am at it. Clip off the connector and pull it from the inside of the jacket. Make a note of the length from the cut-off end to the knot. You'll need that measurement when you install the new wire. On the original Gerbing Jackets, the wire is stranded 'lamp' wire with soldered joints covered by shrink wrap.
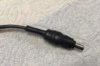
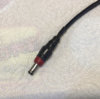
5. With the bad wire removed, take a careful look at the glove harness (which should come with a pair of new gloves. It should have 3 male coax plugs - one for each glove and one to plug into a power source. One of the glove leads will be longer than the other - used it for the right sleeve and the shorter one for the left sleeve since the power connectors are on the left side of the jacket. Clip the glove harness wires as close to the power source connect as you can to maximize harvested wire length. Feed the appropriate glove connector from the outside through the grommet in the jacket. Tie a loose knot in the inside of the jacket sleeve the same length as the old wire that you removed. Pull the new wire to power connection where the old wire is soldered.
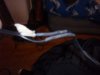
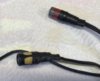
6. Remove the heat shrink so the soldered connection is exposed. Clip the two wires of the old glove wire on the opposite side of the solder joint from the old glove wire. Take notice - there should be a 'rib' or marking on the the new wires and the old wires. Pair them up so that they are the same (keeps the outside of the new plug from being the 'hot' one). Strip about 1/4- 3/8 back on the new wires and the power wires. Slip some heat shrink over one side or the other far enough away from the connection so the soldering heat won't make it shrink. Solder the wires together (polarity does not seem to matter to these jackets).
7. Once the soldered connection cools, then slide the heat shrink over the connection and shrink it. Follow the same procedure for the other glove connection.
8. Place all the wire back into the inside of the jacket and sew up the seam.
Note - This same procedure can be used to separate the older jackets where the gloves and the jacket were on the same power connection,. You just have to trace the wire and re-solder the connections so the gloves are on a separate power feed. Also, you can replace the SAE connectors with the newer coax connectors following the same procedure. You might consider also covering the wire and glove connector with a layer of shrink wrap to strengthen the connection at the usual breaking point.
Phil Derryberry
www.unclephil.us
STOC #0698
Repairing A Gerbing Jacket Liner Glove Connections
1. You will need -
a. Seam Ripper
b. Sewing Needle And Black Thread
c. Soldering Iron
d. Solder
e. Glove Harness
f. Patience
2. There is a seam in the inside of the jacket line on the left side near the bottom where the tag is stitched in.
3. Open this seam with a seam ripper to gain access to the wiring inside.
4. If one glove connector fails like this -
the other one will not be far behind it. So I always replace both connectors while I am at it. Clip off the connector and pull it from the inside of the jacket. Make a note of the length from the cut-off end to the knot. You'll need that measurement when you install the new wire. On the original Gerbing Jackets, the wire is stranded 'lamp' wire with soldered joints covered by shrink wrap.
5. With the bad wire removed, take a careful look at the glove harness (which should come with a pair of new gloves. It should have 3 male coax plugs - one for each glove and one to plug into a power source. One of the glove leads will be longer than the other - used it for the right sleeve and the shorter one for the left sleeve since the power connectors are on the left side of the jacket. Clip the glove harness wires as close to the power source connect as you can to maximize harvested wire length. Feed the appropriate glove connector from the outside through the grommet in the jacket. Tie a loose knot in the inside of the jacket sleeve the same length as the old wire that you removed. Pull the new wire to power connection where the old wire is soldered.
6. Remove the heat shrink so the soldered connection is exposed. Clip the two wires of the old glove wire on the opposite side of the solder joint from the old glove wire. Take notice - there should be a 'rib' or marking on the the new wires and the old wires. Pair them up so that they are the same (keeps the outside of the new plug from being the 'hot' one). Strip about 1/4- 3/8 back on the new wires and the power wires. Slip some heat shrink over one side or the other far enough away from the connection so the soldering heat won't make it shrink. Solder the wires together (polarity does not seem to matter to these jackets).
7. Once the soldered connection cools, then slide the heat shrink over the connection and shrink it. Follow the same procedure for the other glove connection.
8. Place all the wire back into the inside of the jacket and sew up the seam.
Note - This same procedure can be used to separate the older jackets where the gloves and the jacket were on the same power connection,. You just have to trace the wire and re-solder the connections so the gloves are on a separate power feed. Also, you can replace the SAE connectors with the newer coax connectors following the same procedure. You might consider also covering the wire and glove connector with a layer of shrink wrap to strengthen the connection at the usual breaking point.
Phil Derryberry
www.unclephil.us
STOC #0698
Last edited:
") I've added that suggestion to the write up.
I've added that suggestion to the write up.