
I am not done yet but as I seem to be the first one to tackle the job of modding a GL 1500 wheel to run the Dark Side on an 1100 ABS II, I thought I would share what I've found so far.
The Dan has documented the changes needed for the 1500 wheel. So look at his post for that common information. https://www.st-owners.com/forums/showthread.php?99514-auto-tires-on-ST1100/page6 And this link too http://s1223.photobucket.com/albums/dd501/TheDan1/The Darkside/
Where I had some fun was modding the GL wheel to accept the pulse ring. Given the fact that I work as a mold maker I have access to the shop for my fun.
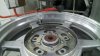
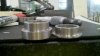
I had to first mill the GL wheel's flange so the ring would fit. The O.D. was roughly .02 too big. After I got that to fit I dropped my end mill down and milled a flat all the way around the wheel just outside the flange's dia.. Once I had that I could measure where that surface was in relation to the face of the bearing. Since I knew where the ring needed to go in relation to the bearing, I could figure out the length of my 6 spacers that will support the ring in position.
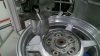
Next I put the ring on the flange and using my edge finder with the 60 Deg pointed end down I found where the clearance holes in the ring were. Drilled and tapped the wheel and moved to the step of bolting the ring to the wheel. I made 6 spacers from 3/8 round brass.
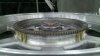
That's when I discovered that the ring is more outboard than I had thought. It no longer is fitted on the flange but sits just a bit above it. No big deal as I had to have the ring on the wheel if only for that short time to know where to drill and tap the mounting holes. I put shims between the flange and the ID of the ring to center it and bolted it on using green lock tite.
/
EDIT: I found that after the brake hanger was moved left .25 I had to remove some of the ribbing on the outside, lower edge. This has to be done to allow the hanger to swing down into it's proper position to get the keeper pin screwed in. I will not post a pic of this as I did it by hand with a Dremel tool and I'm not very proud of the way it looks. It will not be visible so it's no big.
It has been a bit of a PITA to get it done but will be worth it.
I hope this helps answer the questions of how to make it work on the ABS 1100.
Dan's wheel came with all the spacers from the GL. Mine did not so I will need to make another spacer to fill the gap between the brake hanger an the bearing.
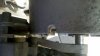
In the 4th pic you will see that I still need to remove and remake the steel insert that the axle goes through on the hanger. I will remove the original and make a new one with only a .062 wide flange. To go back to stock I will simply put the original back in. Actually, I made a new "original one" that will slip in and out. Honda makes it a press fit insert but not me. See the last pic.
Now to get a tire!
/
Edit: As Scott mentioned, shoot some clear paint on the freshly milled aluminum surfaces to avoid corrosion.
I also have a tire on the way, so I will update when I have more to share. My wrecked 97 can use the PR3 that isn't worn out yet.
The Dan has documented the changes needed for the 1500 wheel. So look at his post for that common information. https://www.st-owners.com/forums/showthread.php?99514-auto-tires-on-ST1100/page6 And this link too http://s1223.photobucket.com/albums/dd501/TheDan1/The Darkside/
Where I had some fun was modding the GL wheel to accept the pulse ring. Given the fact that I work as a mold maker I have access to the shop for my fun.
I had to first mill the GL wheel's flange so the ring would fit. The O.D. was roughly .02 too big. After I got that to fit I dropped my end mill down and milled a flat all the way around the wheel just outside the flange's dia.. Once I had that I could measure where that surface was in relation to the face of the bearing. Since I knew where the ring needed to go in relation to the bearing, I could figure out the length of my 6 spacers that will support the ring in position.
Next I put the ring on the flange and using my edge finder with the 60 Deg pointed end down I found where the clearance holes in the ring were. Drilled and tapped the wheel and moved to the step of bolting the ring to the wheel. I made 6 spacers from 3/8 round brass.
That's when I discovered that the ring is more outboard than I had thought. It no longer is fitted on the flange but sits just a bit above it. No big deal as I had to have the ring on the wheel if only for that short time to know where to drill and tap the mounting holes. I put shims between the flange and the ID of the ring to center it and bolted it on using green lock tite.
/
EDIT: I found that after the brake hanger was moved left .25 I had to remove some of the ribbing on the outside, lower edge. This has to be done to allow the hanger to swing down into it's proper position to get the keeper pin screwed in. I will not post a pic of this as I did it by hand with a Dremel tool and I'm not very proud of the way it looks. It will not be visible so it's no big.
It has been a bit of a PITA to get it done but will be worth it.
I hope this helps answer the questions of how to make it work on the ABS 1100.
Dan's wheel came with all the spacers from the GL. Mine did not so I will need to make another spacer to fill the gap between the brake hanger an the bearing.
In the 4th pic you will see that I still need to remove and remake the steel insert that the axle goes through on the hanger. I will remove the original and make a new one with only a .062 wide flange. To go back to stock I will simply put the original back in. Actually, I made a new "original one" that will slip in and out. Honda makes it a press fit insert but not me. See the last pic.
Now to get a tire!
/
Edit: As Scott mentioned, shoot some clear paint on the freshly milled aluminum surfaces to avoid corrosion.
I also have a tire on the way, so I will update when I have more to share. My wrecked 97 can use the PR3 that isn't worn out yet.
Attachments
-
 228.8 KB Views: 47
 -
 207.4 KB Views: 44
 -
 214.9 KB Views: 46
 -
 242.2 KB Views: 54
 -
 169.1 KB Views: 32
")