Hi everyone. I would like to share my experience and information related to timing belt replacement.
During my preparation for this maintenance activity I have read on some forum on timing belt replacement, that only the kilometres or milage is relevant because the service manual is not mentioning the time interval. True. However, I have been looking that information on timing belt manifactures websites or pdf files and I have found on couple of different places that change interval for this belt particularly is 150 000 or 160 000 km depend on manifacture and 5 years.
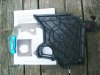
My Honda ST1100 is 1996, and I don't have service buck as well as an information on timing belt. The bike km is 088000 but 24 years. I have took it off, and I would say that it is in very good condition. I is UNITTA Japan HONDA 147RU24 and beside 14401 MT3 004 (belt model/type) numbers there are some 6-05 which I haven't found what are they but I assume that could be a month and year of production. However, since it is HONDA genuine it might be actually a 24 years old. I bought a GOOD YEAR G1274 (for opel ascona, combo, cadet / vauxsal astra, astravan etc) for 7 €. 147 teath and 24mm wide. I have compare them by putting them one against another and tention them slightly. The old good looking one was visibly stretched. Some 3-4 cm longer than new one.
Another interesting fact related to belt changing is that is not actually a complicated job to do. Also during my preparation I have found a video on YouTube on this and among other parts they took off the exhaust pipes, drained oil, clutch housing and part of a frame in front of the engine.
That is complicated and not necessary.
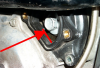
I have took off the bottom plastik cover, left and right plastic panels, radiator, horn and belt covers on engine. It seems that plastic cover on the front could not be pooled out because crankshaft pooly lock bolt.
I just followed the manual, unscrew that bolt and pool out the plastic cover. Pretty simple and fast to do. To block the engine "put i 5th gear and press the rear break... Manual says.
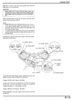
Of course, while doing on timing belt it is necessary to be careful and to check everything, to be sure that everything is in place and tighten correctly.
Follow the manual...
The manual say that belt should be inspected on 100 000 and changed on 150 000.
My advice would be, if you reach the belt, change it.
During my preparation for this maintenance activity I have read on some forum on timing belt replacement, that only the kilometres or milage is relevant because the service manual is not mentioning the time interval. True. However, I have been looking that information on timing belt manifactures websites or pdf files and I have found on couple of different places that change interval for this belt particularly is 150 000 or 160 000 km depend on manifacture and 5 years.
My Honda ST1100 is 1996, and I don't have service buck as well as an information on timing belt. The bike km is 088000 but 24 years. I have took it off, and I would say that it is in very good condition. I is UNITTA Japan HONDA 147RU24 and beside 14401 MT3 004 (belt model/type) numbers there are some 6-05 which I haven't found what are they but I assume that could be a month and year of production. However, since it is HONDA genuine it might be actually a 24 years old. I bought a GOOD YEAR G1274 (for opel ascona, combo, cadet / vauxsal astra, astravan etc) for 7 €. 147 teath and 24mm wide. I have compare them by putting them one against another and tention them slightly. The old good looking one was visibly stretched. Some 3-4 cm longer than new one.
Another interesting fact related to belt changing is that is not actually a complicated job to do. Also during my preparation I have found a video on YouTube on this and among other parts they took off the exhaust pipes, drained oil, clutch housing and part of a frame in front of the engine.
That is complicated and not necessary.
I have took off the bottom plastik cover, left and right plastic panels, radiator, horn and belt covers on engine. It seems that plastic cover on the front could not be pooled out because crankshaft pooly lock bolt.
I just followed the manual, unscrew that bolt and pool out the plastic cover. Pretty simple and fast to do. To block the engine "put i 5th gear and press the rear break... Manual says.
Of course, while doing on timing belt it is necessary to be careful and to check everything, to be sure that everything is in place and tighten correctly.
Follow the manual...
The manual say that belt should be inspected on 100 000 and changed on 150 000.
My advice would be, if you reach the belt, change it.